

原文:Next.js Image Tutorial – How to Upload, Crop, and Resize Images in the Browser in Next,作者:Idris Olubisi
两个最基本的图像编辑功能是调整大小和裁剪。但是你应该谨慎执行这些操作,因为它们可能会降低图像质量。
裁剪总是会删除原始图像的一部分,从而导致一些像素的丢失。
这篇文章将教你如何在浏览器中上传、裁剪和调整图像大小。
我在 Codesandbox 中构建了这个项目。要快速开始的话,请下载 Codesandbox 并运行项目。
先决条件
要跟上本教程,你应该有一些 JavaScript 和 React.js 经验。对 Next.js 的经验不是必须的,但有这个经验也不错。
你还需要一个 Cloudinary account 帐户来存储媒体文件。
Cloudinary 提供了一个安全且完整的 API,用于快速和有效地从服务器、浏览器或移动应用程序上传媒体文件。
最后你需要 Next.js 。它是一个基于 React 的开源前端开发 Web 框架,允许服务端渲染和生成静态网站和应用。
项目设置和安装
使用 npx create-next-app 命令在你选择的目录中创建一个新项目。
你可以使用以下命令执行此操作:
npx create-next-app <project name>
要安装这些依赖项,请使用这些命令:
cd <project name>
npm install cloudinary-react
在该应用程序创建并安装完依赖项后,你会看到一条信息,其中有关于导航到你的网站并在本地运行的说明。
你可以使用以下命令执行此操作:
npm run dev
Next.js 将启动一个默认可访问的热重载开发环境 http://localhost:3000 。
如何构建用户界面
在我们的项目中,我们希望能够在主页的用户界面上上传、裁剪和调整图像大小。我们将通过更新 pages/index.js 文件为组件来做到这一点:
import React, { useState } from "react";
import Head from "next/head";
const IndexPage = () => {
return (
<>
<div className="main">
<div className="splitdiv" id="leftdiv">
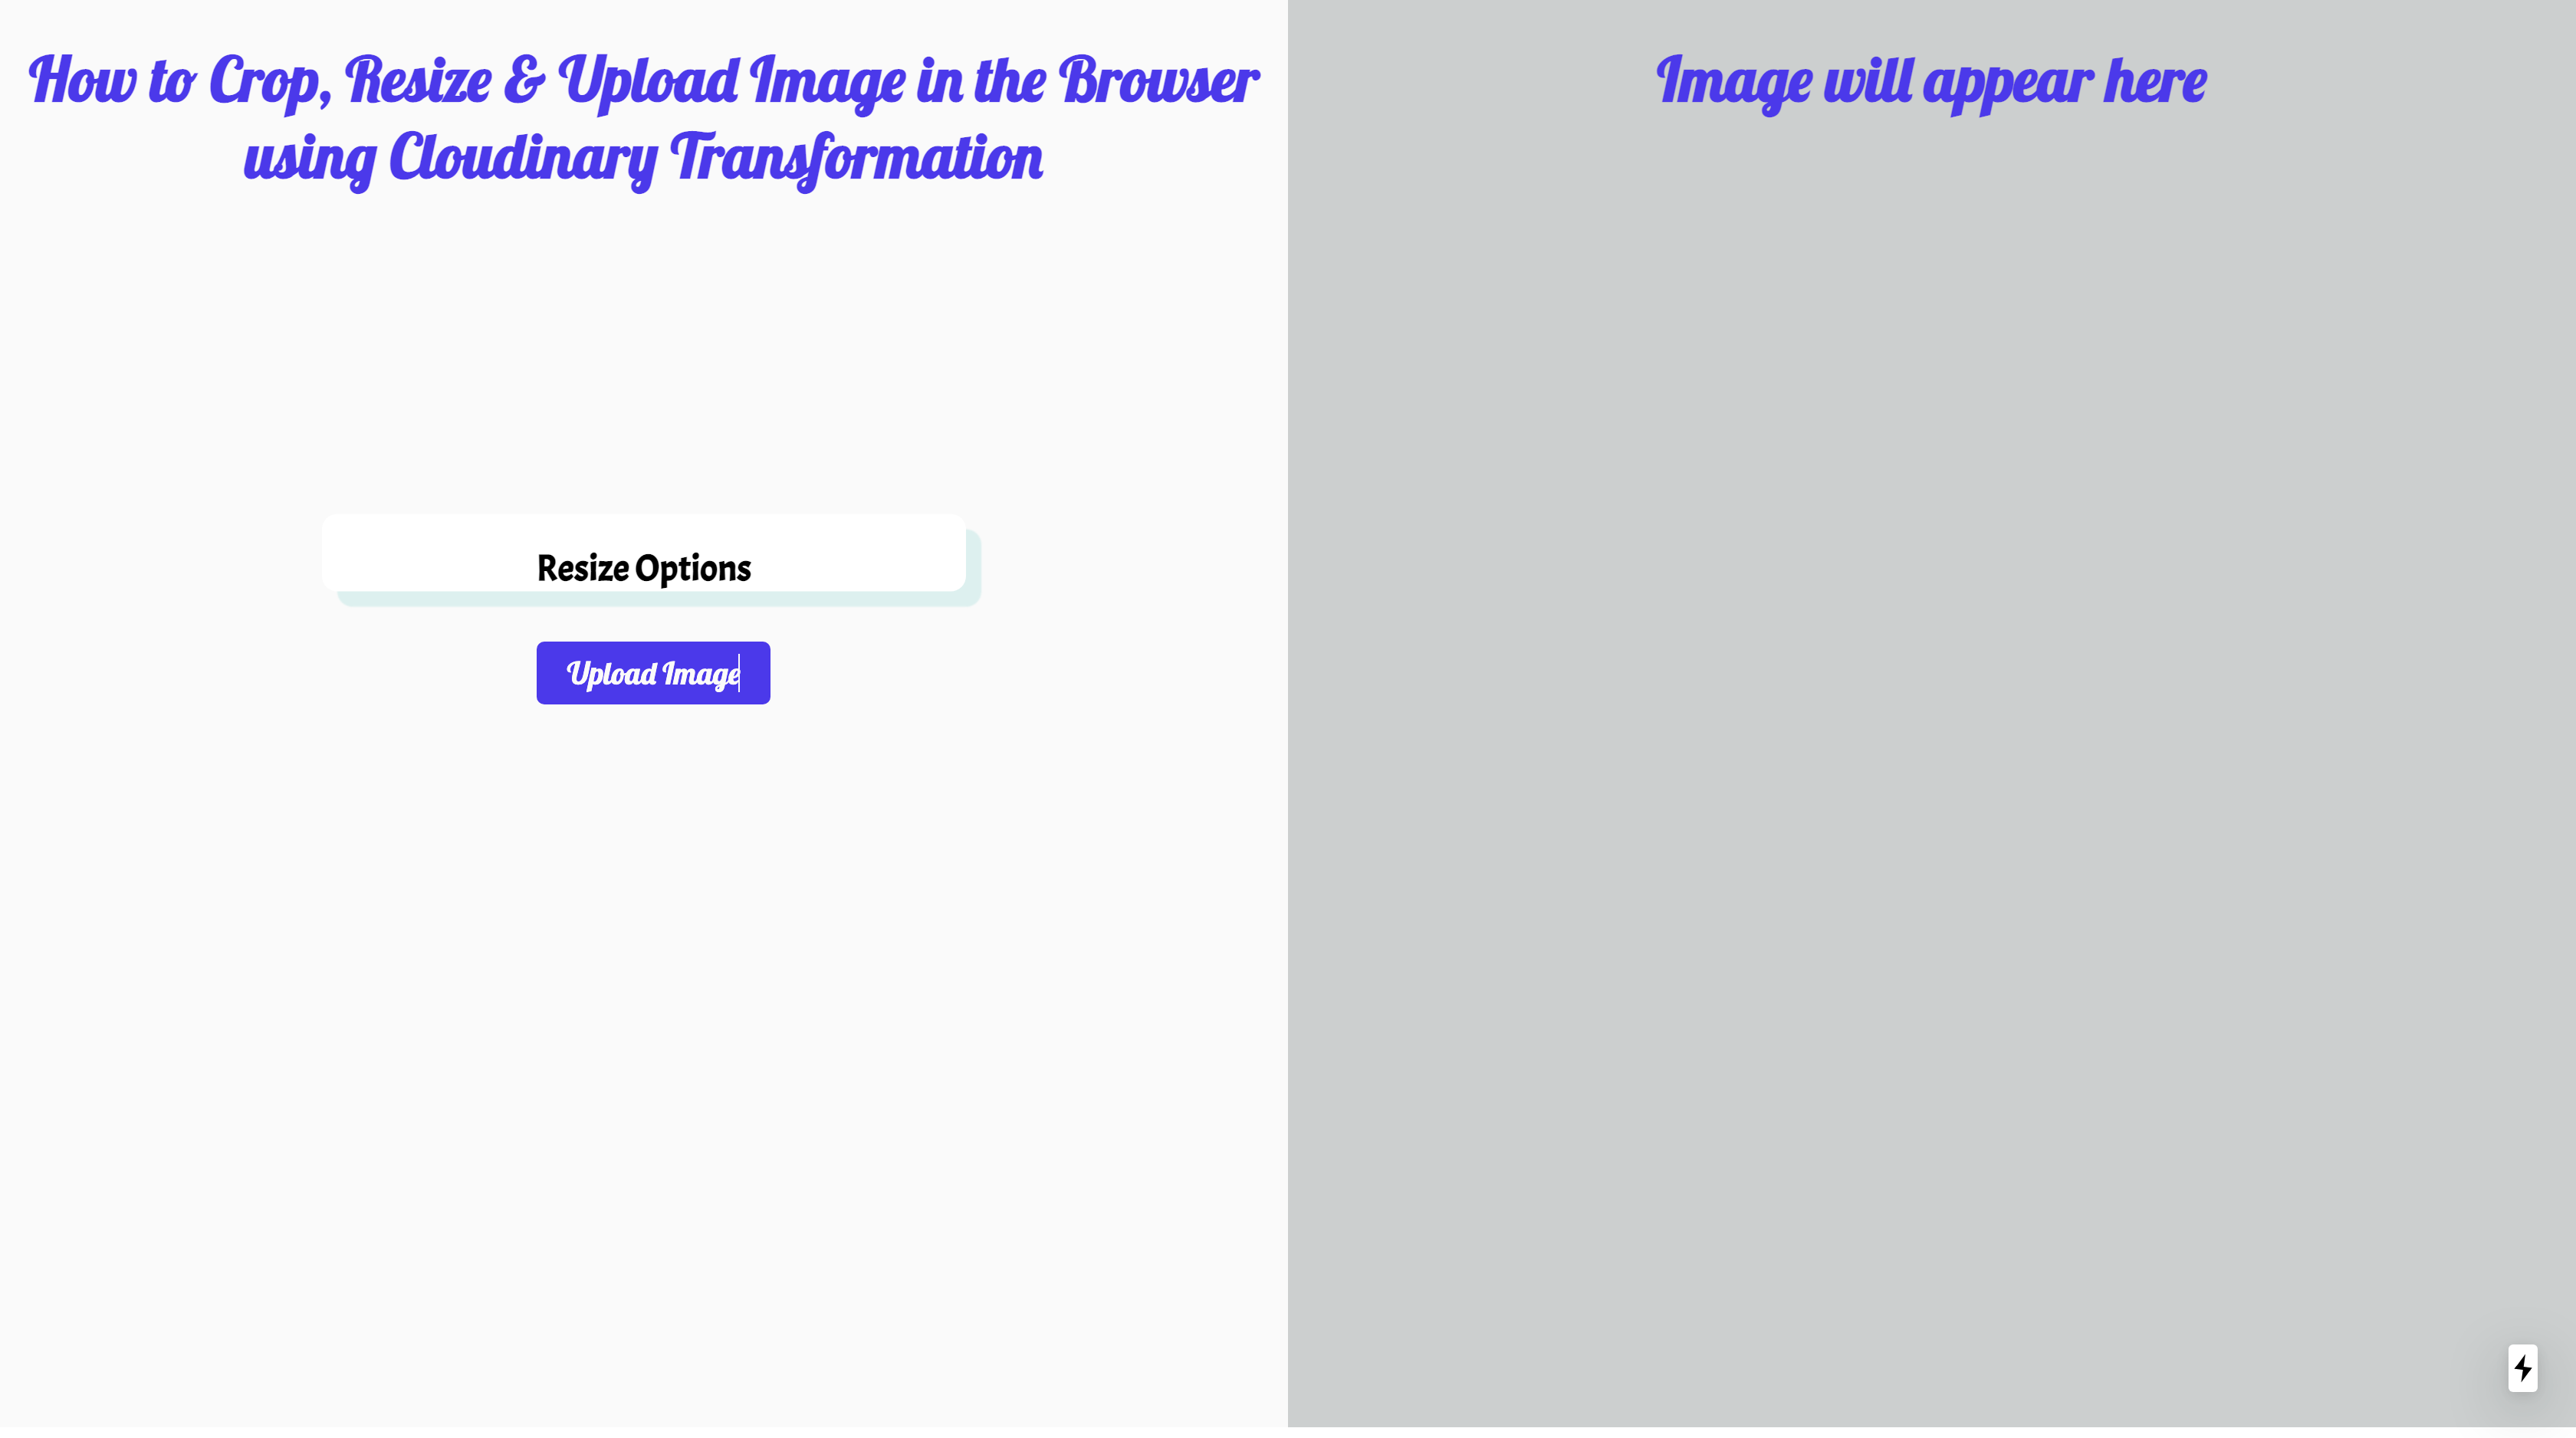
<h1 className="main-h1">
How to Crop, Resize & Upload Image in the Browser using Cloudinary
Transformation
</h1>
<div id="leftdivcard">
<h2 className="main-h2">Resize Options</h2>
</div>
<button type="button" id="leftbutton">
Upload Image
</button>
</div>
<div className="splitdiv" id="rightdiv">
<h1> Image will appear here</h1>
</div>
</div>
</>
);
};
export default IndexPage;
不过,当前的用户界面看起来并不那么好。我们将在 style.css 文件中添加一些 CSS 样式,如下所示:
@import url("https://fonts.googleapis.com/css?family=Acme|Lobster");

/* 这使我能够拥有整个页面的宽度,而没有最初的 padding/margin。 */
body,
html {
  margin: 0;
  padding: 0;
  height: 100%;
  width: 100%;
  font-family: Acme;
  min-width: 700px;
}

.splitdiv {
  height: 100%;
  width: 50%;
}

/* 这一部分包含了屏幕左侧的所有内容 */
/* ----------------------------------------- */
#leftdiv {
  float: left;
  background-color: #fafafa;
  height: 932px;
}

#leftdivcard {
  margin: 0 auto;
  width: 50%;
  background-color: white;
  margin-top: 25vh;
  transform: translateY(-50%);
  box-shadow: 10px 10px 1px 0px rgba(78, 205, 196, 0.2);
  border-radius: 10px;
}

#leftbutton {
  background-color: #512cf3;
  border-radius: 5px;
  color: #fafafa;
  margin-left: 350px;
}

/* ----------------------------------------- */

/* 这一部分包含了屏幕右侧的所有内容 */
/* ----------------------------------------- */
#rightdiv {
  float: right;
  background-color: #cbcfcf;
  height: 932px;
}

#rightdivcard {
  margin: 0 auto;
  width: 50%;
  margin-top: 50vh;
  transform: translateY(-50%);
  background-position: bottom;
  background-size: 20px 2px;
  background-repeat: repeat-x;
}

/* ----------------------------------------- */

/* 基础样式 */
/* ----------------------------------------- */

button {
  outline: none !important;
  font-family: Lobster;
  margin-bottom: 15px;
  border: none;
  font-size: 20px;
  padding: 8px;
  padding-left: 20px;
  padding-right: 20px;
  margin-top: -15px;
  cursor: pointer;
}

h1 {
  font-family: Lobster;
  color: #512cf3;
  text-align: center;
  font-size: 40px;
}

input {
  font-family: Acme;
  font-size: 16px;
  font-family: 15px;
}

input {
  width: 30%;
  height: 20px;
  padding: 16px;
  margin-left: 1%;
  margin-right: 2%;
  margin-top: 15px;
  margin-bottom: 10px;
  display: inline-block;
  border: none;
}

input:focus {
  outline: none !important;
  border: 1px solid #512cf3;
  box-shadow: 0 0 1px round #719ece;
}

/* ----------------------------------------- */

.main {
  height: 100%;
  width: 100%;
  display: inline-block;
}

.main-h2 {
  padding-top: 20px;
  text-align: center;
}

.body-h1 {
  padding-top: 20px;
  text-align: center;
  color: white;
}

.inner-p {
  color: white;
  text-align: center;
}

.main-align {
  text-align: center;
}

.form-control {
  margin-left: 15px;
}
我们的应用程序现在应该看起来如 http://localhost:3000/ 上所呈现出来那样:
如何创建图像上传小部件
Cloudinary 的上传小部件让我们可以从多个来源上传媒体资源,包括 Dropbox、Facebook、Instagram 和直接从我们设备相机拍摄的图像。我们将在这个项目中使用这个上传小部件。
创建一个免费的 cloudinary 帐户, 获取你的云账户名称(cloud name)和上传预设(upload_presets)。
upload_presets 允许我们集中定义一组资源上传选项,而不是在每次上传调用中去提供它们。Cloudinary 中的 cloud name是与你的 Cloudinary 帐户关联的唯一标识符。
首先, 我们通过内容分发网络(CDN)将 Cloudinary 小部件的 JavaScript 文件添加到位于 pages/index.js 中的 index.js中。并且使用 next/head 中的文件去包裹所有 meta 标签,这使我们可以将数据添加到 React 中 HTML 文档的 Head 部分。
接下来,在 pages/index.js 文件中,我们从 next/head 导入 Head 组件并添加脚本文件。
import React, { useState } from "react";
import Head from "next/head";

const IndexPage = () => {

  return (
    <>
      <Head>
        <title>How to Crop and Resize Image in the Browser</title>
        <link rel="icon" href="/favicon.ico" />
        <meta charSet="utf-8" />
        <script
          src="https://widget.Cloudinary.com/v2.0/global/all.js"
          type="text/javascript"
        ></script>
      </Head>
      <div className="main">
          [...]
      </div>
    </>
  );
};
export default IndexPage;
在 pages/index.js 文件中,我们将在点击按钮时触发的方法中创建一个小部件的实例,以及一个状态变量 imagePublicId 。
import React, { useState } from "react";
import Head from "next/head";

const IndexPage = () => {
  const [imagePublicId, setImagePublicId] = useState("");

  const openWidget = () => {
    // create the widget
    const widget = window.cloudinary.createUploadWidget(
      {
        cloudName: "olanetsoft",
        uploadPreset: "w42epls7"
      },
      (error, result) => {
        if (
          result.event === "success" &&
          result.info.resource_type === "image"
        ) {
          console.log(result.info);
          setImagePublicId(result.info.public_id);
        }
      }
    );
    widget.open(); // open up the widget after creation
  };

  return (
    <>
      //...
    </>
  );
};
export default IndexPage;
该小部件需要我们的 Cloudinary 的 cloud_name 和 uploadPreset。该 createWidget() 函数会创建一个新的上传小部件。成功上传图像后,我们将资产的 public_id 分配给相关的状态变量。
要获得我们的 cloudname 和 uploadPreset, 我们需要按照以下步骤操作:
你可以从 Cloudinary 的仪表板获取 cloudName,如下所示。
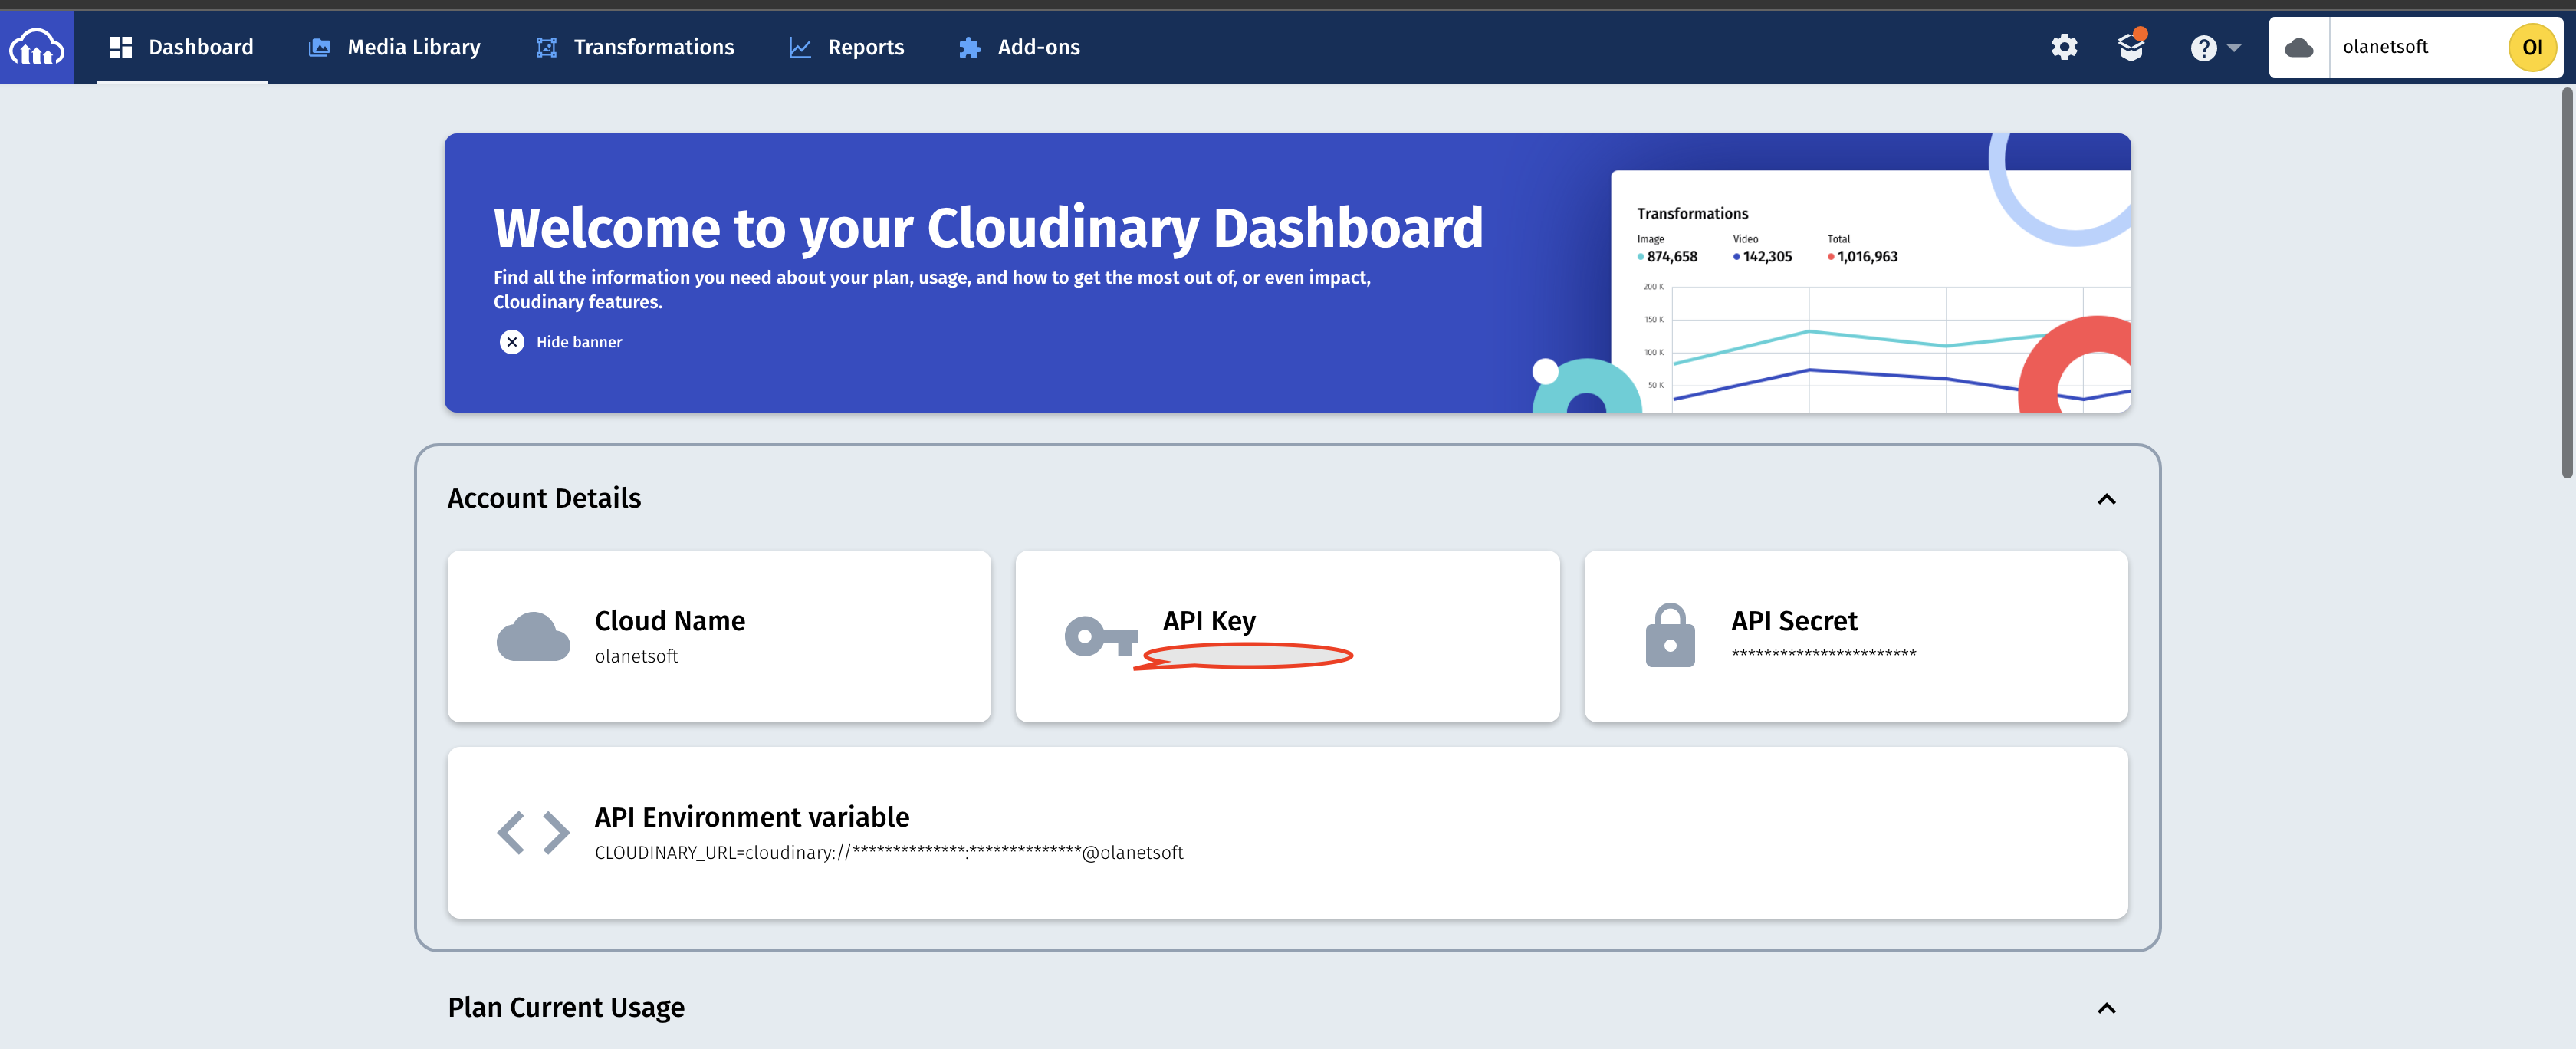
你可以在 Cloudinary 设置页面的 Upload 选项卡中找到 upload_preset。你可以通过点击仪表板页面右上角的齿轮图标来访问它。

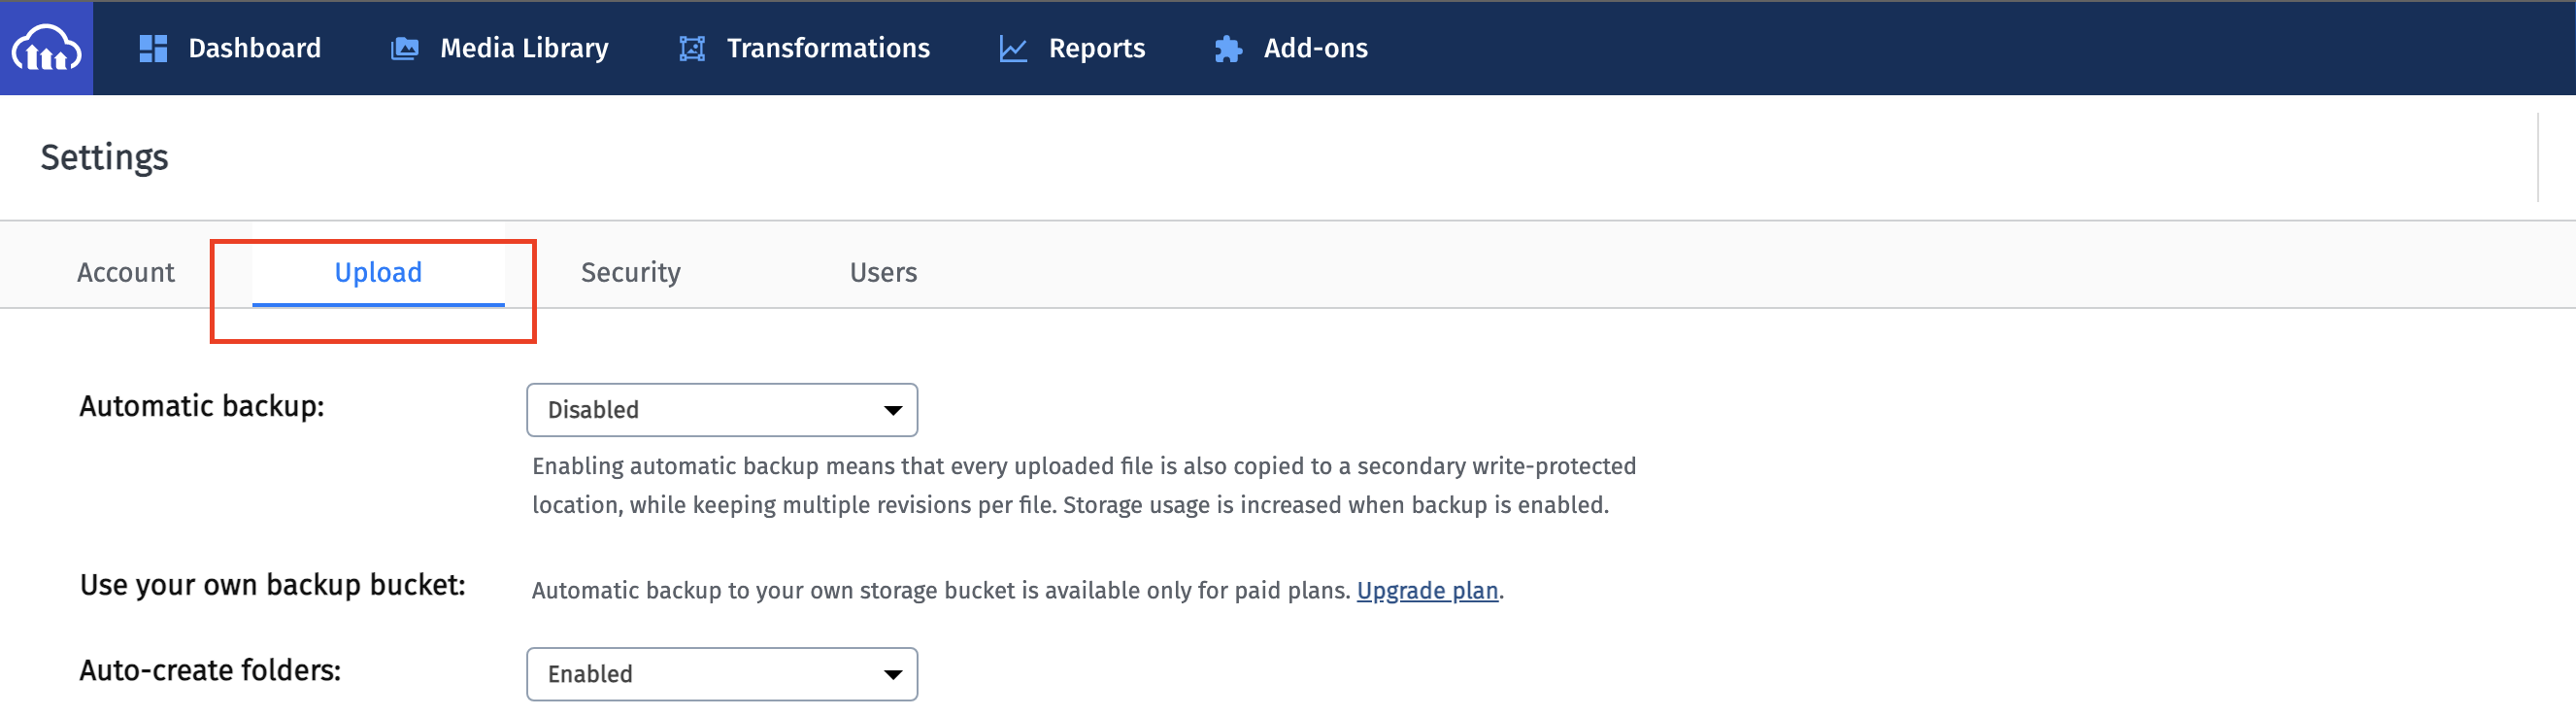
向下滚动到页面底部的上传预设部分,你将在其中看到你的 upload_presets ,或者如果你没有任何预设,可以选择创建一个。
我们将继续在我们的图片上传按钮的 onClick 处理程序中调用 openWidget 函数,如下所示:
//...

const IndexPage = () => {
//...
  return (
    <>
     //....
      <div className="main">
        <div className="splitdiv" id="leftdiv">
          //...
          <div id="leftdivcard">
            <h2 className="main-h2">Resize Options</h2>
             //...
            </div>

          <button type="button" id="leftbutton" onClick={openWidget}>
            Upload Image
          </button>
        </div>

        <div className="splitdiv" id="rightdiv">
        <h1> Image will appear here</h1>
        </div>
      </div>
    </>
  );
};
export default IndexPage;
当我们在浏览器中打开我们的应用程序并单击 Upload Image 按钮时,我们应该会看到如下内容:

如何实现自定义转换功能
我们需要创建一个组件, 根据传递给它的 props 属性来处理转换。我们将在根文件夹中创建一个 components/ 目录。在该目录下,我们将创建一个名为 image.js 的文件,内容如下:
import { CloudinaryContext, Transformation, Image } from "cloudinary-react";

const TransformImage = ({ crop, image, width, height }) => {
  return (
    <CloudinaryContext cloudName="olanetsoft">
      <Image publicId={image}>
        <Transformation width={width} height={height} crop={crop} />
      </Image>
    </CloudinaryContext>
  );
};

export default TransformImage;
在上面的代码片段中,我们导入了 CloudinaryContext,这是一个包装 Cloudinary 组件,用于管理其所有子 Cloudinary 组件之间的共享信息。渲染的 TransformImage 组件将图像转换的数据作为 props 属性。
当我们将其导入到 pages/index.js 时,上面的代码块会渲染上传的图片:
//...
import TransformImage from "../components/image";

const IndexPage = () => {
  const [imagePublicId, setImagePublicId] = useState("");
  const [alt, setAlt] = useState("");
  const [crop, setCrop] = useState("scale");
  const [height, setHeight] = useState(200);
  const [width, setWidth] = useState(200);

  return (
    <>
     //...
      <div className="main">
        <div className="splitdiv" id="leftdiv">
          //...
       </div>
        <div className="splitdiv" id="rightdiv">
          <h1> Image will appear here</h1>
          <div id="rightdivcard">
            {imagePublicId ? (
              <TransformImage
                crop={crop}
                image={imagePublicId}
                width={width}
                height={height}
              />
            ) : (
              <h1> Image will appear here</h1>
            )}
          </div>
        </div>
      </div>
    </>
  );
};
export default IndexPage;
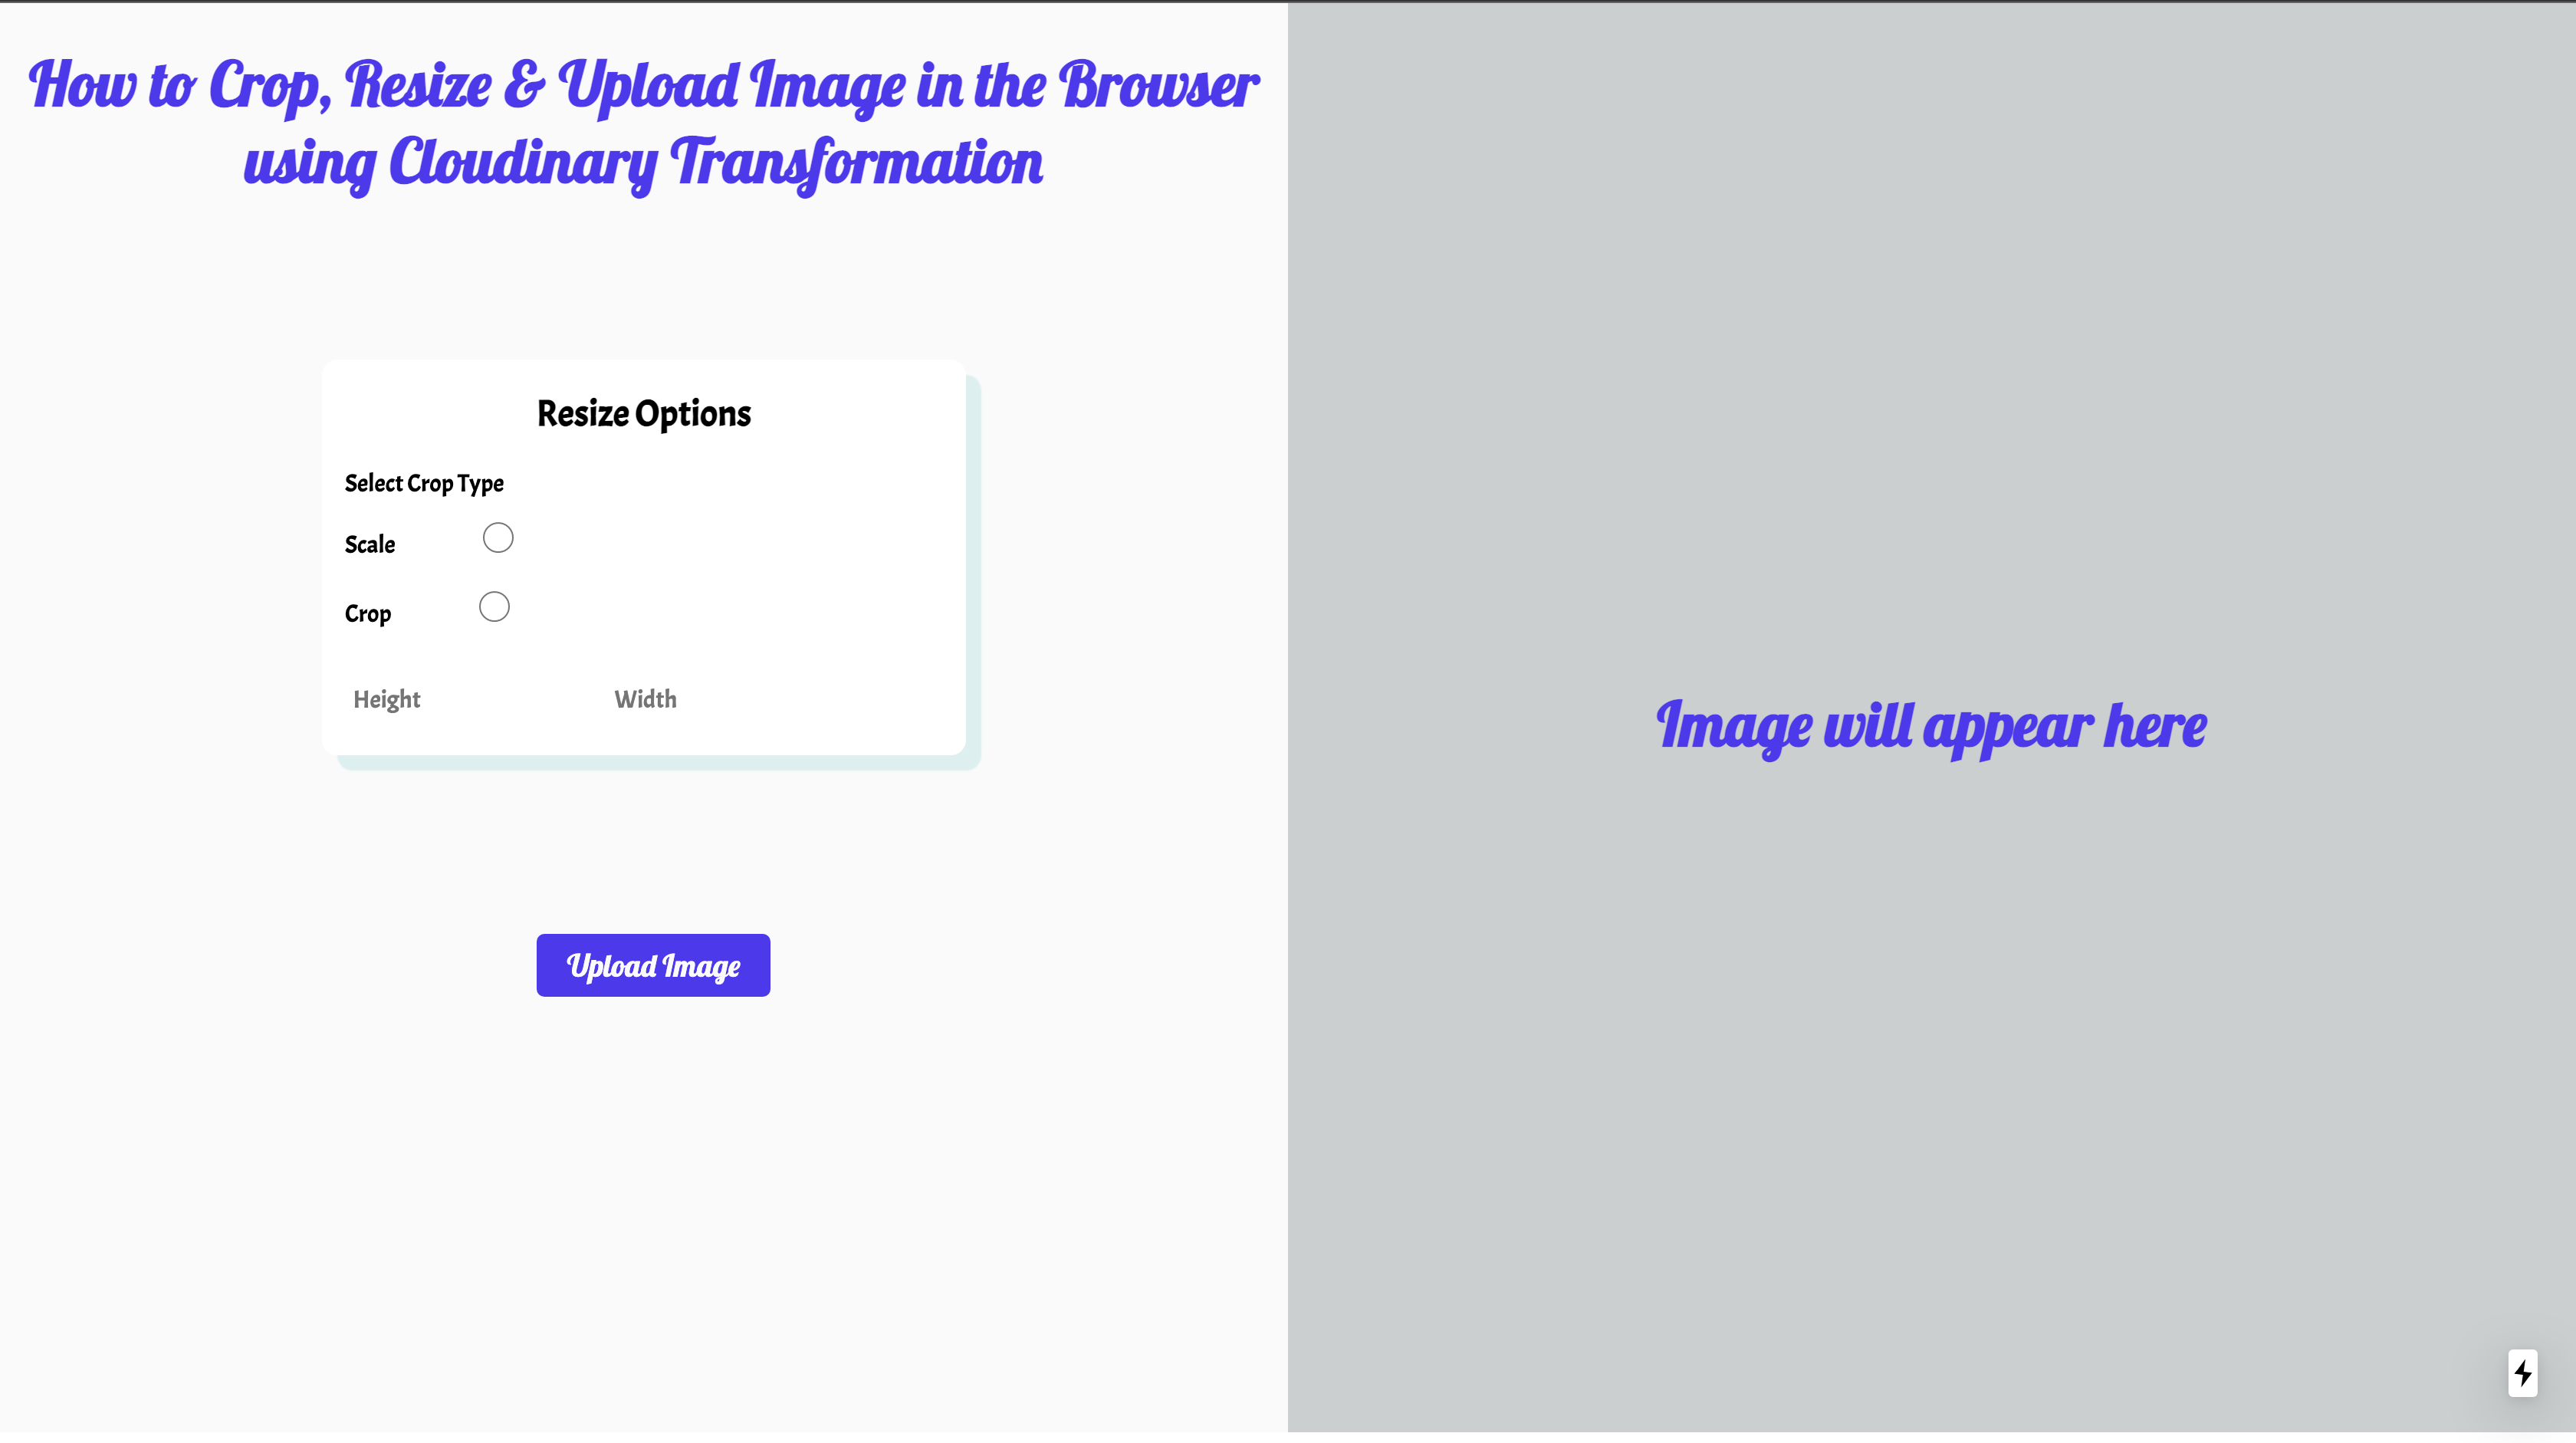
接下来,我们将添加 Resize Options 单选按钮,这样我们就可以通过以下代码片段选择不同的调整大小和裁剪选项:
//...

const IndexPage = () => {
//...

  return (
    <>
    //...
      <div className="main">
        <div className="splitdiv" id="leftdiv">
          //...
          <div id="leftdivcard">
            <h2 className="main-h2">Resize Options</h2>

          <label className="form-control">Select Crop Type</label>
            <div>
              <label className="form-control">Scale</label>
              <input
                type="radio"
                value="scale"
                name="crop"
                onChange={(event) => setCrop(event.target.value)}
              />
            </div>
            <div>
              <label className="form-control">Crop</label>
              <input
                type="radio"
                value="crop"
                name="crop"
                onChange={(event) => setCrop(event.target.value)}
              />
            </div>
            <input
              type="number"
              placeholder="Height"
              onChange={(event) => setHeight(event.target.value)}
            />
            <input
              type="number"
              placeholder="Width"
              onChange={(event) => setWidth(event.target.value)}
            />
          </div>

          <button type="button" id="leftbutton" onClick={openWidget}>
            Upload Image
          </button>
        </div>

        <div className="splitdiv" id="rightdiv">
          //...
        </div>
      </div>
    </>
  );
};
export default IndexPage;
在上面的代码片段中:
- 添加了裁剪类型以及宽度和高度选项
- 添加了一个 onChange 属性来分别跟踪高度和宽度输入框的变化
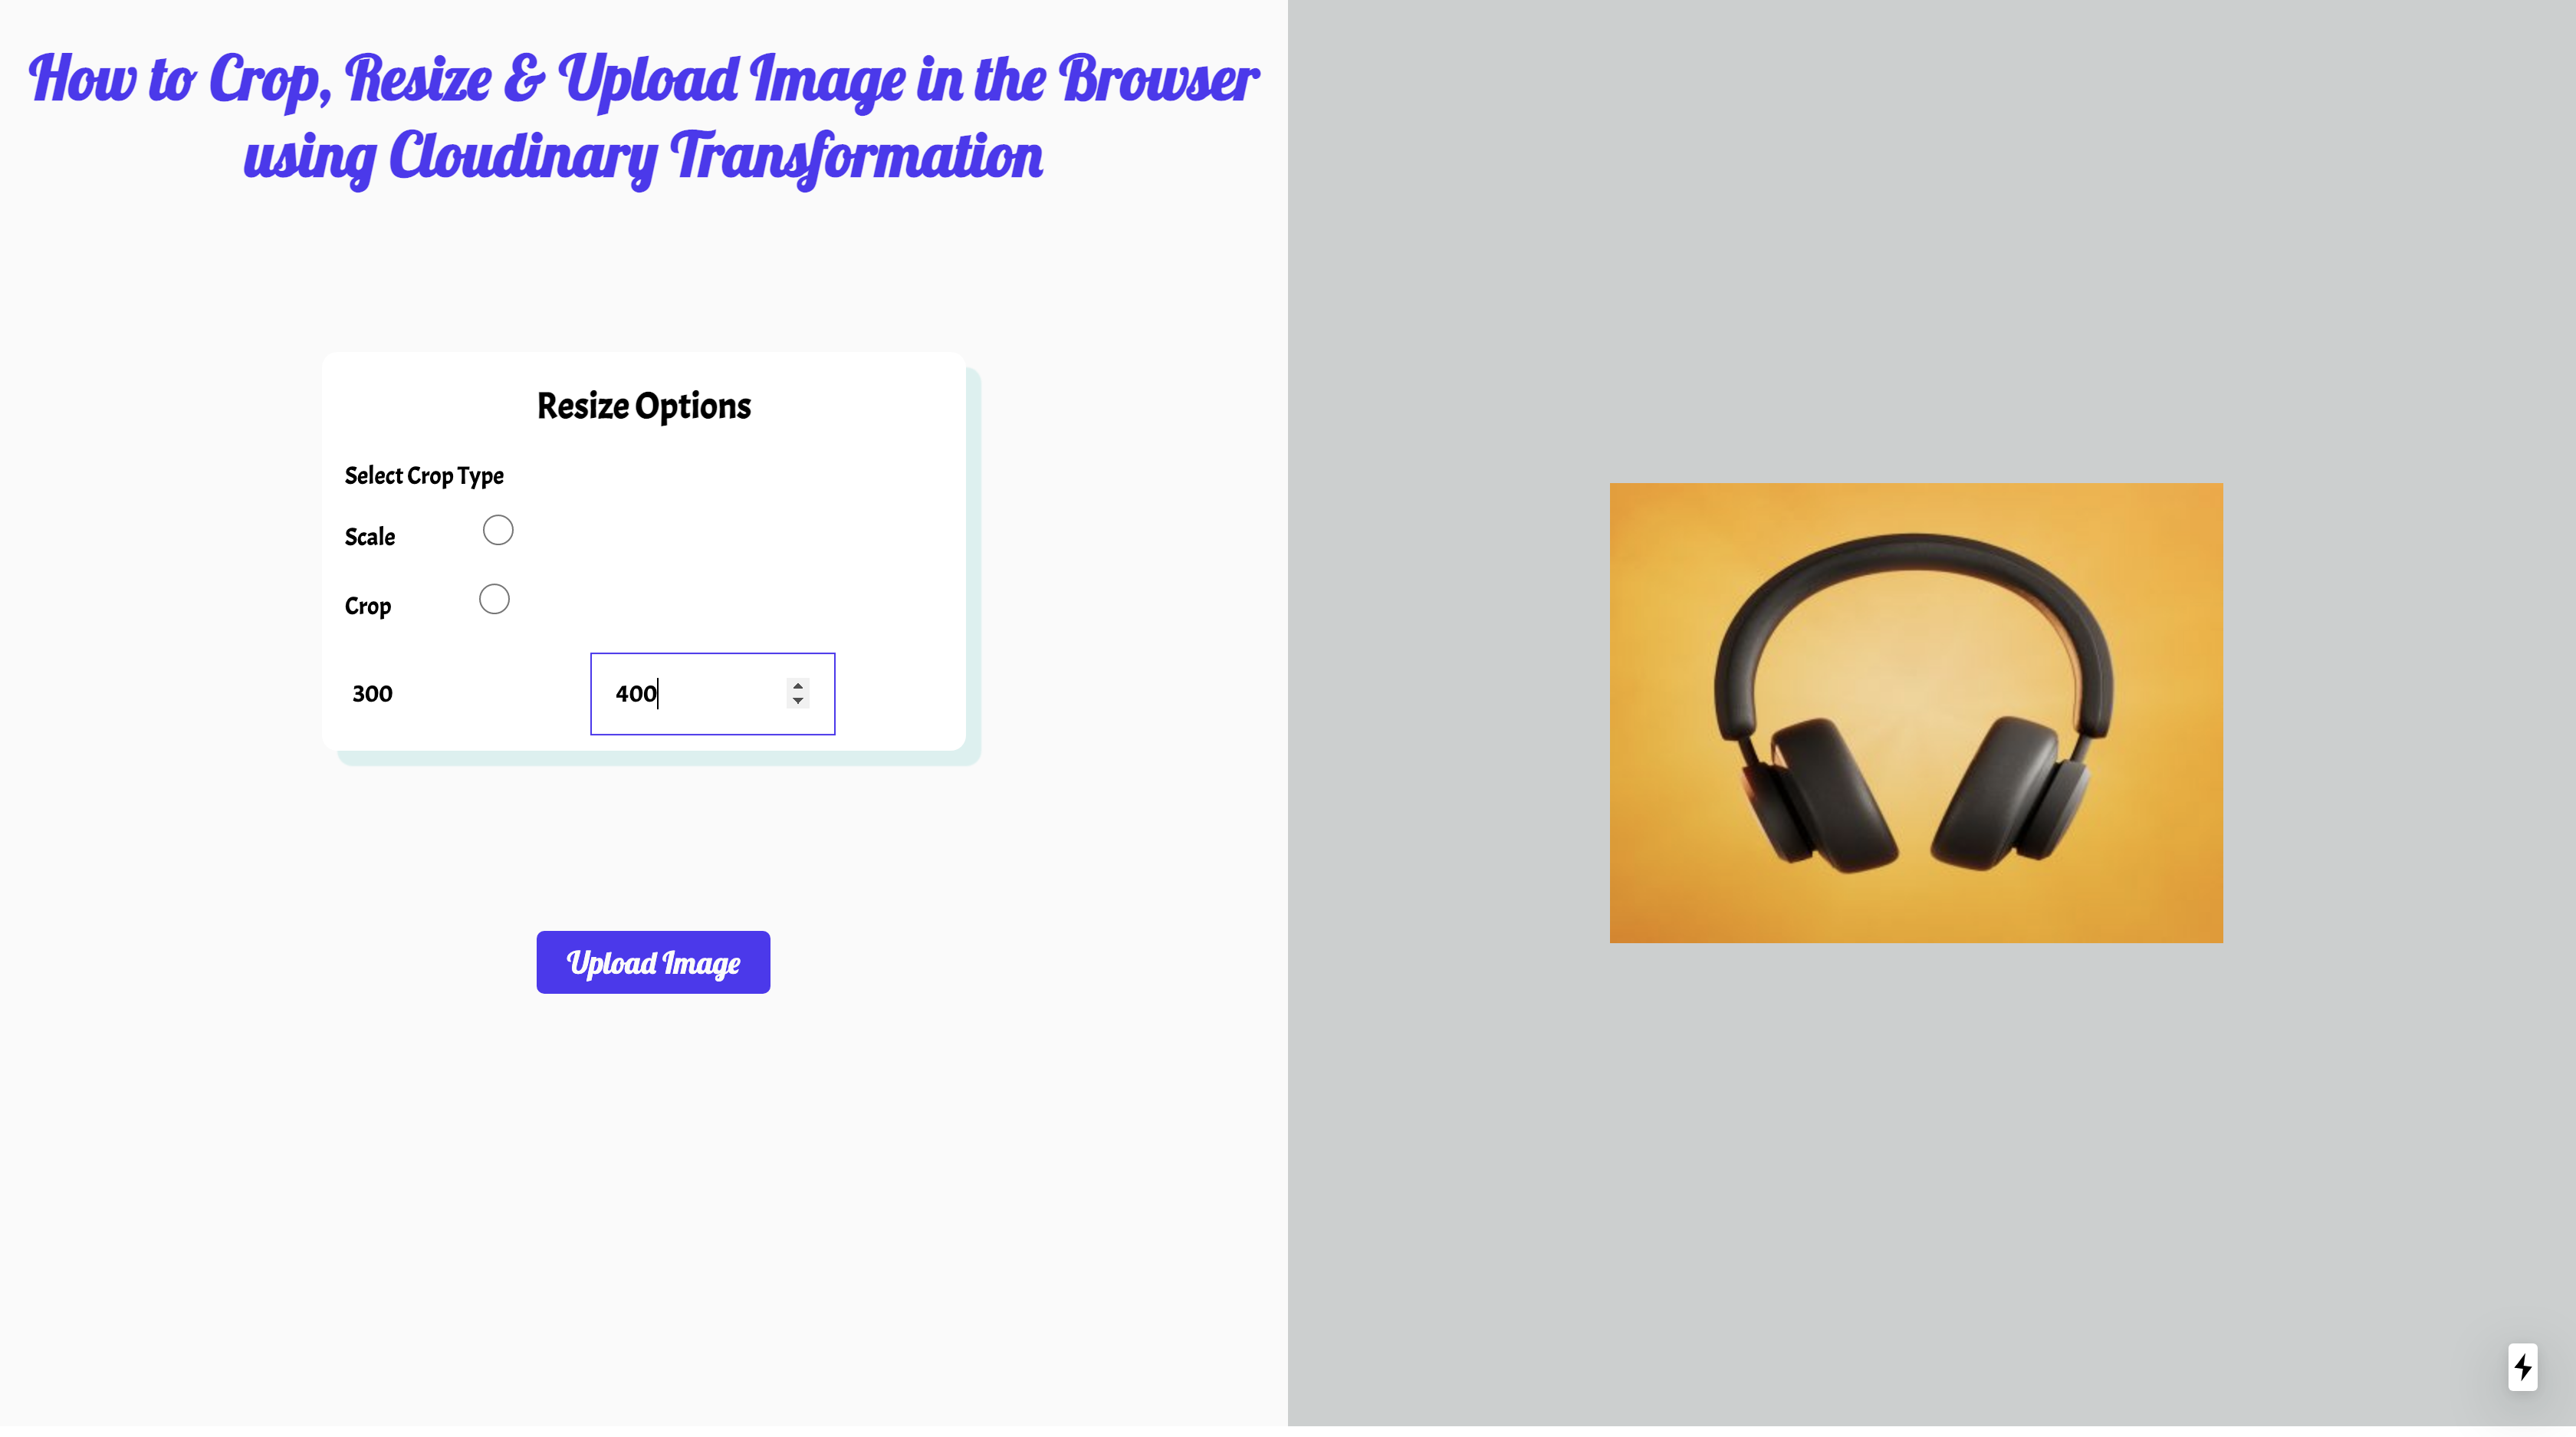
我们的应用程序的最终输出应该类似于下面的内容:
如果你想查看完整代码,这里是项目的 GitHub 仓库:https://github.com/Olanetsoft/how-to-upload-crop-and-resize-images-in-the-browser-in-next.js
结论
这篇文章展示了如何在 Next.js 的浏览器中上传、裁剪和调整图像大小。
资源
你可能会发现这些资源很有帮助。