

原文:How to Build Your Own Heroku with Dokku,作者:Nuno Bispo
Heroku是一个被开发者广泛使用的知名PaaS。而作为一个有趣和有用的项目,你可以用Dokku轻松地制作你自己的类似Heroku的PaaS。
![]()
什么是Heroku?
Heroku是一家成立于2007年的平台即服务(PaaS)公司。该平台在AWS上运行,其临时存储系统被称为“Dyno”。
Heroku是开发者使用最多的PaaS之一,这是有原因的——它很容易使用,有很好的文档,并支持多种编程语言。
但是,如果你可以通过一个简单易用的应用程序来部署你自己的类似Heroku的平台,包括CI/CD管道、数据库连接、HTTPS连接等等,会怎么样呢?
嗯,这就是Dokku所提供的,甚至更多。让我们来看看。
什么是PaaS?
平台即服务(PaaS)是一种软件架构风格,为部署你的应用程序的代码和管理它提供一个易于使用的抽象层。
这使你可以专注于编写业务逻辑,而不是担心平台本身。
PaaS供应商通常提供他们自己的数据库服务以及其他相关服务,这可以大大简化常见的开发任务。
PaaS的巨大优势在于,应用程序开发人员不需要执行任何系统管理工作。相反,你只需将你的代码和配置设置上传到一个中央服务器平台。
然后,该服务负责部署代码,根据需要进行扩展,备份数据,处理托管和正常运行时间问题,等等。
什么是Dokku?
Dokku是一个托管的平台即服务,使开发者能够轻松地部署他们的应用程序。
来自他们的网站:
你见过的最小的PaaS实现
Dokku基于Docker,使用Heroku的构建包来编译和打包你的应用程序。
Dokku最好的一点是,它非常轻量级,可以安装在一台服务器或虚拟机上。
它包括使用Docker容器的可扩展主机,使用Git的持续部署,以及其他流行的DevOps工具。
Dokku还提供各种功能,如支持多种语言、自定义域、自动部署等。
你可以轻松地将Postgres数据库甚至是文件存储连接到你的应用程序。
你可以在 https://dokku.com/ 查看更多信息,或在文件中查看。https://dokku.com/docs/getting-started/installation/。
你也可以对 这里的GitHub开源项目 点个赞。
如何安装Dokku
为了安装Dokku,你将需要一个Linux VPS和一个域名。
你可以在没有域名的情况下安装和使用Dokku,但使用域名就简单多了。我推荐使用云VPS,因为它使访问和配置更容易。
连接域名时,可以将单个域名或通配符与服务器的IP联系起来。
我将使用托管在 Hetzner 的VPS,安装了Ubuntu 20.04。
我们首先要确保我们的系统是最新的,有这些命令:
# Update the linux installation
$ sudo apt update
$ sudo apt upgrade -y
然后我们可以下载并运行Dokku的安装脚本:
# Install Dokku with the install script
$ wget https://raw.githubusercontent.com/dokku/dokku/v0.26.8/bootstrap.sh;
$ sudo DOKKU_TAG=v0.26.8 bash bootstrap.sh

--> Ensuring we have the proper dependencies
--> Note: Installing dokku for the first time will result in removal of
    files in the nginx 'sites-enabled' directory. Please manually
    restore any files that may be removed after the installation and
    web setup is complete.

    Installation will continue in 10 seconds.

    [...........]

    --> Running post-install dependency installation

 ! Setup a user's ssh key for deployment by passing in the public ssh key as shown:

     echo 'CONTENTS_OF_ID_RSA_PUB_FILE' | dokku ssh-keys:add admin
安装脚本将安装Docker和所有必要的依赖项,同时也安装Dokku本身,如上面的代码所示。
安装完成后,我们需要分配SSH密钥来访问,同时配置我们的域名。
如果你已经设置了用SSH访问你的VPS(你应该这样做),那么你已经有了必要的密钥——你只需要把它们添加到Dokku中:
# Assign SSH key to Dokku
$ cat ~/.ssh/authorized_keys | dokku ssh-keys:add admin

SHA256:6O1TLVOUkWV+zmTWXXXXXXXXXXXXXXXXXXXXXXXXXXXXXX
如果你在服务器中还没有SSH密钥,那么你需要生成一个密钥对:
# Generate SSH key
$ ssh-keygen

Generating public/private rsa key pair.
Enter file in which to save the key (/root/.ssh/id_rsa):
Enter passphrase (empty for no passphrase):
Enter same passphrase again:
Your identification has been saved in /root/.ssh/id_rsa
Your public key has been saved in /root/.ssh/id_rsa.pub
The key fingerprint is:
SHA256:7T6BbRCVWjGtcSUXXXXXXXXXXXXXXXXXXXXXXXXXXXXX root@freeDokku
The key's randomart image is:
+---[RSA 3072]----+
[.................]
|     . oS*.o . . |
[.................]
+----[SHA256]-----+
然后你可以把它添加到Dokku:
# Add SSH key to Dokku
$ dokku ssh-keys:add admin /root/.ssh/id_rsa.pub

SHA256:7T6BbRCVWjGtcSUXXXXXXXXXXXXXXXXXXXXXXXX
下一步,也是最后一步,是为你的Dokku安装分配域名。我们用以下命令来做这件事:
# Set installation global domain
$ dokku domains:set-global domain.com

-----> Set domain.com
确保你用你自己的域名替换domain.com,并且你的域名DNS指向服务器的IP地址。
这就是你安装和设置Dokku所需要做的一切。真的就这么简单。
你现在可以开始添加你的应用程序了。
让我们在下一节中通过添加一个标准的Django应用程序来看看这个例子。
如何在Dokku中创建你的应用程序
为了创建和部署我们的第一个应用程序,我们需要在Dokku上做一些准备工作。
要在Dokku上部署一个应用程序,请遵循以下步骤:
- 在Dokku上创建应用程序,这意味着给它一个名字。
- 创建关联数据库(或其他插件,如果需要)。这将创建并提供一个数据库,以便使用自动添加到应用程序的DATABASE_URL,以方便部署。
- 推送必要的代码到Dokku的应用程序内部GitHub端点。这也可以包括必要的发布步骤(比如说,运行Django迁移
代码推送后,Dokku将生成任何必要的Docker容器,并将运行我们的应用程序与任何相关的数据库(或其他插件)。
现在我们已经涵盖了必要的步骤,让我们在实践中进行。
让我们从创建我们的应用程序开始。在本教程中,我将创建一个非常简单的Django网站,其中包含我们测试Dokku的所有必要逻辑。
我们用这个命令在Dokku上创建一个应用程序(在我们安装Dokku的服务器上):
# Creating our application on Dokku
$ dokku apps:create djangotutorial

-----> Creating djangotutorial...
默认情况下,数据存储(或数据库)在应用程序创建时不会被创建。
数据存储由一系列的插件来处理。你可以 在这里查看所有可用的插件。
对于我们的应用程序,我们将创建一个Postgres数据存储。由于默认情况下没有安装插件,我们首先需要安装Postgres插件:
# install the postgres plugin
# plugin installation requires root, hence the user change
sudo dokku plugin:install https://github.com/dokku/dokku-postgres.git
然后我们可以创建我们的Postgres数据存储:
# Create a Postgres datastore
$ dokku postgres:create djangotutorial_datastore

       Waiting for container to be ready
       Creating container database
       Securing connection to database
=====> Postgres container created: djangotutorial_datastore
=====> djangotutorial_datastore postgres service information
       Config dir:          /var/lib/dokku/services/postgres/djangotutorial_datastore/data
       Config options:
       Data dir:            /var/lib/dokku/services/postgres/djangotutorial_datastore/data
       Dsn:                 postgres://postgres:ea706cc108c805d5124d134d934024c5@dokku-postgres-djangotutorial-datastore:5432/djangotutorial_datastore
       Exposed ports:       -
       Id:                  782a04fe6bbd25958752c17c304358fd5ec1f3c54d6d53175b6481b3b957d94b
       Internal ip:         172.17.0.5
       Links:               -
       Service root:        /var/lib/dokku/services/postgres/djangotutorial_datastore
       Status:              running
       Version:             postgres:14.1
我们可以检查我们的数据存储的Docker容器是否已经启动并运行,方法是:
# Check running containers
$ docker ps

CONTAINER ID   IMAGE                      COMMAND                  CREATED              STATUS              PORTS      NAMES
782a04fe6bbd   postgres:14.1              "docker-entrypoint.s…"   About a minute ago   Up About a minute   5432/tcp   dokku.postgres.djangotutorial_datastore
现在我们已经建立并运行了数据存储,我们需要把它与我们的应用程序联系起来:
# Associate datastore with the application
$ dokku postgres:link djangotutorial_datastore djangotutorial

-----> Setting config vars
       DATABASE_URL:  postgres://postgres:ea706cc108c805d5124d134d934024c5@dokku-postgres-djangotutorial-datastore:5432/djangotutorial_datastore
-----> Restarting app djangotutorial
 !     App image (dokku/djangotutorial:latest) not found
你可以看到,一个DATABASE_URL被自动创建并与应用程序相关联。
上面的例子提到,我们的应用程序图像没有被发现,因为我们还没有向它推送任何代码。
我们可以检查应用程序的环境变量来确认我们的 DATABASE\_URL 是否存在:
# Checking an application environment variables
$ dokku config:show djangotutorial

=====> djangotutorial env vars
DATABASE_URL:  postgres://postgres:ea706cc108c805d5124d134d934024c5@dokku-postgres-djangotutorial-datastore:5432/djangotutorial_datastore
我们现在已经在Dokku方面完成了所有必要的配置,以支持我们应用程序的部署。
接下来,我们将为我们的应用程序创建代码,并将其部署到Dokku,以实现自动化的CI/CD管道。
如何在PyCharm上创建我们的应用代码
在我们部署一个应用程序之前,我们需要有它的源代码来推送到Dokku。
在本教程中,我们将创建一个非常简单的 Django 应用程序,同时展示Postgres数据库的使用。
我们将使用 PyCharm 作为我们的 IDE 来创建和管理我们的项目。
我们在PyCharm中创建一个新的项目——让我们称之为 DjangoTutorial:
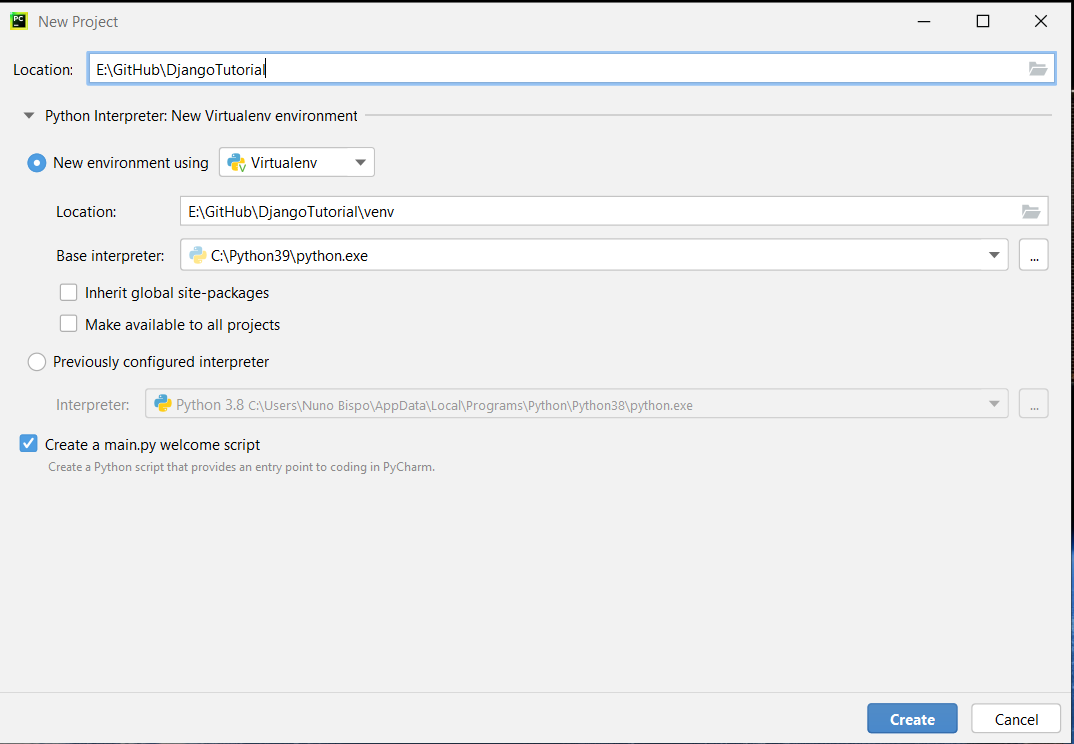
我个人更喜欢在已经有了虚拟环境的情况下创建新项目,这让生活变得更加简单。
如果你创建的项目有一个默认的main.py文件(就像我一样,因为我一直忘了去掉复选标记),你现在可以安全地删除它。我们不打算使用它了。
第一步当然是安装Django,以便我们能够构建我们的应用程序。我们使用pip进行安装:
$ pip install django

Collecting django
  Downloading Django-4.0.2-py3-none-any.whl (8.0 MB)
     |████████████████████████████████| 8.0 MB 6.4 MB/s
Collecting sqlparse>=0.2.2
  Using cached sqlparse-0.4.2-py3-none-any.whl (42 kB)
Collecting tzdata
  Using cached tzdata-2021.5-py2.py3-none-any.whl (339 kB)
Collecting asgiref<4,>=3.4.1
  Downloading asgiref-3.5.0-py3-none-any.whl (22 kB)
Installing collected packages: tzdata, sqlparse, asgiref, django
Successfully installed asgiref-3.5.0 django-4.0.2 sqlparse-0.4.2 tzdata-2021.5
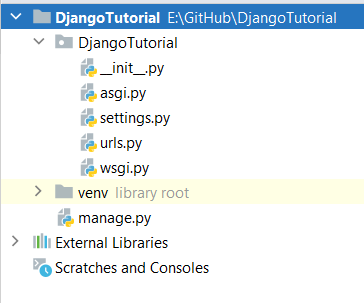
然后,我们用以下命令创建我们的Django项目:
django-admin startproject DjangoTutorial .
注意命令末尾的“.”。我喜欢用它,这样它就会在当前目录下创建项目,而不是创建一个额外的子目录。
现在你在PyCharm中应该有一个这样的项目结构:
我们可以用标准的Django运行方式来运行我们的项目:
$ python manage.py runserver

Watching for file changes with StatReloader
Performing system checks...

System check identified no issues (0 silenced).

You have 18 unapplied migration(s). Your project may not work properly until you apply the migrations for app(s): admin, auth, contenttypes, sessions.
Run 'python manage.py migrate' to apply them.
February 02, 2022 - 16:49:27
Django version 4.0.2, using settings 'DjangoTutorial.settings'
Starting development server at http://127.0.0.1:8000/
Quit the server with CTRL-BREAK.
我们还没有应用我们的迁移,所以我们将在讨论了本地和Dokku访问的数据库配置之后再做这个。
导航到链接 http://127.0.0.1:8000/,我们现在可以访问我们标准的 Django 欢迎页面。
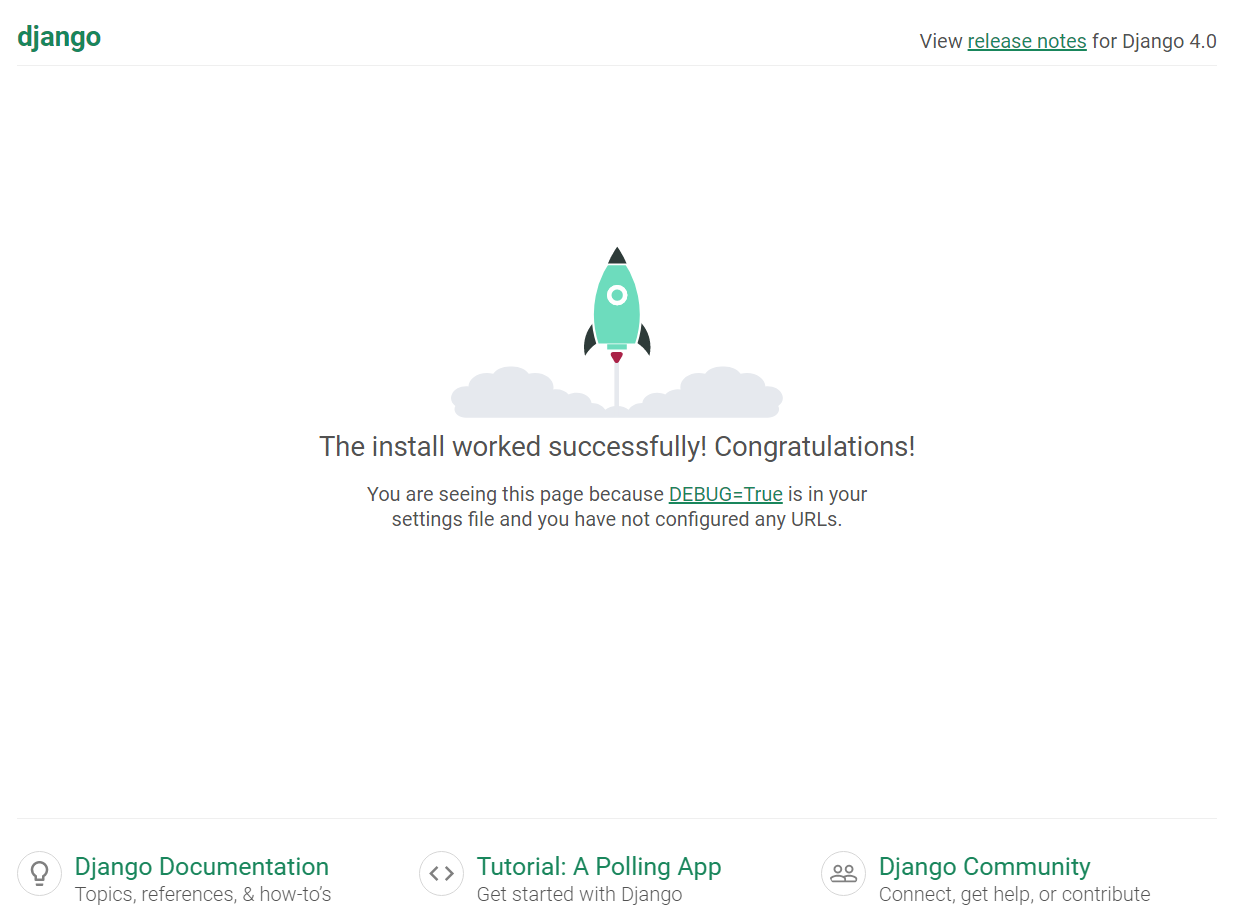
我们已经完成了 Django 的安装并开始运行,所以现在我们可以开始构建项目的其他部分。
像大多数项目一样,我们将需要在数据库(或使用Dokku命名的数据库)中存储数据。
我们还希望能够在开发机器上本地调试和运行我们的应用程序(使用本地数据库,在这里是SQLite),并使用 Dokku 的 Postgres 数据库在云上运行它。
这意味着我们需要改变 settings.py 中的一些配置,以便能够支持两种使用情况,而不需要我们每次都改变任何标志或配置。
我们首先安装dj-database-url软件包:
# Install packages for the database url
$ pip install dj-database-url
$ pip install psycopg2


# We also install this package to be able to use environment variables
$ pip install python-decouple
这个包使我们能够拥有一个Django数据库连接字典,通过简单地指定一个数据库URL来填充所有的数据。
安装好软件包后,让我们更新settings.py中的配置:
# We need to add this import at the beginning to use environment variables
import dj_database_url
from decouple import config
from django.conf.global_settings import DATABASES

.....

# Let's also updated the allowed host so we can use it later on
ALLOWED_HOSTS = config('ALLOWED_HOSTS').split(',')

.....

# We replace the default database configuration from Django with this one
# Database
# https://docs.djangoproject.com/en/4.0/ref/settings/#databases

# DATABASE URL
DATABASES['default'] = dj_database_url.parse(config('DATABASE_URL'),conn_max_age=600)
settings.py
我们还需要在我们项目的根目录下创建 .env 文件:
#HOST SETTINGS
ALLOWED_HOSTS = 127.0.0.1

#DATABASE SETTINGS
DATABASE_URL='sqlite:///db.sqlite3'
.env
正如你所看到的,通过这一改变,我们可以在本地开发机器上使用本地 .env 文件中的数据库 URL,然后在 Dokku 上会自动使用已经定义好的 DATABASE_URL,这个 URL 是我们在 Dokku 上链接数据存储和应用程序时创建的。
现在我们可以创建本教程的第一个(也是唯一)网页,一个简单的计数器,存储和读取数据库中的值。
让我们创建一个单独的应用程序来包含我们的逻辑:
python manage.py startapp counter
现在我们的项目中应该有一个名为“counter”的新文件夹。让我们通过打开models.py文件添加一个新的模型:
from django.db import models


class Counter(models.Model):
    count = models.IntegerField(default=0)

    def __str__(self):
        return self.count
counter/models.py
现在我们可以添加一个新的URL来加载我们的计数器页面。我们通过在counter文件夹中添加一个名为“urls.py”的新文件来做到这一点:
from django.urls import path
from . import views

urlpatterns = [
    path('counter/', views.counter, name='counter'),
]
counter/urls.py
我们现在有了模型和URL来加载我们的测试页面。现在我们需要的是视图和HTML模板来渲染页面。
让我们通过编辑'views.py'文件来创建该视图(view):
from django.shortcuts import render
from .models import Counter


def counter(request):
    counter_value = Counter.objects.last()

    if counter_value is None:
        counter_value = Counter(count=0)
        counter_value.save()

    if request.method == 'POST':
        counter_value.count += 1
        counter_value.save()

    return render(request, 'counter.html', {'counter': counter_value.count})
counter/views.py
现在我们可以创建我们的HTML模板,在页面上显示计数器的值。我们在一个新的“templates”文件夹中创建一个名为“counter.html”的新文件:
<!DOCTYPE html>
<html lang="en">
<head>
    <meta charset="UTF-8">
    <title>Counter</title>
</head>
<body>
  <form method="post">
      {%csrf_token%}
    <h4>Counter value is: {{ counter }}</h4>
    <input type="submit" name="submit" value="Increase Counter">
  </form>
</body>
</html>
counter/templates/counter.html
最后一步是将我们新创建的应用程序添加到settings.py文件中,以便Django能够识别它:
.....

INSTALLED_APPS = [
    'counter',
    'django.contrib.admin',
    'django.contrib.auth',
    'django.contrib.contenttypes',
    'django.contrib.sessions',
    'django.contrib.messages',
    'django.contrib.staticfiles',
]

.....
settings.py
而我们的主URLs文件的URL:
from django.contrib import admin
from django.urls import path, include

urlpatterns = [
    path('', include('counter.urls')),
    path('admin/', admin.site.urls),
]
urls.py
有了所有必要的代码和HTML,我们现在可以创建并运行我们的迁移,在数据库中创建我们的新模型。我们首先在本地服务器上通过运行:
# Create and run migrations
$ python manage.py makemigrations
$ python manage.py migrate

Operations to perform:
  Apply all migrations: admin, auth, contenttypes, counter, sessions
Running migrations:
  Applying contenttypes.0001_initial... OK
  Applying auth.0001_initial... OK
  Applying admin.0001_initial... OK
  Applying admin.0002_logentry_remove_auto_add... OK
  Applying auth.0009_alter_user_last_name_max_length... OK
  Applying auth.0010_alter_group_name_max_length... OK
  Applying auth.0011_update_proxy_permissions... OK
  Applying auth.0012_alter_user_first_name_max_length... OK
  Applying counter.0001_initial... OK
  Applying sessions.0001_initial... OK
正如你所看到的,我们不仅为我们的新应用程序应用了迁移(migrations),而且还为其他Django应用程序运行了初始迁移,因为这是我们第一次运行迁移(migrations)。
我们可以再次在本地运行我们的服务器,我们应该能够访问URL http://127.0.0.1:8000/counter/ 并增加计数器:

运行我们的计数器应用程序 - 作者的GIF图
正如你所看到的,重新加载页面可以保持我们的计数器值,这意味着该值已经和我们的模型一起存储在数据库中。
如何将我们的应用程序部署到Dokku上
现在我们有一个非常简单的应用程序正在运行,并与数据库集成以存储我们的计数器值。
我们准备把它部署到云端,这样我们就可以在那里进行测试,并确保我们的数据库也能在云端工作。
在我们用Git推送将代码部署到Dokku之前,我们需要做一些准备。
- 安装我们的网络服务器(gunicorn)
- 创建我们的需求文件(为我们的软件包)。
- 创建我们的Procfile(用于我们的部署命令)
让我们从安装我们的网络服务器开始,以便在云中使用:
# Install our web server
$ pip install gunicorn
我们现在可以用以下方法创建我们的 requirements.txt 文件,获得包的依赖:
# Create requirements file
$ pip freeze > requirements.txt
现在我们需要创建 Procfile。这个文件被 Dokku 用来决定在部署时和部署后运行哪些命令。
因此,让我们在根目录下创建一个名为 "Procfile "的新文件,其内容如下:
web: gunicorn DjangoTutorial.wsgi
release: python manage.py migrate
Procfile
我们创建了两个命令供Dokku运行:
- release - 这个命令是在我们的应用程序在Dokku的部署上执行的。我们用它来迁移我们的数据库。
- web - 这个命令允许Dokku知道运行哪个webserver以允许访问该应用程序。
最后,为了确保我们的代码被部署到Dokku时能收集到任何静态文件,我们需要在根目录上创建一个名为'static'的新目录。在里面我们创建一个名为'.gitkeep'的空文件(这将使我们以后能够将该目录添加到Git仓库中)。
我们还需要在'settings.py'文件中为静态文件添加这个路径:
# Static files (CSS, JavaScript, Images)
# https://docs.djangoproject.com/en/4.0/howto/static-files/

STATIC_URL = 'static/'
STATIC_ROOT = BASE_DIR / "static"
settings.py
现在所有的文件和逻辑都到位了,我们可以用标准的Git推送方式部署到Dokku。让我们检查一下我们当前的文件结构:
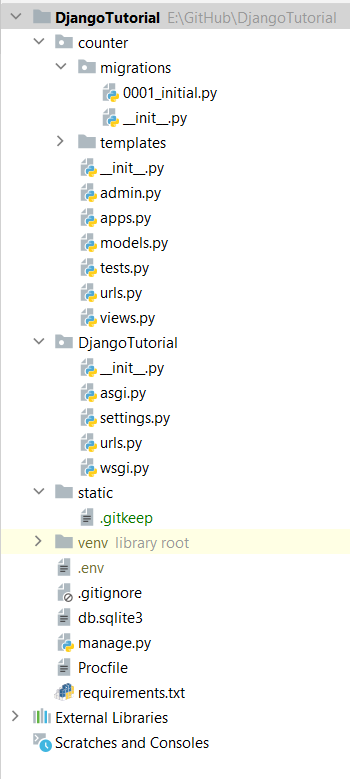
PyCharm文件夹结构--作者的截图
为了能够将我们的代码推送到Dokku,我们需要将我们的项目添加到一个Git仓库。
由于我们不想把文件夹结构中的所有文件都推送到Dokku的git仓库,所以我们创建一个".gitignore "来排除某些文件和目录。我使用这个优秀的Gist的内容来填充这个文件:
[python pycharm gitignore
python pycharm gitignore. GitHub Gist: instantly share code, notes, and snippets.
![]() 262588213843476Gist
262588213843476Gist

](https://gist.github.com/MOOOWOOO/3cf91616c9f3bbc3d1339adfc707b08a)
We can now initialize and commit our code to a Git repository locally:
# Initialize repository
$ git init -b main

# Add and commit our files
$ git add . && git commit -m "initial commit"

[main (root-commit) e77a16a] initial commit
 20 files changed, 438 insertions(+)
 create mode 100644 .gitignore
 create mode 100644 DjangoTutorial/__init__.py
 create mode 100644 counter/tests.py
 create mode 100644 counter/urls.py
 create mode 100644 counter/views.py
 create mode 100644 db.sqlite3
 create mode 100644 manage.py
 create mode 100644 requirements.txt
在提交了我们的仓库后,我们现在可以把它推送到远程仓库,也就是我们应用程序的Dokku Git仓库:
# Adding our remote repository (replace domain.com with your domain name)
$ git remote add dokku dokku@domain.com:djangotutorial

# Time to push our code to the remote repository
$ git push dokku main

Enumerating objects: 34, done.
Counting objects: 100% (34/34), done.
Delta compression using up to 8 threads
Compressing objects: 100% (31/31), done.
Writing objects: 100% (34/34), 11.41 KiB | 402.00 KiB/s, done.
Total 34 (delta 7), reused 0 (delta 0)
-----> Set main to DOKKU_DEPLOY_BRANCH.
-----> Cleaning up...
-----> Building djangotutorial from herokuish
-----> Adding BUILD_ENV to build environment...
       BUILD_ENV added successfully
-----> Python app detected
-----> No Python version was specified. Using the buildpack default: python-3.9.9
       To use a different version, see: https://devcenter.heroku.com/articles/python-runtimes
-----> No change in requirements detected, installing from cache
-----> Installing python-3.9.9
-----> Installing pip 21.3.1, setuptools 57.5.0 and wheel 0.37.0
-----> Installing SQLite3
-----> Installing requirements with pip
       Collecting asgiref==3.5.0
       Downloading asgiref-3.5.0-py3-none-any.whl (22 kB)
       Collecting dj-database-url==0.5.0
       Downloading dj_database_url-0.5.0-py2.py3-none-any.whl (5.5 kB)
       Collecting Django==4.0.2
       Downloading Django-4.0.2-py3-none-any.whl (8.0 MB)
       Collecting gunicorn==20.1.0
       Downloading gunicorn-20.1.0-py3-none-any.whl (79 kB)
       Collecting psycopg2==2.9.3
       Downloading psycopg2-2.9.3.tar.gz (380 kB)
       Preparing metadata (setup.py): started
       Preparing metadata (setup.py): finished with status 'done'
       Collecting python-decouple==3.5
       Downloading python_decouple-3.5-py3-none-any.whl (9.6 kB)
       Collecting sqlparse==0.4.2
       Downloading sqlparse-0.4.2-py3-none-any.whl (42 kB)
       Collecting tzdata==2021.5
       Downloading tzdata-2021.5-py2.py3-none-any.whl (339 kB)
       Building wheels for collected packages: psycopg2
       Building wheel for psycopg2 (setup.py): started
       Building wheel for psycopg2 (setup.py): finished with status 'done'
       Created wheel for psycopg2: filename=psycopg2-2.9.3-cp39-cp39-linux_x86_64.whl size=579484 sha256=9d6a2810a5d766738526d6f411e5e9ce514cce882b6c80a47a13c02dc7529e02
       Stored in directory: /tmp/pip-ephem-wheel-cache-8k0chg5g/wheels/b3/a1/6e/5a0e26314b15eb96a36263b80529ce0d64382540ac7b9544a9
       Successfully built psycopg2
       Installing collected packages: sqlparse, asgiref, tzdata, python-decouple, psycopg2, gunicorn, Django, dj-database-url
       Successfully installed Django-4.0.2 asgiref-3.5.0 dj-database-url-0.5.0 gunicorn-20.1.0 psycopg2-2.9.3 python-decouple-3.5 sqlparse-0.4.2 tzdata-2021.5
-----> $ python manage.py collectstatic --noinput
       128 static files copied to '/tmp/build/static'.

-----> Discovering process types
       Procfile declares types -> release, web
-----> Releasing djangotutorial...
-----> Checking for predeploy task
       No predeploy task found, skipping
-----> Checking for release task
-----> Executing release task from Procfile: python manage.py migrate
=====> Start of djangotutorial release task (a602cab30) output
       Operations to perform:
         Apply all migrations: admin, auth, contenttypes, counter, sessions
       Running migrations:
         Applying contenttypes.0001_initial... OK
         Applying auth.0001_initial... OK
         Applying admin.0001_initial... OK
         Applying admin.0002_logentry_remove_auto_add... OK
         Applying admin.0003_logentry_add_action_flag_choices... OK
         Applying contenttypes.0002_remove_content_type_name... OK
         Applying auth.0002_alter_permission_name_max_length... OK
         Applying auth.0003_alter_user_email_max_length... OK
         Applying auth.0004_alter_user_username_opts... OK
         Applying auth.0005_alter_user_last_login_null... OK
         Applying auth.0006_require_contenttypes_0002... OK
         Applying auth.0007_alter_validators_add_error_messages... OK
         Applying auth.0008_alter_user_username_max_length... OK
         Applying auth.0009_alter_user_last_name_max_length... OK
         Applying auth.0010_alter_group_name_max_length... OK
         Applying auth.0011_update_proxy_permissions... OK
         Applying auth.0012_alter_user_first_name_max_length... OK
         Applying counter.0001_initial... OK
         Applying sessions.0001_initial... OK
=====> End of djangotutorial release task (a602cab30) output
-----> App Procfile file found
=====> Processing deployment checks
       No CHECKS file found. Simple container checks will be performed.
       For more efficient zero downtime deployments, create a CHECKS file. See https://dokku.com/docs/deployment/zero-downtime-deploys/ for examples
-----> Deploying djangotutorial via the docker-local scheduler...
-----> Deploying web (count=1)
       Attempting pre-flight checks (web.1)
       Waiting for 10 seconds (web.1)
       Default container check successful (web.1)
-----> Deploying release (count=0)
-----> Running post-deploy
-----> Creating new app virtual host file...
-----> Configuring djangotutorial.domain.com...(using built-in template)
-----> Creating http nginx.conf
       Reloading nginx
-----> Renaming containers
       Renaming container djangotutorial.web.1.upcoming-7101 (f8d229ebd8bc) to djangotutorial.web.1
-----> Checking for postdeploy task
       No postdeploy task found, skipping
-----> Updated schedule file
=====> Application deployed:
       http://djangotutorial.domain.com

To domain.com:djangotutorial
 * [new branch]      main -> main
我们刚刚将我们的应用程序部署到Dokku。
刚刚发生了什么?嗯,Dokku为我们做了很多工作:
- 安装 Python
- 根据 requirements 文件安装Python的包
- 收集静态文件
- 执行migrations
- 最后启动gunicorn服务器来部署我们的应用程序
如果你有一个权限错误,那么你的私钥应该在你的本地开发环境中注册。如果你在推送时得到一个 "拒绝许可 "的错误,你可以按以下方式注册你的私钥。ssh-add -k ~/<your private key>。
你也可能在访问应用程序时看到关于 ALLOWED_HOSTS 的错误。在这种情况下,你需要做的就是在Dokku服务器上运行以下命令,将环境变量设置为正确值:
# Set ALLOWED_HOSTS environment variable (make sure to use your domain name)
$ dokku config:set djangotutorial ALLOWED_HOSTS=djangotutorial.domain.com
现在我们可以在上述网址上访问和测试我们的应用程序:
恭喜你,你刚刚在Dokku上部署了你的应用程序。
如何使用Let's Encrypt 加上 SSL
我们可以做的最后一项配置是通过安装Let's Encrypt SSL证书为我们的应用程序添加SSL安全。
我们可以通过Let's Encrypt插件在Dokku上非常容易地做到这一点:
# Install the Let's Encrypt plugin
sudo dokku plugin:install https://github.com/dokku/dokku-letsencrypt.git

# Configure the plugin (make sure to replace to your email)
dokku config:set --global DOKKU_LETSENCRYPT_EMAIL=email@domain.com

# set a custom domain that you own for your application
dokku domains:set djangotutorial djangotutorial.your.domain.com

# Enable Let's Encrypt
dokku letsencrypt:enable djangotutorial

# Enable Let's Encrypt auto-renewal
dokku letsencrypt:cron-job --add
现在我们有一个更安全的应用程序。毕竟,我们的计数器是非常重要的。
结语
使用PaaS使开发者在构建网络应用时更容易。
你可以使用像Heroku这样的托管PaaS,还有很多其他的,所以选择是有的。
但也有一些主要的缺点:
- 价格——托管解决方案可能在数据库存储或文件存储等方面有限制
- 你不能控制部署PaaS的主机,最近AWS的例子表明,即使是最大的云服务商也不是没有问题的。
你可以通过自我托管你的PaaS来解决这些问题。
这允许在定价方面有更多的控制。你可以使用像 Digital Ocean、Hetzner 和其他有相当便宜的VPS的主机供应商,它们可以完美地与 Dokku 一起工作。
没有数据库限制。你可能有的唯一限制是内存和磁盘空间,但你可以随时升级你的VPS,价格比在Heroku获得一个新的数据库要低。
Dokku很容易安装,就像我们看到的那样。创建和部署一个应用程序是一个3步过程:
- 在Dokku上创建一个应用程序
- 在Dokku上创建一个数据存储(如果需要,如Postgres)并链接到应用程序
- 用Git将你的代码部署到Dokku上
此外,你可能需要配置一些环境变量和SSL证书,但这就是全部。
Dokku确实是最小的PaaS实现。
可在这里获得Django应用程序的完整源代码。
在推特上关注我:https://twitter.com/DevAsService
查看我的网站:https://developer-service.io/
或在我的博客上查看:https://blog.developer-service.io/