
原文: How to Build a Blog with the Ghost API and Next.js
Ghost CMS 是一个流行的内容管理系统,许多开发者和公司用它来托管他们的博客。
它有许多功能和一个高度优化的编辑器,适合写作。你甚至可以使用 handlebars.js 构建不同的主题。
但如果你不了解 Handlebars,学习它可能是一个漫长而困难的过程。如果你已经是一个 Next.js 的开发者,而你不知道 Handlebars,为你基于 Ghost 的网站创建一个新的主题可能会很艰难。
在这篇文章中,我将教你如何使用 Ghost CMS 作为后端和 Next.js 作为前端。我将指导你完成与 Nextjs 13 应用目录 和 Ghost CMS API 有关的一切。
Next.js 13 团队目前正在开发实验性的 app 文件夹。Next 使用基于文件的路由与page目录。新的 app 目录基于文件系统路由,并提供额外的功能,如布局、错误处理、组件加载、服务器端和客户端渲染等。
所有的代码都可以在 GitHub 上找到。你也可以查看网上的 演示网站。
目录
- 为什么在前端使用 Next.js 而不是 Ghost CMS 主题
- 做项目前需要做好的准备
- 如何设置 Ghost CMS
- 如何利用云计算建立 Ghost CMS
- 如何获得博客模板
- 如何设置 Next.js
- 在学习本教程之前,需要知道什么
- 文件夹结构
- 如何配置 Ghost CMS 和 Next.js
- 了解 Next.js 13 app 文件夹
- 项目的演示数据
- 如何建立博客
- 如何建立页眉(header)
- 如何建立页脚(Footer)
- 如何建立 layout
- 如何建立主页(homepage)
- 如何建立阅读页(reading page)
- 如何建立标签页(tag page)
- 如何建立作者页(author page)
- 如何建立单页(single pages)
- 如何处理分页(pagination)
- Next.js SEO
- 如何开启搜索
- 错误处理
- 如何用 webhooks 重新构建你的静态网站
- 总结
在这篇文章中,我们将介绍 Next 的带有实验性的 app 文件目录的基本情况。然后,我将教你如何在本地加强 Next 和 Ghost CMS,以及如何将 Ghost 与 Next 整合。最后,我会告诉你如何从后端(通过 Ghost CMS 的 API)获取数据,并用 React.js 在网站上显示。
为什么在前端使用 Next.js 而不是 Ghost CMS 主题
有几个原因可以让你考虑使用 Next 作为你的博客的前端框架:
- Ghost CMS 不生成静态构建,但 Next.js 可以。
- 使用 Next.js,你可以获得更高的网站速度和性能,而且它现在提供了内置的 SEO 支持和其他优化功能。Ghost 不具备其中的一些功能。
- 对于 React 开发者来说,用 Next 构建一个新的博客很容易(因为 Next 是基于 React 的),你不需要学习额外的工具。
- 你会发现有一些服务提供商可以为 Ghost 提供服务,一键部署 Ghost 博客。他们中的大多数都有一个付费计划,而有一两个提供免费计划(但这些往往有时间和功能限制)。对于 Next.js,市场上有许多供应商。
通常来说,当涉及到静态构建和网站性能时,Ghost 在这两种情况下的表现都不尽如人意。另一个选择是使用一个前端平台,如 Next、React、Angular 或 Vue。
我选择 Next 是因为它是一个需求量很大、很受欢迎的 React 框架,而且大量的工具和库都是围绕它建立的。
请注意,目前的项目还没有为 TypeScript 做好准备,但我正在努力。因为这个原因 我在构建时禁用了 TypeScript,像这样:
/** @type {import('next').NextConfig} */
const nextConfig = {
  experimental: {
    appDir: true
  },

  typescript: {
    ignoreBuildErrors: false
  }
};

module.exports = nextConfig;
在开发过程中忽略构建错误
做项目前需要做好的准备
要跟上这个教程,你需要具备以下软件包的基本知识:
- PNPM是一个类似于 npm 或 yarn 的 Node.js 包管理器(你也可以使用你喜欢的任何一个)。
- TypeScript帮助你在 JavaScript 中编写类型安全的代码,也可以帮助提高生产力。不过,这不是必须的。你可以在你的项目中使用 JavaScript。
- React.js是一个免费和开源的前端 JavaScript 库,用于用类和函数组件构建用户界面。
- Next.js 13 (app)是基于 React 的,它提供了额外的功能,如路由、错误处理和布局。
- Ghost CMS API是一个开源的内容管理系统(CMS),类似于 WordPress。Ghost 是专门为博客设计和建造的。在这个项目中,我们将 Ghost 作为后端,Next 作为前端。对于后端和前端开发之间的通信,我们将使用 Ghost CMS API。
- Tailwind CSS是一个开源的 CSS 的框架,类似于 Bootstrap。我们将使用 Tailwind CSS 来设计我们的博客网站。
如何设置 Ghost CMS
下一步是在本地安装 Ghost,你可以用一条命令完成。首先,你需要用 pnpm、yarn 或 npm 全局安装ghost-cli。
pnpm add -g ghost-cli@latest

# or

yarn global add ghost-cli@latest

# or

npm install ghost-cli@latest -g
global
安装 Ghost CLI 后,你可以用以下命令在本地创建一个新的 Ghost 博客项目:
ghost install local
博客安装完成后,你可以用 ghost start 命令启动你的本地开发服务器,你的本地开发服务可以通过http://localhost:2368/ghost 访问。
其他 Ghost CLI 命令
在使用 Ghost CLI 时,有几个命令是有帮助的:
ghost start:启动你的服务ghost stop:停止运行你的 Ghost 服务ghost help:查看可用的命令列表
注意:
在安装之前,请确保你当前的安装目录是空的。目前,你是在开发模式下安装 Ghost。对于生产来说,你不会遵循同样的步骤。
如何利用云计算建立Ghost CMS
如果你在本地安装 Ghost 时遇到任何问题,或者可能太复杂,或者你的驱动器上没有足够的空间,你可以使用像 digital press 这样的工具或任何其他云服务,如 GCP 或 AWS,Digital Ocean,等等。
我喜欢 digital press,因为它有一个免费计划。其他云服务不提供这一点,这就是为什么我建议它。
如何获得博客模板
从头开始创建一个新的博客可能很困难。在本教程中,我们将使用一个来自 the frontend web 的预构建好的模板。所有的模板都有一个开源的 MIT 许可,所以你可以使用它们,而且你不需要设置一切。
我从里面挑选了 Open-blog 的模板。
如何设置 Next.js
设置 Next 是本教程的主要部分之一,你将花时间和精力在编码、调试和部署网站上。
以下是要运行的命令,取决于你使用的是 npx、yarn,还是 pnpm:
npx create-next-app@latest --experimental-app

# or

yarn create next-app --experimental-app

# or

pnpm create next-app --experimental-app
安装 nextjs 的时候使用新的实验性功能。
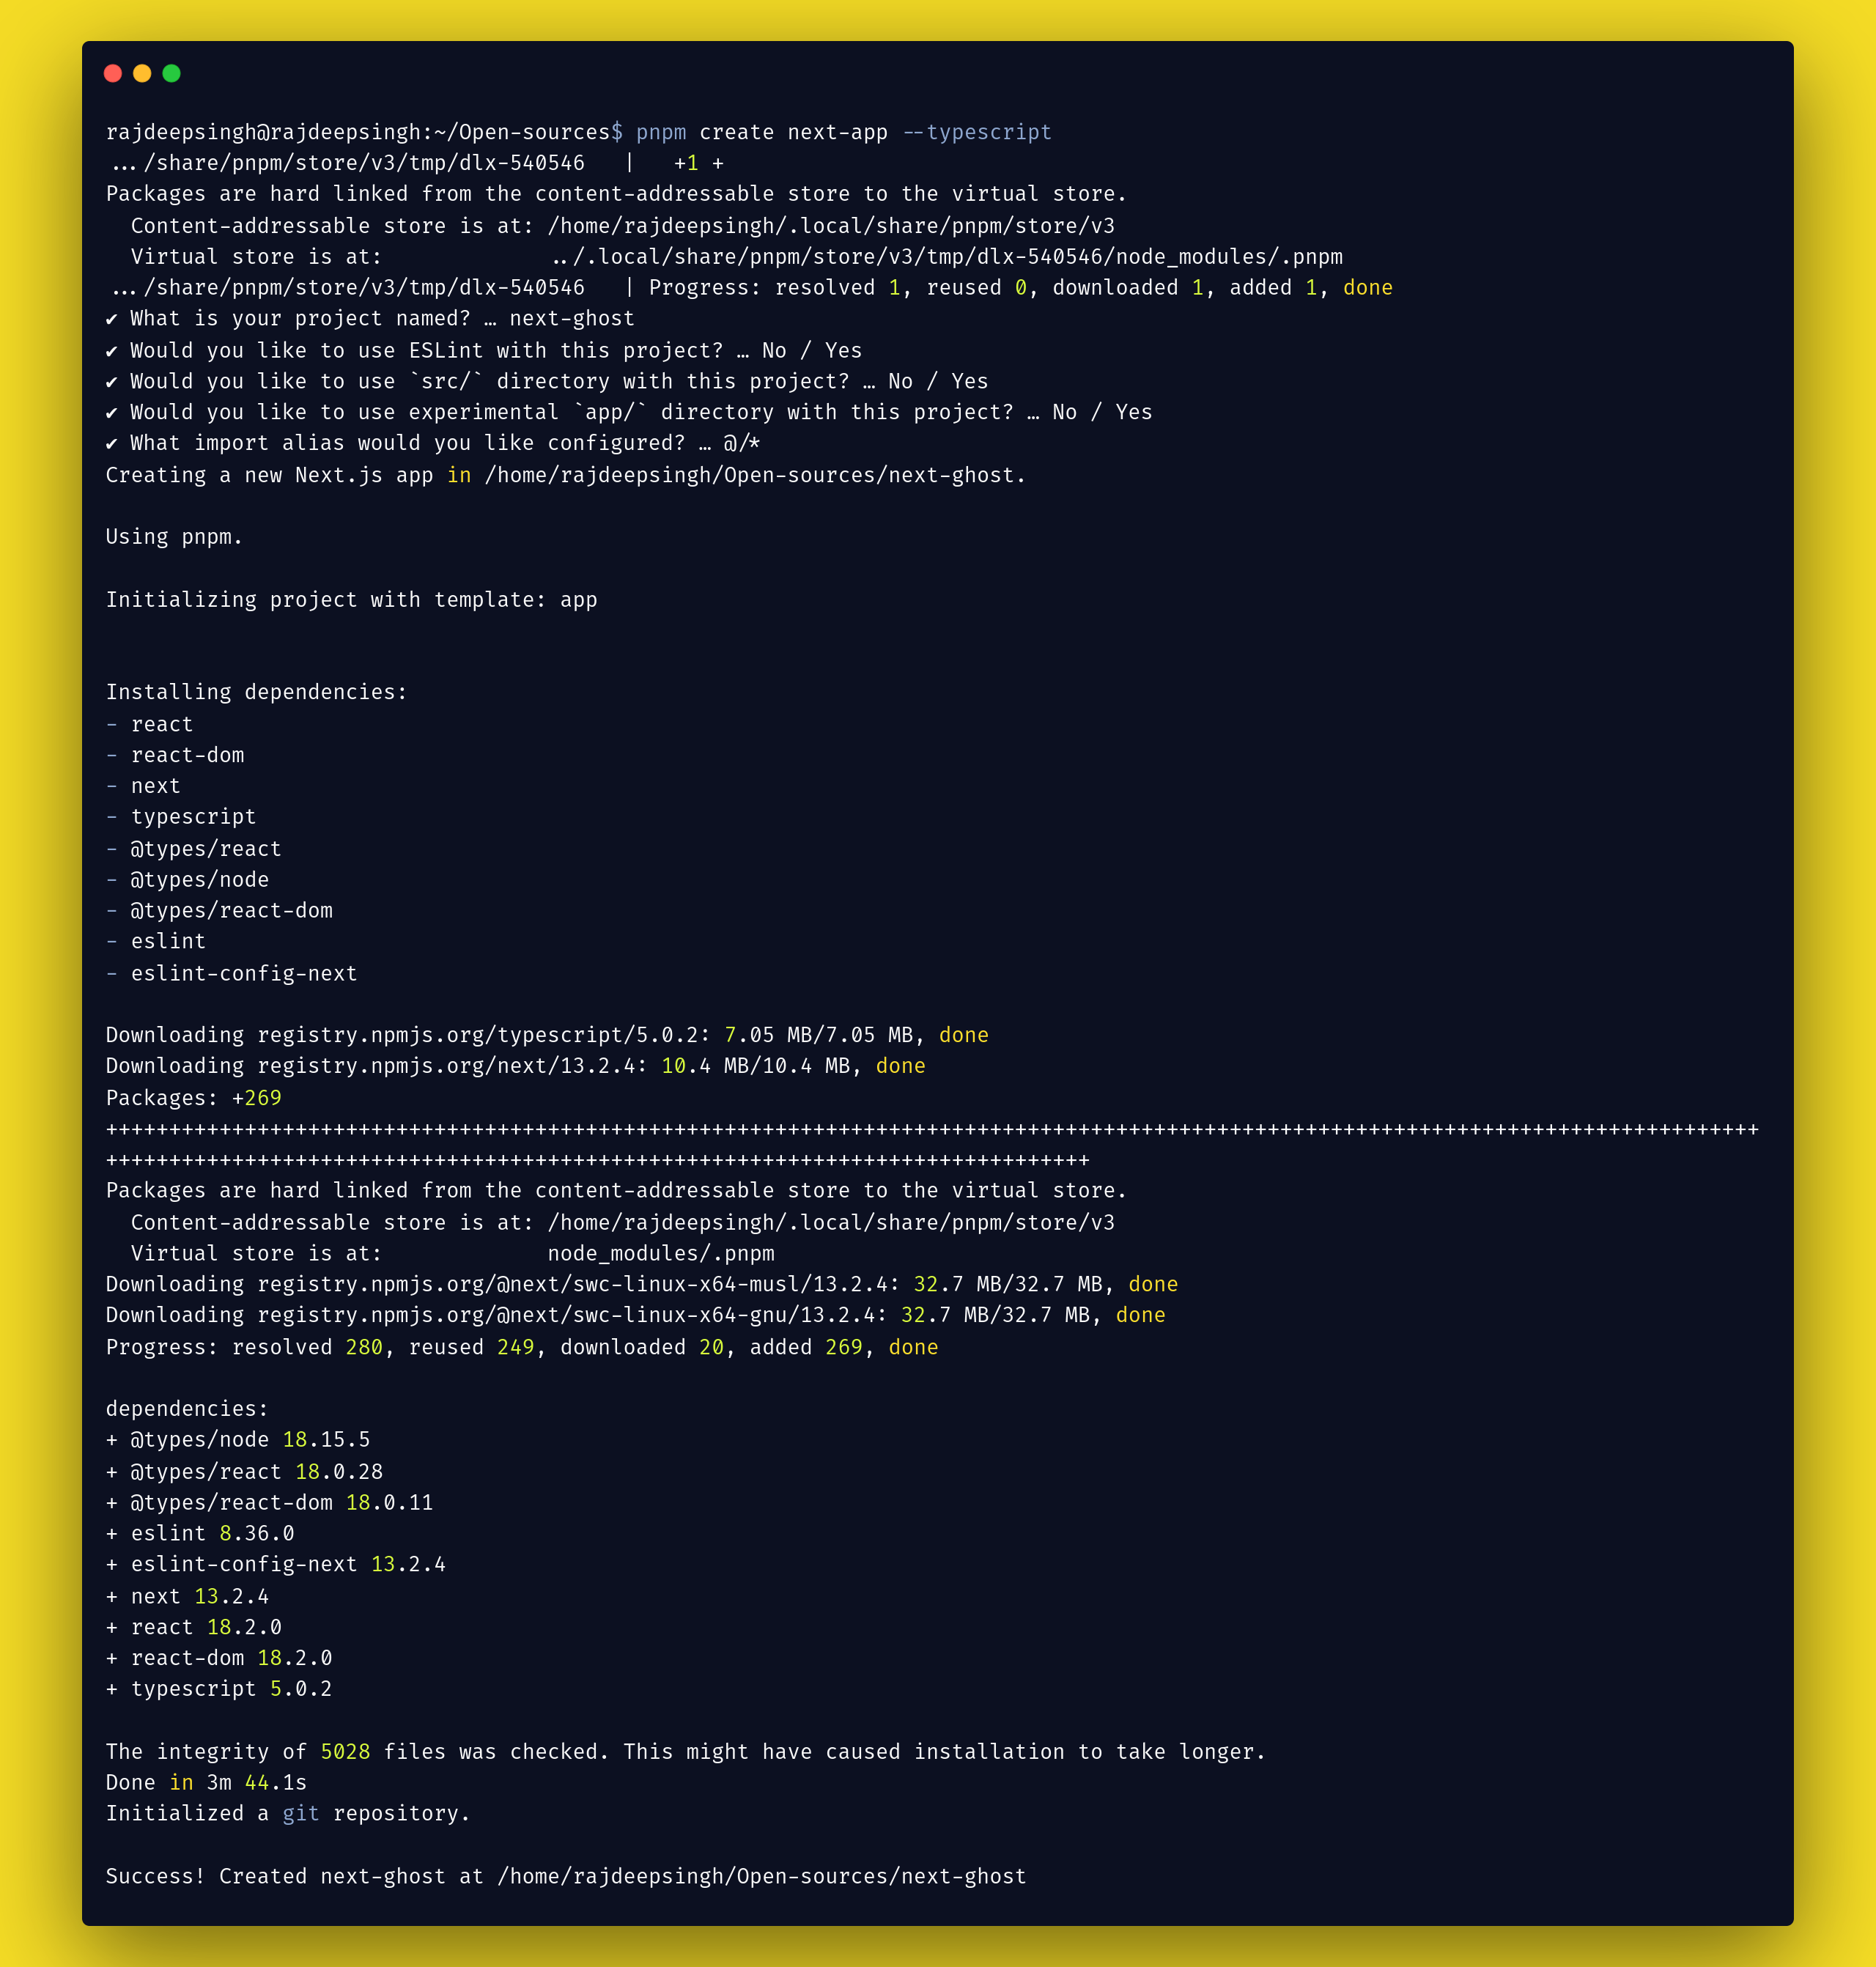
创建一个新的 Nextjs 应用程序。
完成安装过程后,我们必须为博客安装一些额外的 Node 包。
这些 Node 包可以帮助你加快开发进程。请确保安装以下所有的包,以便跟上本指南:
要安装的 Node 包
pnpm add @tryghost/content-api(required)pnpm add @types/tryghost__content-api(required by TypeScript)pnpm add tailwindcss postcss autoprefixerpnpm add @tailwindcss/typographypnpm add react-iconspnpm add date-fnspnpm add next-themespnpm add @radix-ui/react-popover
以下是这些包的作用:
- @tryghost/content-api 是一个 Ghost JavaScript 客户端库,用于获取content API数据。
- @types/tryghost__content-api 包含@tryghost/content-api 的类型定义。
- TailwindCSS、autoprefixer 和 PostCSS 都是在使用时需要的包。 Tailwind CSS.
- @tailwindcss/typography 用于用 Tailwind CSS 处理动态排版的包。
- next-themes 主题包,如在你的网站上从黑暗模式切换到日间模式。
- react-icons为项目提供了大量的 SVG 图标。这样一来,你就不需要手动下载它们了。
- @radix-ui/react-popover是 Radix UI 生态系统的一部分。我选择 Radix 的弹出式组件来设计网站上的搜索组件。
- date-fns 有助于将你的
published_at日期转换成不同的日期格式的包。
在学习本教程之前,需要知道什么
在构建这个项目之前,我强烈建议在 YouTube 上观看一些教程(尤其是如果你是 Next.js 的初学者)。这些将帮助你了解有关 Next.js app 文件夹的实验性功能一些基本知识。
每个视频将解释同一类主题。如果你看了这四个视频中的每一个,你就对 Next.js 应用文件夹的工作原理有了基本的了解。这将使这个高级教程更容易理解。
Vercel
在本教程中,Lee Robinson 介绍了路由(route)、动态路由段(dynamic route segments)、数据获取(data fetching)、缓存(caching)和元数据(metadata)的基础知识。
Sakura Dev
Sakura Dev 用实例教你 Next.js 页面和 App 文件夹以及路由之间的区别。
Tuomo Kankaanpaa
Tuomo Kankaanpaa 教你了解 Next 应用程序的文件夹路由(folder routing)、布局(layouts)和服务器组件(server components)。
Piyush Garg
Piyush Garg 编译了所有 Next 的新功能,并将其转换为一个小的速成课程,并建立了一个演示项目。
现在你已经准备好了,让我们开始建立我们的博客。
文件夹结构
对于我们的演示应用程序,我们的文件夹结构看起来像这样:
.
├── next.config.js
├── next-env.d.ts
├── package.json
├── pnpm-lock.yaml
├── postcss.config.js
├── public
├── README.md
├── search.json
├── src
│   └── app
│       ├── authors
│       │   └── [slug]
│       │       └── page.tsx
│       ├── BlogLayout.tsx
│       ├── cards.min.css
│       ├── Card.tsx
│       ├── error.tsx
│       ├── favicon.ico
│       ├── Footer.tsx
│       ├── ghost-client.ts
│       ├── globals.css
│       ├── Header.tsx
│       ├── layout.tsx
│       ├── not-found.tsx
│       ├── pages
│       │   └── [slug]
│       │       └── page.tsx
│       ├── page.tsx
│       ├── pagination
│       │   └── [item]
│       │       └── page.tsx
│       ├── Pagination.tsx
│       ├── read
│       │   └── [slug]
│       │       ├── Newsletter.tsx
│       │       └── page.tsx
│       ├── Search.tsx
│       ├── SocialIcons.tsx
│       └── tags
│           └── [slug]
│               └── page.tsx
├── tailwind.config.js
└── tsconfig.json

13 directories, 30 files
使用 Nextjs 和 Ghost cms 的文件夹结构
如何配置Ghost CMS和Next.js
下一步是为 Ghost Content API 设置数据获取。这就是为什么我们安装了上面的@tryghost/content-api包。
Ghost CMS 带有两种类型的 API:第一种是内容 API,第二种是管理 API。对于博客,我们将使用内容 API。
内容 API 是一个 RESTful API,为 Ghost 数据库获取已发布的内容。它是一个只读的 API。你不能用它来调用 POST 请求。
为了配置它,我们在src/app文件夹下创建了一个新的文件ghost-client.ts。在该文件中,我们有一个新的 Ghost API 实例。
// ghost-client.ts

import GhostContentAPI from '@tryghost/content-api';

// Create API instance with site credentials
const api = new GhostContentAPI({
  url: process.env.GHOST_URL as string,
  key: process.env.GHOST_KEY as string,
  version: 'v5.0'
});
创建一个新的 Ghost CMS 实例。
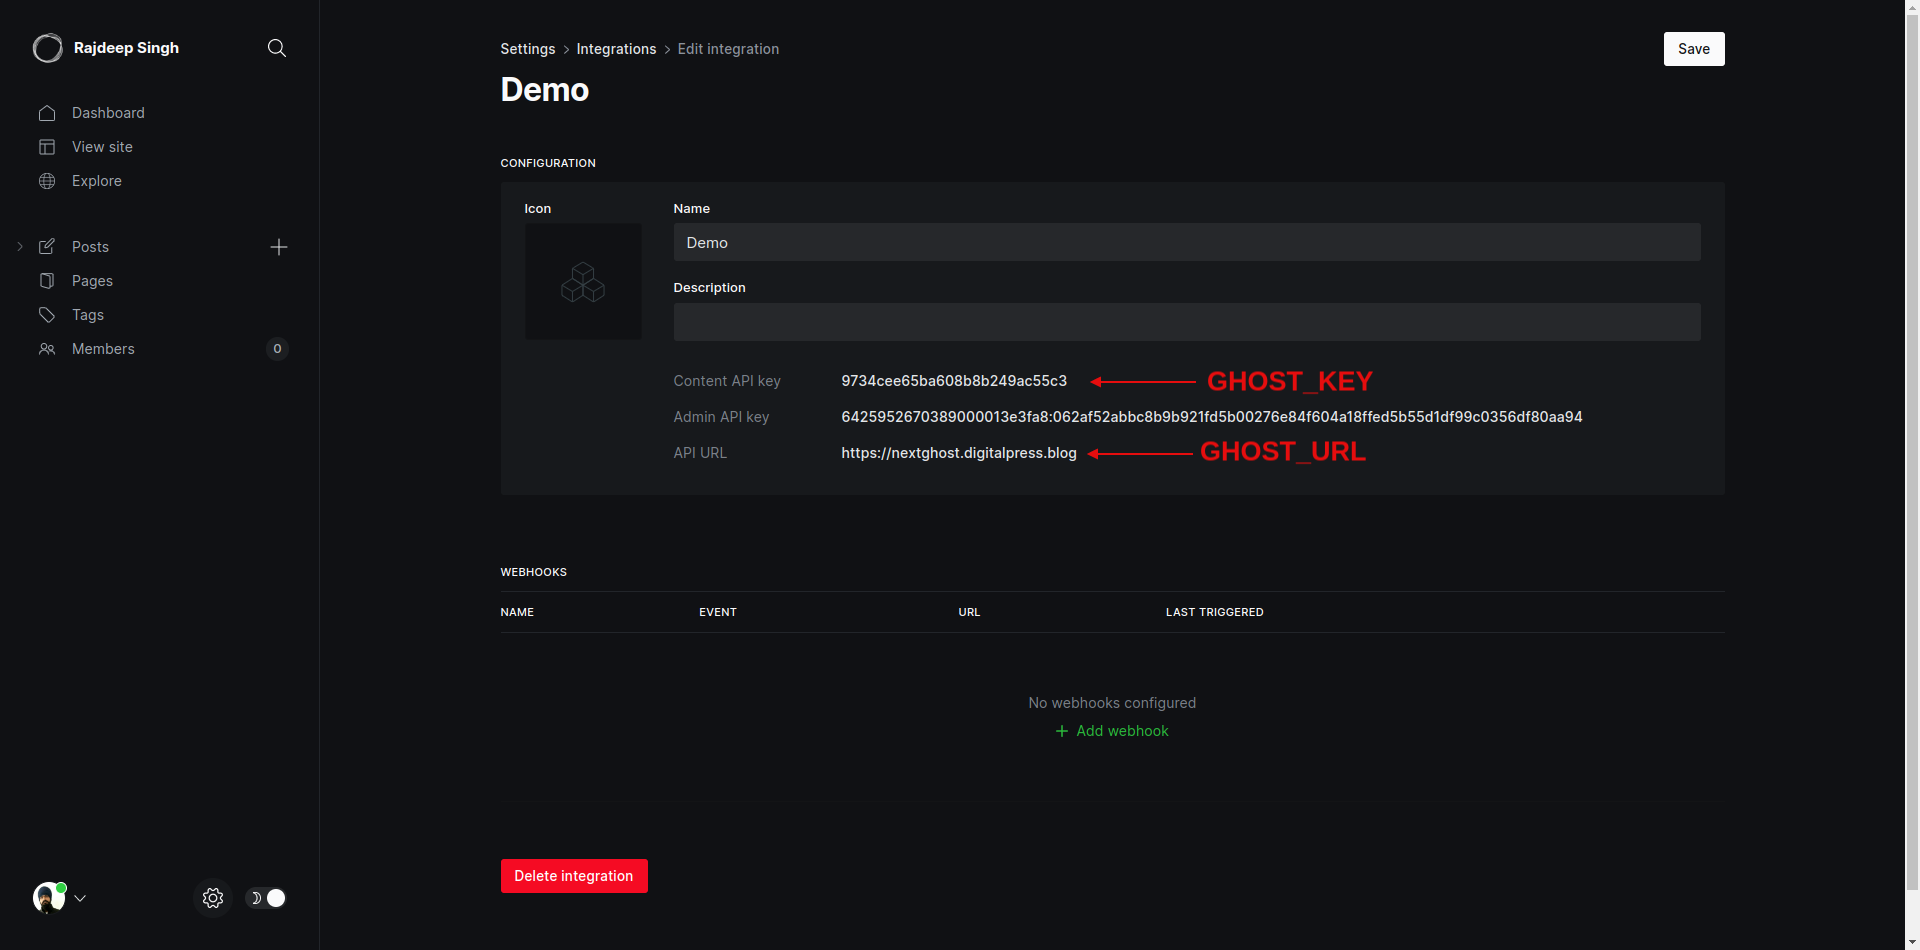
我们需要博客的 URL、Key 和版本来在 Next 中配置 Ghost 的内容 API。你可以在 Ghost 仪表盘中找到 URLs 和 Key 属性,以及版本值,它是你当前 Ghost CMS 的版本。
进入 Ghost 仪表板:
去到 dashboard > settings > integrations > Your-intergration-id, 获得你的 GHOST_URL 和 GHOST_KEY。 现在你可以复制这两份信息,并将其粘贴在你的 .env.local 文件.
了解Next.js 13 app文件夹
随着 Next.js 13 的发布,Next.js 的pages文件夹和app文件夹发生了很多变化。我们现在就来讨论一些重要的东西,在构建应用时再讨论更多:
- 没有
_app、_document、getServerSideProps、getStaticProps、getStaticPaths、404和useRouter - 现在它将
_app和_document文件与layout文件相结合。 useRouter是从next/navigation中导入的。404文件被notFound()函数取代。error.tsx文件提供了对错误边界的反应等功能。- 现在
index.js文件被page.js取代。 - 传递动态路由段
pages/blog/[slug].js被改变,下一个应用程序目录看起来像这样:app/blog/[slug]/page.js。
例子
为了理解 Next 带有实验性的 app 文件夹,让我们看看一个真实的例子:
- tag page =>
app/tag/[slug]/page.ts。 - category =>
app/tag/[slug]/page.ts。
现在你可以在每个路由里面创建五个文件。例如,如果你在你的 app 文件夹中创建一个tag 或 category 路由,那么你可以在你的 app 路由文件夹中创建四个文件。
page.ts(必填):它是你的主文件。layout.ts(可选):它有助于设计你的布局。loading.ts(可选):它用 React suspense 创建一个加载指标。error.ts(可选):它帮助处理你的 React 应用程序中的错误。components(可选):你也可以在你的路由中创建另一个组件。
让我们通过一个真实的例子来了解新的 Next.js 13 路由是如何工作的:你的标签路由文件夹看起来像这样。
app / tag / [slug] / page.ts;
app / tag / [slug] / loading.ts;
app / tag / [slug] / layout.ts;
app / tag / [slug] / error.ts;
app / tag / [slug] / my - card - component.ts;
Tag 文件夹结构
项目的演示数据
你不必担心创建一个演示或假的博客文章数据。对于你的测试,你可以从这个GitHub 仓库下载它。
如何建立博客
我们将在下面的章节中对博客的每个部分进行梳理和构建,这样你就可以在家里一个人跟着做。
- 如何建立页眉(header)
- 如何建立页脚(footer)
- 如何建立 layout
- 如何建立主页(homepage)
- 如何建立阅读页(reading page)
- 如何建立标签页(tag page)
- 如何建立作者页(author page)
- 如何建立单页(single pages)
- 如何处理分页(pagination)
- Next.js SEO
- 如何开启搜索
- 错误处理
- 如何用 webhooks 重建你的静态网站
如何建立页眉(header)
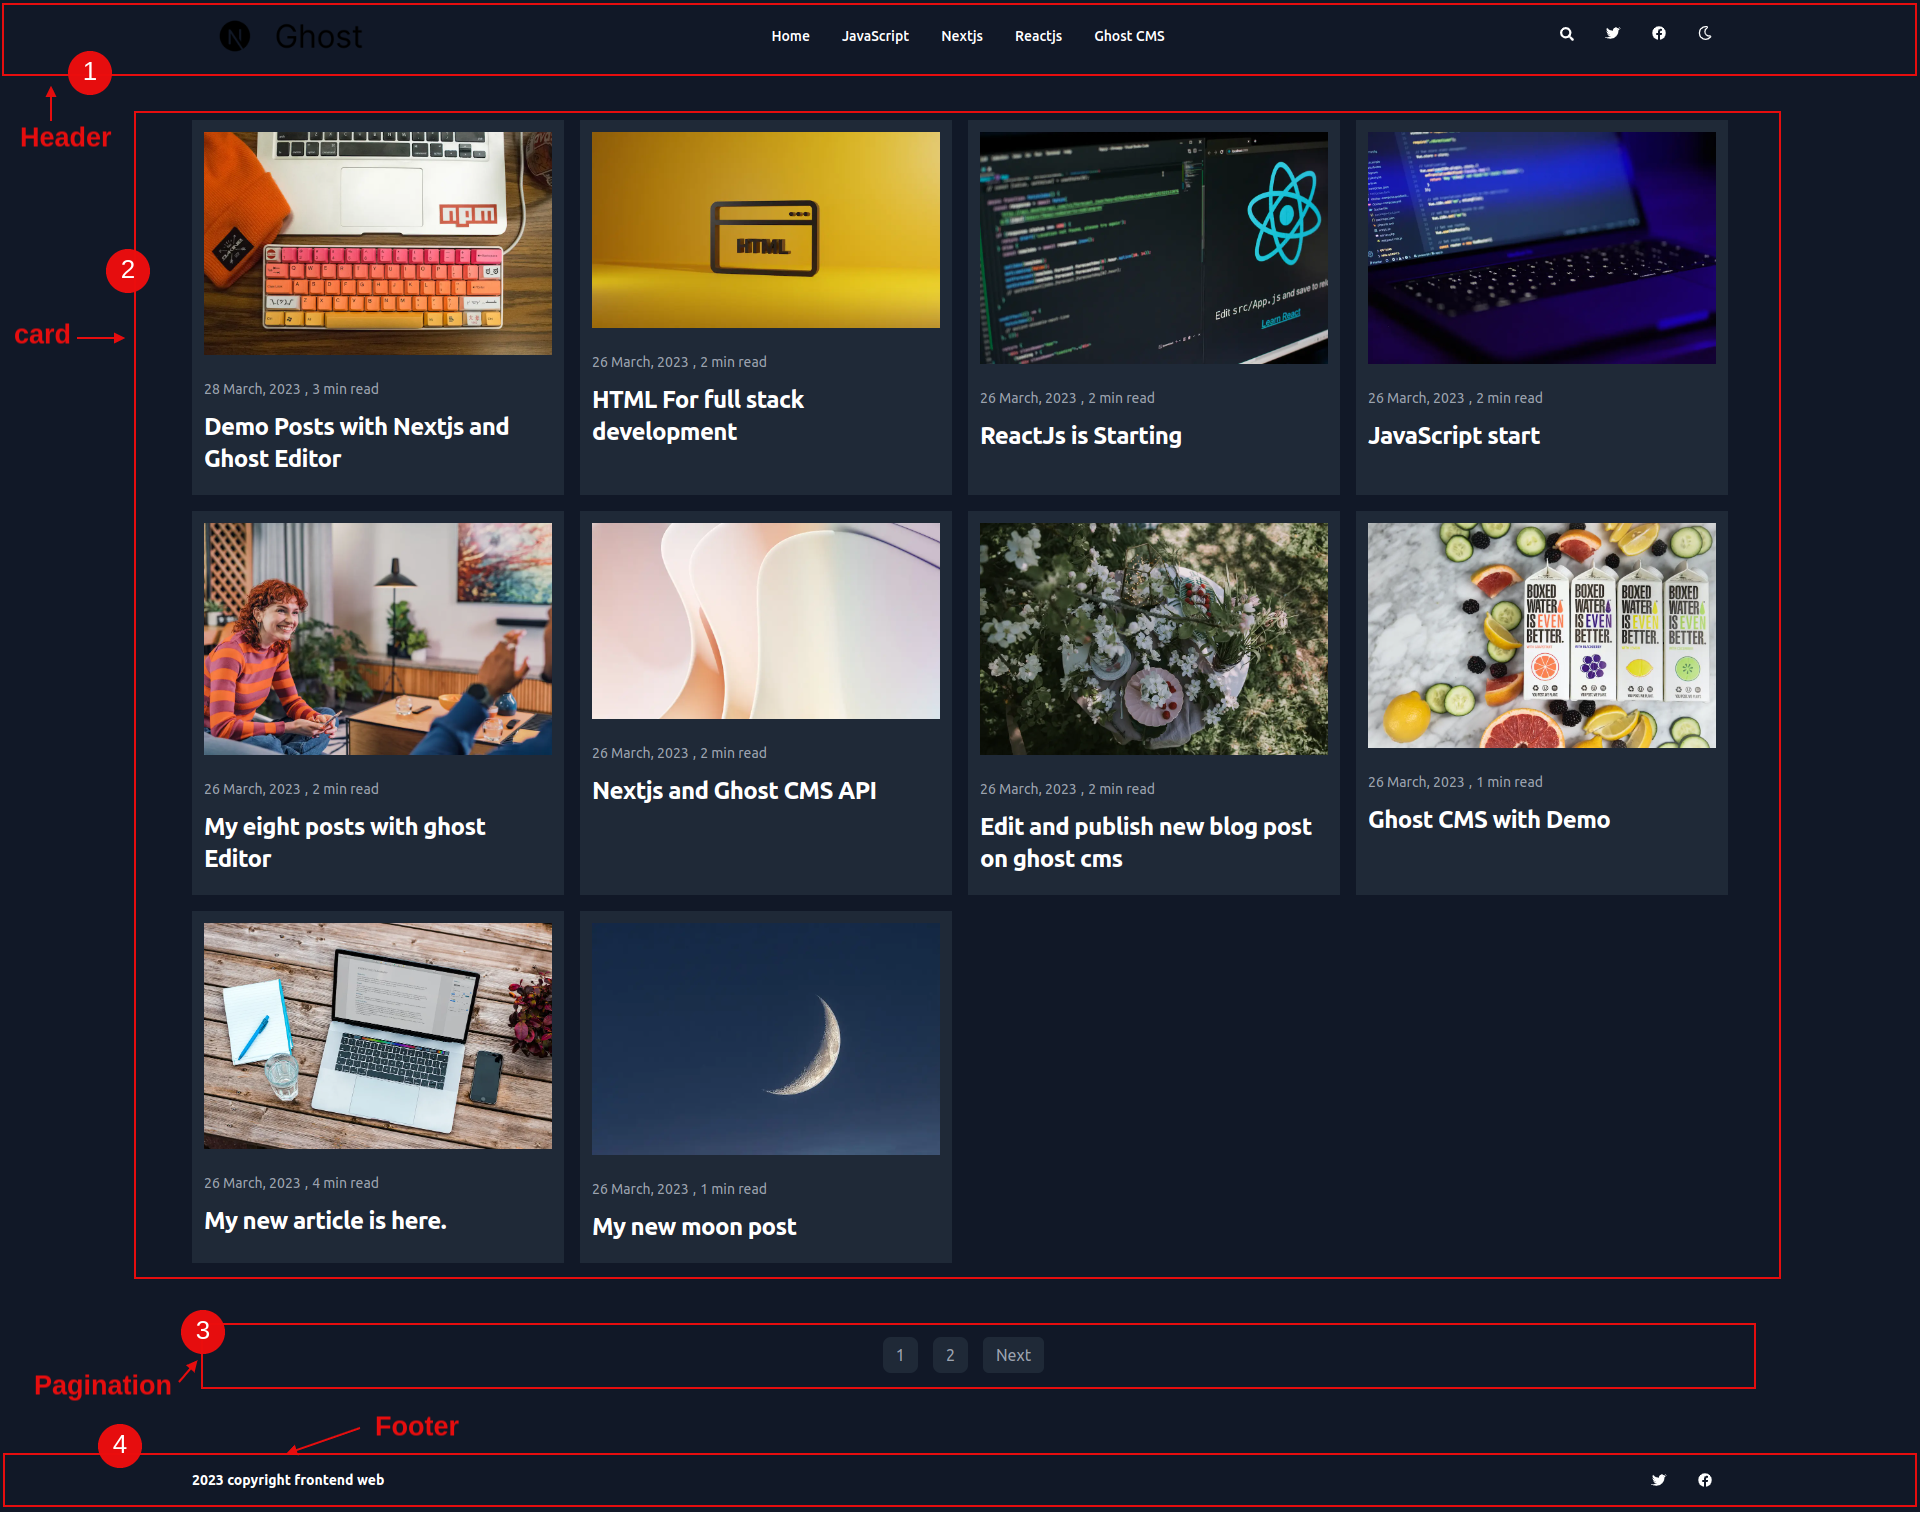
网站的第一个也是最主要的部分是页眉(header)。首先,我们将为我们的演示博客创建一个简单的页眉(header)。我们的页眉最终将看起来像这样:

首先是 logo,接下来是带有各种元素的导航栏(nav),最后是图标部分(icon)。所有的数据都来自 Ghost CMS 的 API。你可以在 Ghost CMS 里面改变东西,而且会反映在网站上。
下面是建立标题组件的代码:
// Header.tsx

import Link from 'next/link';
import SocialIcons from './SocialIcons';
import Image from 'next/image';
import type { Settings } from '@tryghost/content-api';

function Header({ setting }: { setting: Settings }) {
  return (
    <header className="px-2 sm:px-4 py-2.5 dark:bg-gray-900 w-full">
      <div className="container flex flex-wrap items-center justify-between mx-auto">
        {/* Logo for blog */}
        <Link href="/" className="flex items-center">
          {setting.logo !== null ? (
            <Image
              alt={setting.title}
              width={200}
              height={100}
              src={setting.logo}
              className="self-center text-xl font-semibold whitespace-nowrap dark:text-white"
            />
          ) : (
            setting.title
          )}
        </Link>
        <div className="flex md:order-2">
          <ul className="flex flex-wrap p-4 md:space-x-8 md:mt-0 md:text-sm md:font-medium">
            {
              /* Blog Navigation Edit in GHOST CMS  */
              setting.navigation !== undefined
                ? setting?.navigation.map((item) => (
                    <li
                      key={item.label}
                      className="block py-2 pl-3 pr-4 text-gray-700 rounded hover:text-blue-700 dark:hover:text-blue-700 md:p-0 dark:text-white"
                      aria-current="page"
                    >
                      <Link href={item.url}>{item.label}</Link>
                    </li>
                  ))
                : ' '
            }
          </ul>
        </div>
        <SocialIcons setting={setting} />
      </div>
    </header>
  );
}
export default Header;
如何建立页脚(Footer)
页脚(footer)也是博客网站的一个重要部分。它显示你的重要信息和各种有用的链接。

我设计了一个带有版权文本的基本页脚(footer),并为网站添加了社交图标。这些社交图标来自 Ghost CMS 的 API。
// Footer.tsx

import { FaTwitter, FaFacebook } from 'react-icons/fa';
import Link from 'next/link';
import type { Settings } from '@tryghost/content-api';

function Footer({ setting }: { setting: Settings }) {
  return (
    <footer className="px-2 sm:px-4 py-2.5 dark:bg-gray-900 w-full">
      <div className="container flex flex-wrap items-center justify-between mx-auto">
        <Link
          href="https://github.com/frontendweb3"
          className="flex items-center"
        >
          <span className="self-center text-gray-800 text-sm font-semibold whitespace-nowrap dark:text-white">
            2023 copyright frontend web
          </span>
        </Link>

        <div className="flex md:order-2">
          <ul className="flex p-4 flex-row md:space-x-8 md:mt-0 md:text-sm font-medium">
            {setting.twitter !== null ? (
              <li>
                <Link
                  target="_blank"
                  href={`https://twitter.com/${setting.twitter}`}
                  className="block py-2 pl-3 pr-4 text-gray-700 rounded hover:text-blue-700 dark:hover:text-blue-700 md:p-0 dark:text-white"
                  aria-current="page"
                >
                  <FaTwitter />
                </Link>
              </li>
            ) : (
              ' '
            )}

            {setting.facebook !== null ? (
              <li>
                <Link
                  target="_blank"
                  href={`https://www.facebook.com/${setting.facebook}`}
                  className="block py-2 pl-3 pr-4 text-gray-700 rounded hover:text-blue-700 dark:hover:text-blue-700 md:p-0 dark:text-white "
                >
                  <FaFacebook />
                </Link>
              </li>
            ) : (
              ' '
            )}
          </ul>
        </div>
      </div>
    </footer>
  );
}

export default Footer;
如何建立 layout
我为博客设计了一个基本的布局(layout)。为了在 Next.js 中构建布局,有一个特殊的layout.tsx文件。
在创建布局(layout)设计之前,我们需要定义一个getNavigation 函数来从 Ghost 中获取导航和基本的网站相关数据。
// ghost-client.ts

export async function getNavigation() {
  return await api.settings.browse();
}
Fetch
这些数据看起来像这样
{
  title: 'Rajdeep Singh',
  description: 'Thoughts, stories and ideas.',
  logo: 'http://localhost:2368/content/images/2023/04/nextjsandghostlogo-2.png',
  icon: 'http://localhost:2368/content/images/size/w256h256/2023/04/nextjs-60pxx60px.png',
  accent_color: '#d27fa0',
  cover_image: 'https://static.ghost.org/v4.0.0/images/publication-cover.jpg',
  facebook: 'ghost',
  twitter: '@ghost',
  lang: 'en',
  locale: 'en',
  timezone: 'Etc/UTC',
  codeinjection_head: null,
  codeinjection_foot: null,
  navigation: Array(5) [
    { label: 'Home', url: '/' }, { label: 'JavaScript', url: '/tags/javascript/' }, { label: 'Nextjs', url: '/tags/nextjs/' },
    { label: 'Reactjs', url: '/tags/reactjs/' }, { label: 'Ghost CMS', url: '/tags/ghost-cms/' }
  ],
  secondary_navigation: Array(1) [ { label: 'Login', url: '#/portal/' } ],
  meta_title: 'My demo post',
  meta_description:
    'Lorem Ipsum is simply dummy text of the printing and typesetting industry. Lorem Ipsum has been the industry\'s standard dummy text ever since the 1500s, when an unknown printer took a galley of type and scrambled it to make a type specimen book.',
  og_image: null,
  og_title: null,
  og_description:
    'Lorem Ipsum is simply dummy text of the printing and typesetting industry. Lorem Ipsum has been the industry\'s standard dummy text ever since the 1500s, when an unknown printer took a galley of type and scrambled it to make a type specimen book.',
  twitter_image: null,
  twitter_title: null,
  twitter_description:
    'Lorem Ipsum is simply dummy text of the printing and typesetting industry. Lorem Ipsum has been the industry\'s standard dummy text ever since the 1500s, when an unknown printer took a galley of type and scrambled it to make a type specimen book.',
  members_support_address: 'noreply',
  members_enabled: true,
  members_invite_only: false,
  paid_members_enabled: false,
  firstpromoter_account: null,
  portal_button_style: 'icon-and-text',
  portal_button_signup_text: 'Subscribe',
  portal_button_icon: null,
  portal_plans: Array(1) [ 'free' ],
  portal_name: true,
  portal_button: true,
  comments_enabled: 'all',
  url: 'http://localhost:2368/',
  version: '5.39'
}
api.settings.browse()接收的数据
getNavigation函数返回设置数据,然后我们把数据作为 props 传给页眉(header)和页脚(footer)组件。
我们的主文件layout.tsx在服务器端工作。它通过 React use hook 帮助在服务器端获取数据。
// Layout.tsx

import './globals.css';
import BlogLayout from './BlogLayout';
import { getNavigation } from './ghost-client';
import { use } from 'react';
import type { Settings } from '@tryghost/content-api';

interface UpdateSettings extends Settings {
  accent_color?: string;
}

export default function RootLayout({
  children
}: {
  children: React.ReactNode;
}) {
  const settings: UpdateSettings = use(getNavigation());

  return (
    <html className="light" lang="en">
      <body
        style={{
          '--bg-color': settings?.accent_color ? settings.accent_color : ''
        }}
        className={` bg-[--bg-color] dark:bg-gray-900`}
      >
        <BlogLayout setting={settings}>{children}</BlogLayout>
      </body>
    </html>
  );
}
BlogLayout 组件
BlogLayout组件在客户端工作。在 Next.js 应用程序文件夹中,你可以通过以下 use client 的语法轻松地将服务器端的组件转换到客户端。
BlogLayout 组件的目的是包含ThemeProvider、页眉(header)和页脚(footer)。ThemeProvider 是一个高阶组件,它提供额外的功能,比如将主题从深色改为浅色。我们用 ThemeProvider 的高阶组件来包含网站内的内容。在旧页面目录中,我们用 nextjs 中的 _app.ts自定义应用程序实现类似的功能。
ThemeProvider 组件有助于将主题从浅色变为深色模式。
'use client';

// BlogLayout.tsx

import Footer from './Footer';
import Header from './Header';
import { ThemeProvider } from 'next-themes';
import type { Settings } from '@tryghost/content-api';
function Layout({
  setting,
  children
}: {
  setting: Settings;
  children: React.ReactNode;
}) {
  return (
    <ThemeProvider attribute="class">
      <Header setting={setting} />
      {children}
      <Footer setting={setting} />
    </ThemeProvider>
  );
}
export default Layout;
BlogLayout.tsx component
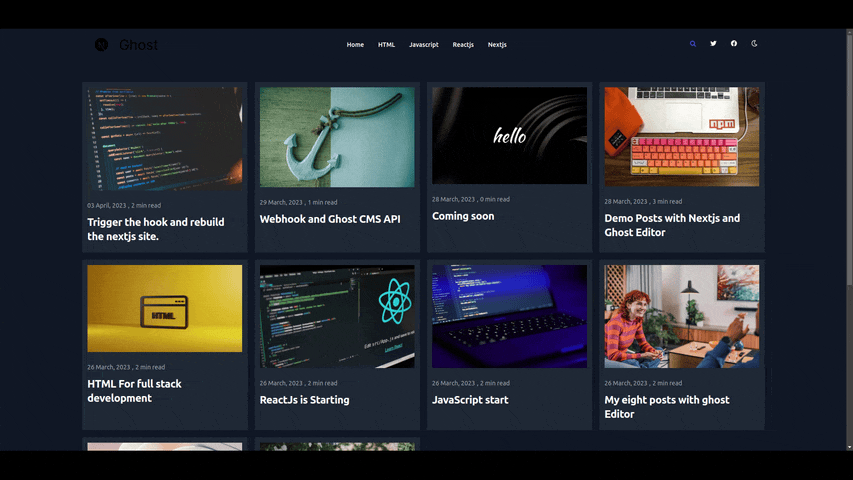
如何建立主页(homepage)
Next.js 有一个特殊的app/page.tsx文件,用于设计和建立主页(home page)。我们的博客网站的主页看起来就像你下面看到的那样。我们在主页(home page)上导入页眉(header)、卡片(card)、分页(pagination)和页脚(footer)。页眉(header)和页脚(footer)是layout.tsx的一部分。
首先,我们在ghost-client.ts文件中定义的getPosts函数的帮助下,从 Ghost CMS 获取所有帖子数据。
// ghost-client.ts

export async function getPosts() {
  return await api.posts
    .browse({
      include: ['tags', 'authors'],
      limit: 10
    })
    .catch((err) => {
      throw new Error(err);
    });
}
api.post.browse()接收的数据
默认情况下,api.post.browse()只返回文章数据,但你可以轻松地扩展它。在每篇文章或帖子数据中,我们还用include的帮助包括标签和作者。然后,我们将文章限制设置为 10 条。
数据看起来像这样
[
{
id: '6422a742136f5d40f37294f5',
uuid: '8c2fcfda-a6e4-4383-893b-ba18511c0f67',
title: 'Demo Posts with Nextjs and Ghost Editor',
slug: 'demo-posts-with-nextjs-and-reactjs',
html: `<p><strong>Lorem Ipsum</strong> is simply dummy text of the printing and typesetting industry. Lorem Ipsum has been the industry's standard dummy text si
nce the 1500s when an unknown printer scrambled a galley of type and scrambled it to make a type specimen book. </p><p>It has survived five centuries and the leap i
nto electronic typesetting, remaining essentially unchanged. </p><p>It was popularised in the 1960s with Letraset sheets containing Lorem Ipsum passages and, more r
ecently, desktop publishing software like Aldus PageMaker, including versions of Lorem Ipsum.</p><figure class="kg-card kg-gallery-card kg-width-wide kg-card-hascap
tion"><div class="kg-gallery-container"><div class="kg-gallery-row"><div class="kg-gallery-image"><img src="http://localhost:2368/content/images/2023/03/Build-and-d
eploy.png" width="1500" height="400" loading="lazy" alt srcset="http://localhost:2368/content/images/size/w600/2023/03/Build-and-deploy.png 600w, http://localhost:2
368/content/images/size/w1000/2023/03/Build-and-deploy.png 1000w, http://localhost:2368/content/images/2023/03/Build-and-deploy.png 1500w" sizes="(min-width: 720px)
720px"></div><div class="kg-gallery-image"><img src="http://localhost:2368/content/images/2023/03/Build-and-deploy-profile-1.png" width="1500" height="400" loading
="lazy" alt srcset="http://localhost:2368/content/images/size/w600/2023/03/Build-and-deploy-profile-1.png 600w, http://localhost:2368/content/images/size/w1000/2023
/03/Build-and-deploy-profile-1.png 1000w, http://localhost:2368/content/images/2023/03/Build-and-deploy-profile-1.png 1500w" sizes="(min-width: 720px) 720px"></div>
</div><div class="kg-gallery-row"><div class="kg-gallery-image"><img src="http://localhost:2368/content/images/2023/03/Build-and-deploy-profile--1--1.png" width="15
00" height="400" loading="lazy" alt srcset="http://localhost:2368/content/images/size/w600/2023/03/Build-and-deploy-profile--1--1.png 600w, http://localhost:2368/co
ntent/images/size/w1000/2023/03/Build-and-deploy-profile--1--1.png 1000w, http://localhost:2368/content/images/2023/03/Build-and-deploy-profile--1--1.png 1500w" siz
es="(min-width: 720px) 720px"></div><div class="kg-gallery-image"><img src="http://localhost:2368/content/images/2023/03/Build--Test-and-Deploy-profile-1.png" width
="1500" height="400" loading="lazy" alt srcset="http://localhost:2368/content/images/size/w600/2023/03/Build--Test-and-Deploy-profile-1.png 600w, http://localhost:2
368/content/images/size/w1000/2023/03/Build--Test-and-Deploy-profile-1.png 1000w, http://localhost:2368/content/images/2023/03/Build--Test-and-Deploy-profile-1.png
1500w" sizes="(min-width: 720px) 720px"></div></div></div><figcaption>Build and deploy</figcaption></figure><h2 id="why-do-we-use-it">Why do we use it?</h2><p>It is
a long-established fact that a reader will be distracted by the readable content of a page when looking at its layout. </p><p>The point of using Lorem Ipsum is tha
t it has a more-or-less normal distribution of letters, as opposed to using 'Content here, content here', making it look like readable English. </p><p>Many desktop
publishing packages and web page editors now use Lorem Ipsum as their default model text, and a search for 'lorem ipsum' will uncover many web sites still in their
infancy. </p><p>Various versions have evolved over the years, sometimes by accident, sometimes on purpose (injected humour and the like).</p><hr><h2 id="where-can-i
-get-some">Where can I get some?</h2><p>There are many variations of passages of Lorem Ipsum available, but the majority have suffered alteration in some form, by i
njected humour, or randomised words which don't look even slightly believable. </p><p>If you are going to use a passage of Lorem Ipsum, you need to be sure there is
n't anything embarrassing hidden in the middle of text. </p><p>All the Lorem Ipsum generators on the Internet tend to repeat predefined chunks as necessary, making
this the first true generator on the Internet. </p><p>It uses a dictionary of over 200 Latin words, combined with a handful of model sentence structures, to generat
e Lorem Ipsum which looks reasonable. </p><p>The generated Lorem Ipsum is therefore always free from repetition, injected humour, or non-characteristic words etc.</
p><div class="kg-card kg-callout-card kg-callout-card-red"><div class="kg-callout-emoji">💡</div><div class="kg-callout-text">My note is here </div></div><p></
p><div class="kg-card kg-header-card kg-width-full kg-size-small kg-style-dark" style data-kg-background-image><h2 class="kg-header-card-header" id="product">Produc
t</h2><h3 class="kg-header-card-subheader" id="my-blog-list">My blog list</h3></div><p></p><figure class="kg-card kg-embed-card kg-card-hascaption"><iframe width="2
00" height="113" src="https://www.youtube.com/embed/_q1K7cybyRk?feature=oembed" frameborder="0" allow="accelerometer; autoplay; clipboard-write; encrypted-media; gy
roscope; picture-in-picture; web-share" allowfullscreen title="Next.js 13.1 Explained!"></iframe><figcaption>youtube</figcaption></figure><hr><figure class="kg-card
kg-embed-card"><blockquote class="twitter-tweet"><p lang="en" dir="ltr">In 2022, we enabled developers to create at the moment of inspiration, now with over 2 mill
ion deployments per week.<br><br>Here's what we shipped ↓ <a href="https://t.co/6k7Xmbpna3?ref=localhost">pic.twitter.com/6k7Xmbpna3</a></p>— Vercel (@ver
cel) <a href="https://twitter.com/vercel/status/1611094825587167254?ref_src=twsrc%5Etfw&ref=localhost">January 5, 2023</a></blockquote>\n` +
'<script async src="https://platform.twitter.com/widgets.js" charset="utf-8"></script>\n' +
'</figure><hr><figure class="kg-card kg-bookmark-card kg-card-hascaption"><a class="kg-bookmark-container" href="https://medium.com/frontendweb/what-is-progre
ssive-web-app-and-how-to-enable-it-in-nextjs-application-17f2e3240390?ref=localhost"><div class="kg-bookmark-content"><div class="kg-bookmark-title">What is Progres
sive Web App and How to enable it in nextjs Application?</div><div class="kg-bookmark-description">A detailed guide to Progressive Web Apps: How to use it with next
js and publish on Google play store, Microsoft store, Meta Quest, and…</div><div class="kg-bookmark-metadata"><img class="kg-bookmark-icon" src="https://cdn-static-
1.medium.com/_/fp/icons/Medium-Avatar-500x500.svg" alt><span class="kg-bookmark-author">FrontEnd web</span><span class="kg-bookmark-publisher">Rajdeep singh</span><
/div></div><div class="kg-bookmark-thumbnail"><img src="https://miro.medium.com/v2/resize:fit:1200/1*yAoHfq4Wm2Bp8DU1Dav29Q.png" alt></div></a><figcaption>Bookmark<
/figcaption></figure><div class="kg-card kg-header-card kg-width-full kg-size-small kg-style-dark" style data-kg-background-image><h2 class="kg-header-card-header"
id="thank-you">Thank you</h2></div>',
comment_id: '6422a742136f5d40f37294f5',
feature_image: 'https://images.unsplash.com/photo-1543966888-7c1dc482a810?crop=entropy&cs=tinysrgb&fit=max&fm=jpg&ixid=MnwxMTc3M3wwfDF8c2VhcmNofDE2fHxqYXZhc2Nya
XB0fGVufDB8fHx8MTY3OTk5MjY1NA&ixlib=rb-4.0.3&q=80&w=2000',
featured: false,
visibility: 'public',
created_at: '2023-03-28T08:37:22.000+00:00',
updated_at: '2023-03-28T08:51:38.000+00:00',
published_at: '2023-03-28T08:50:44.000+00:00',
custom_excerpt: 'It has survived five centuries and the leap into electronic typesetting, remaining essentially unchanged. ',
codeinjection_head: null,
codeinjection_foot: null,
custom_template: null,
canonical_url: null,
tags: [ [Object] ],
authors: [ [Object] ],
primary_author: {
id: '1',
name: 'Rajdeep Singh',
slug: 'rajdeep',
profile_image: 'https://www.gravatar.com/avatar/dafca7497609ae294378279ad1d6136c?s=250&r=x&d=mp',
cover_image: null,
bio: 'Lorem Ipsum is simply dummy text of the printing and typesetting industry. ',
website: 'https://officialrajdeepsingh.dev',
location: 'India',
facebook: 'officialrajdeepsingh',
twitter: '@Official_R_deep',
meta_title: null,
meta_description: null,
url: 'http://localhost:2368/author/rajdeep/'
},
primary_tag: {
id: '6422aa9a136f5d40f3729552',
name: 'demo',
slug: 'demo',
description: null,
feature_image: null,
visibility: 'public',
og_image: null,
og_title: null,
og_description: null,
twitter_image: null,
twitter_title: null,
twitter_description: null,
meta_title: null,
meta_description: null,
codeinjection_head: null,
codeinjection_foot: null,
canonical_url: null,
accent_color: null,
url: 'http://localhost:2368/tag/demo/'
},
url: 'http://localhost:2368/demo-posts-with-nextjs-and-reactjs/',
excerpt: 'It has survived five centuries and the leap into electronic typesetting, remaining essentially unchanged. ',
reading_time: 3,
access: true,
comments: true,
og_image: null,
og_title: null,
og_description: null,
twitter_image: null,
twitter_title: null,
twitter_description: null,
meta_title: null,
meta_description: null,
email_subject: null,
frontmatter: null,
feature_image_alt: 'Demo Posts with Nextjs and Ghost Editor',
feature_image_caption: 'Photo by <a href="https://unsplash.com/@pinjasaur?utm_source=ghost&utm_medium=referral&utm_campaign=api-credit">Paul Esch-Laurent</a> /
<a href="https://unsplash.com/?utm_source=ghost&utm_medium=referral&utm_campaign=api-credit">Unsplash</a>'
},
meta:{
pagination: { page: 1, limit: 10, pages: 2, total: 12, next: 2, prev: null }
}
]
由api.post.browse()接收的数据
现在我们在服务器端调用getPosts函数。它返回所有的帖子数据以及相关的标签和作者。现在你可以用map()函数循环浏览这些数据。
我们将数据传入app/page.tsx到card.tsx组件。我们把文章数据作为 prop 传给卡片组件。
// src/app/page.tsx

import { getPosts } from './ghost-client';
import Card from './Card';

export default async function Home() {
  const getPost = await getPosts();

  return (
    <>
      <main className="container my-12 mx-auto grid grid-cols-1 gap-2 md:gap-3 lg:gap-4 lg:grid-cols-3 md:grid-cols-2 xl:grid-cols-4 2xl:grid-cols-4">
        {getPost?.map((item) => {
          return <Card key={item.uuid} item={item} />;
        })}
      </main>
    </>
  );
}
Design home /app/page.tsx
Card 组件
我为博客设计了一张基本的卡片。卡片组件看起来像这样:

我把来自主页的每项数据都渲染成 prop,并用Card.tsx在网站上显示。
// Card.tsx

import Image from 'next/image';
import Link from 'next/link';
import type { PostOrPage } from '@tryghost/content-api';
import { format } from 'date-fns';

function Card({ item }: { item: PostOrPage }) {
  return (
    <div className="max-w-full bg-white dark:bg-gray-800">
      {item.featured !== null && item.feature_image !== undefined ? (
        <Link href={`/read/${item.slug}`}>
          <Image
            className="rounded-lg p-3"
            width={1000}
            height={324}
            src={item.feature_image}
            alt={item.feature_image_alt || item.title}
          />
        </Link>
      ) : (
        ' '
      )}

      <div className="p-3">
        <div className="flex mb-3">
          {item.published_at !== null && item.published_at !== undefined ? (
            <p className="text-sm text-gray-500 dark:text-gray-400">
              {format(new Date(item.published_at), 'dd MMMM, yyyy')}
            </p>
          ) : (
            ''
          )}
          <p className="text-sm text-gray-500 dark:text-gray-400 mx-1"> , </p>
          <p className="text-sm text-gray-500 dark:text-gray-400">
            {item.reading_time} min read
          </p>
        </div>

        <Link href={`/read/${item.slug}`}>
          <h5 className="mb-2 text-2xl font-bold tracking-tight text-gray-900 dark:text-white">
            {item.title}
          </h5>
        </Link>
      </div>
    </div>
  );
}

export default Card;
-
如何建立阅读页(reading page)
阅读页面(reading page)是博客网站的第二大重要页面。如果人们不能弄清楚如何阅读作者写的东西,这对前端开发者来说是个大问题。
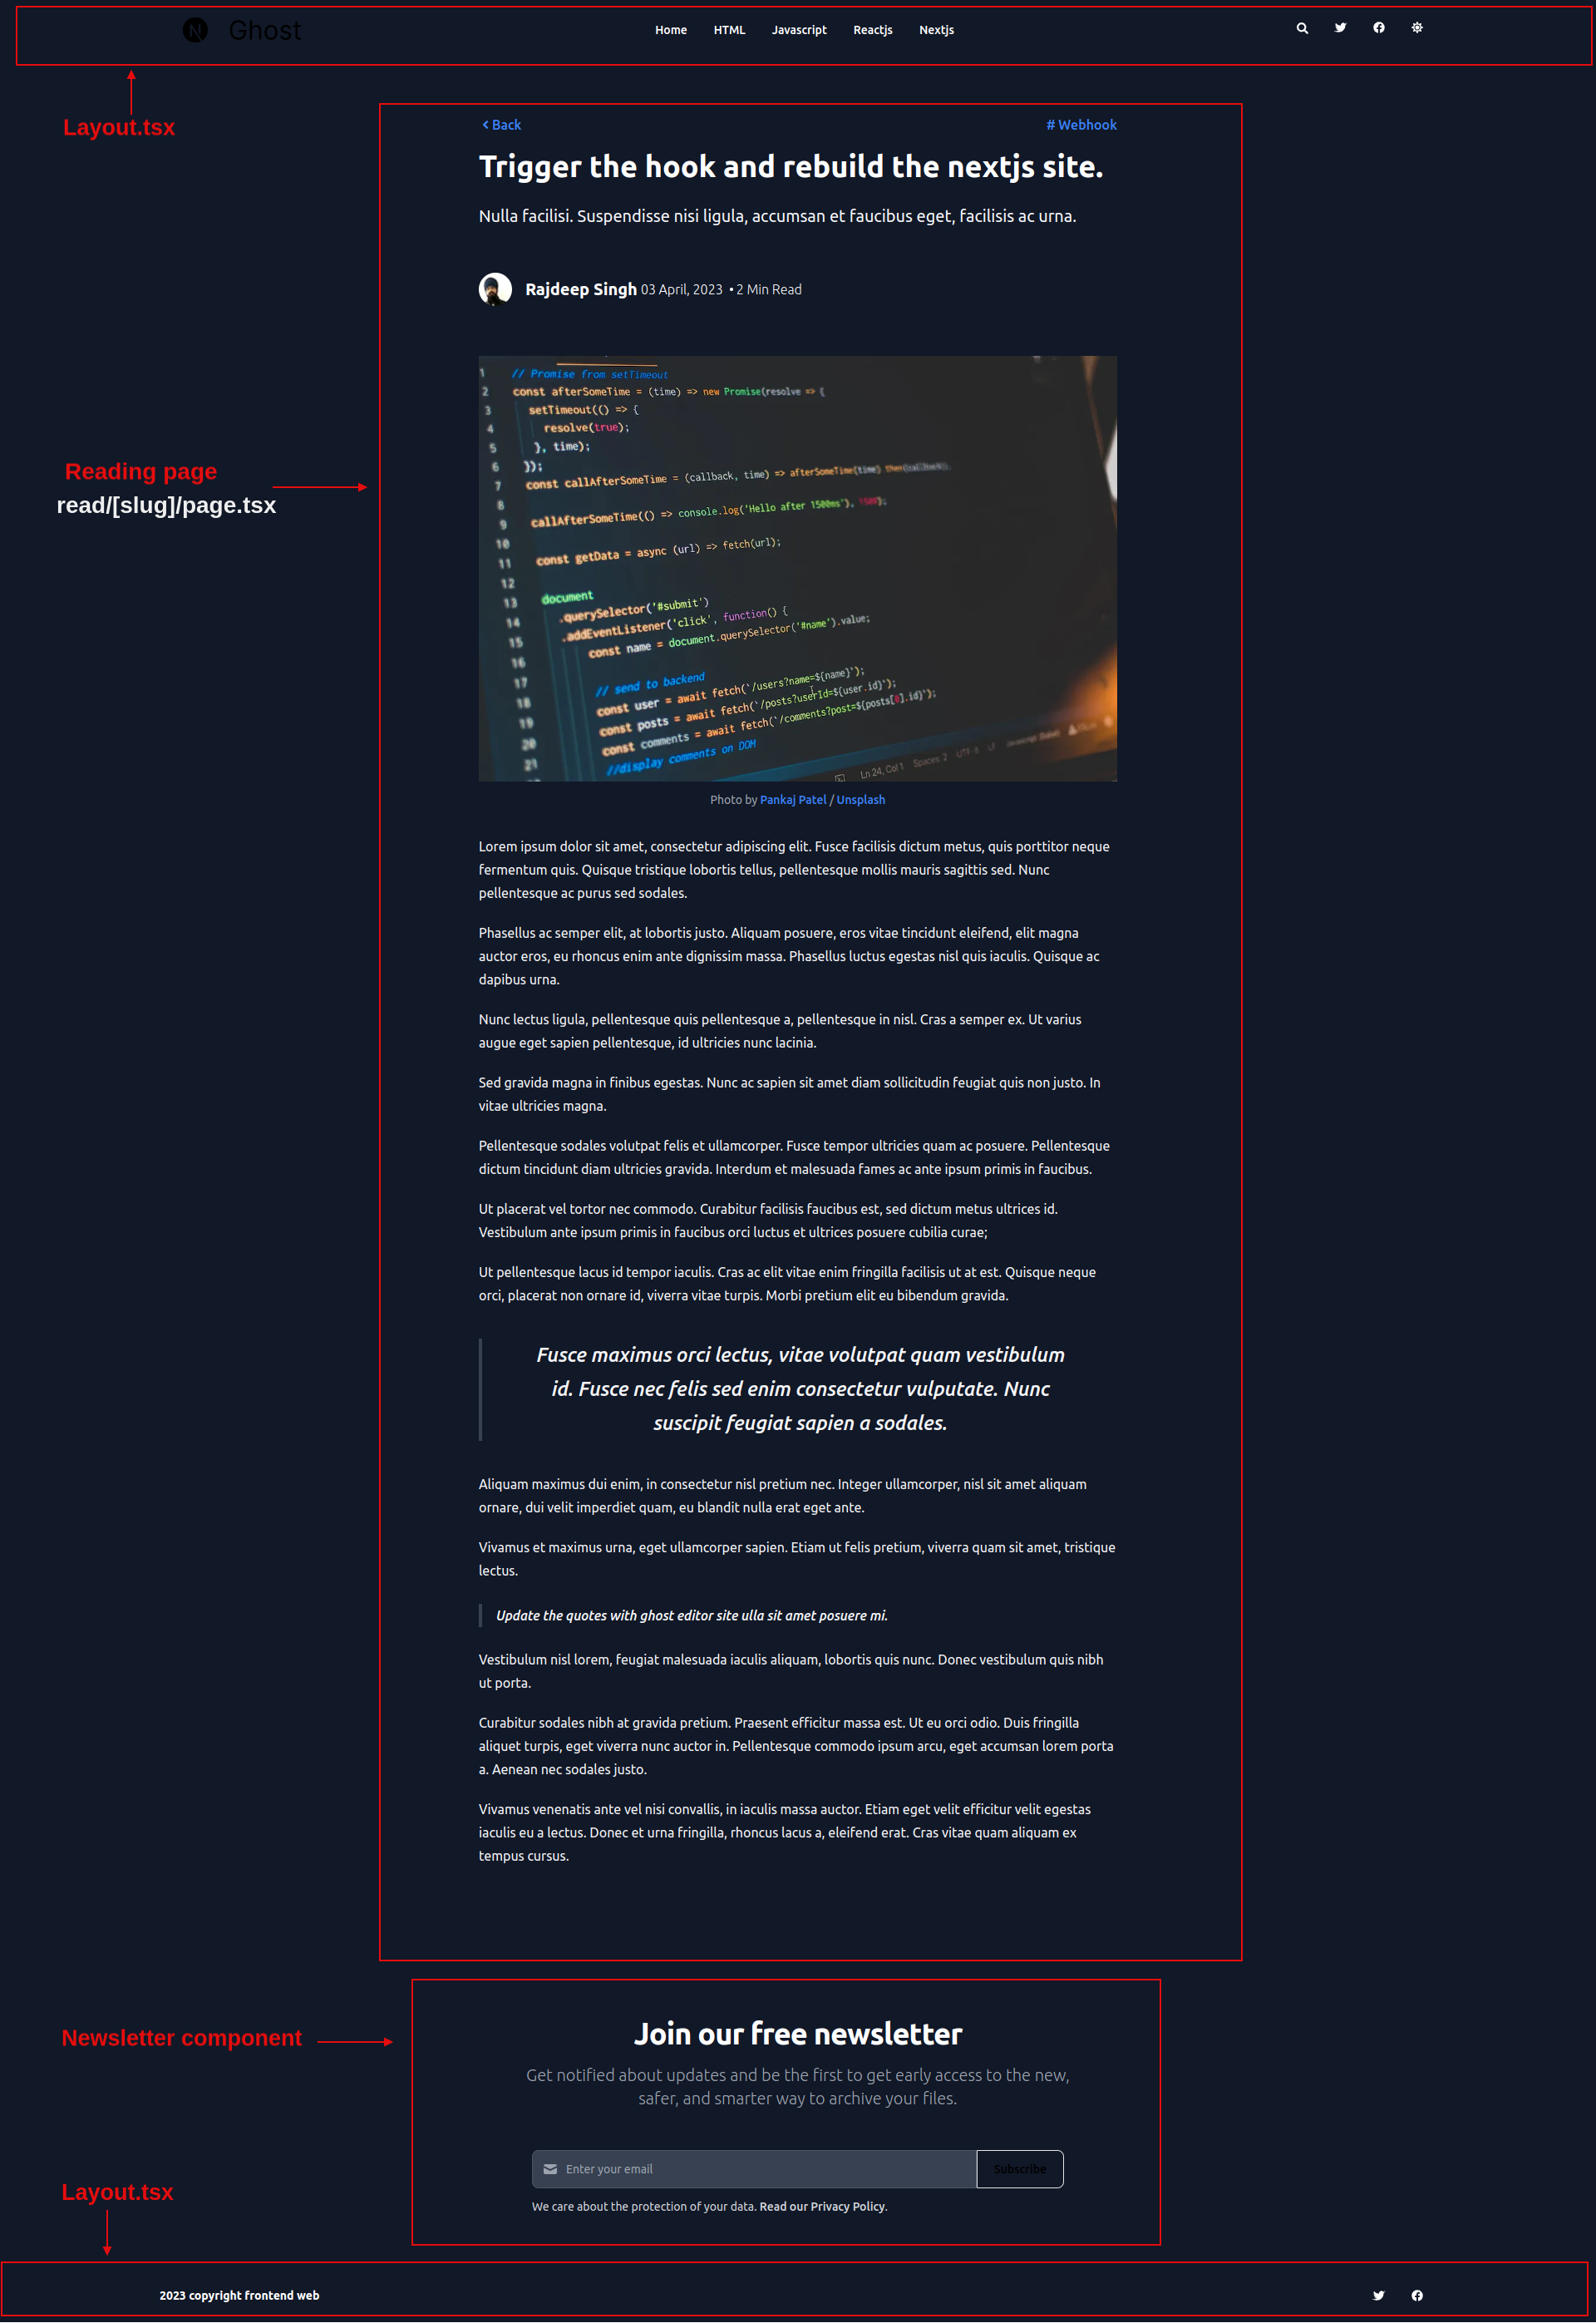
首先,我们从 Ghost CMS 的 API 中获得一篇基于其 slug(一种模板) 的文章。我们用 链接(Link) 组件把它传递给 卡片(Card)组件。
// ghost-client.ts

export async function getSinglePost(postSlug: string) {
  return await api.posts
    .read(
      {
        slug: postSlug
      },
      { include: ['tags', 'authors'] }
    )
    .catch((err) => {
      console.error(err);
    });
}
检索基于 slug 的单个帖子。
getSinglePost(<you-slug>)函数返回单篇文章的数据,你可以在页面上渲染这些数据。
// src/app/read/[slug]/page.tsx

import Newsletter from './Newsletter';
import Link from 'next/link';
import { getSinglePost, getPosts } from '../../ghost-client';
import Image from 'next/image';
// import icon
import { FaAngleLeft } from 'react-icons/fa';

// types for typescript
import type { Metadata } from 'next';
import type { PostOrPage } from '@tryghost/content-api';

// format the date
import { format } from 'date-fns';

// css for card
import '../../cards.min.css';

export async function generateStaticParams() {
  const posts = await getPosts();
  return posts.map((post) => ({
    slug: post.slug
  }));
}

async function Read({ params }: { params: { slug: string } }) {
  const getPost = await getSinglePost(params.slug);

  return (
    <>
      <main className="pt-8 pb-16 lg:pt-16 lg:pb-24 dark:bg-gray-900">
        <div className="flex justify-between px-4 mx-auto max-w-screen-xl ">
          <article className="mx-auto w-full max-w-3xl prose prose-xl prose-p:text-gray-800  dark:prose-p:text-gray-100 sm:prose-base prose-a:no-underline prose-blue dark:prose-invert">
            <div className="flex mb-4 w-full justify-between">
              <Link className="inline-flex items-center" href={`/`}>
                <FaAngleLeft /> Back
              </Link>

              {getPost.primary_tag ? (
                <Link href={`/tags/${getPost?.primary_tag.slug}`}>
                  # {getPost?.primary_tag.name}
                </Link>
              ) : (
                ''
              )}
            </div>

            <h1 className="mb-4 text-3xl font-extrabold leading-tight text-gray-900 lg:mb-6 lg:text-4xl dark:text-white">
              {getPost.title}
            </h1>

            <p className="lead">{getPost.excerpt}</p>

            <header className="mb-4 lg:mb-6 not-format">
              <address className="flex items-center mb-6 not-italic">
                <div className="inline-flex items-center mr-3 text-sm text-gray-900 dark:text-white">
                  <Image
                    width={32}
                    height={32}
                    className="mr-4 w-10 h-10 rounded-full"
                    src={getPost?.primary_author.profile_image}
                    alt={getPost?.primary_author.name}
                  />
                  {getPost.primary_author ? (
                    <Link
                      href={`/authors/${getPost?.primary_author.slug}`}
                      rel="author"
                      className="text-xl font-bold text-gray-800 dark:text-white"
                    >
                      {getPost?.primary_author.name}
                    </Link>
                  ) : (
                    ' '
                  )}

                  {getPost.published_at ? (
                    <time
                      className="text-base font-light text-gray-800 dark:text-white mx-1"
                      dateTime={getPost?.published_at}
                      title={format(
                        new Date(getPost?.published_at),
                        'yyyy-MM-dd'
                      )}
                    >
                      {format(new Date(getPost?.published_at), 'dd MMMM, yyyy')}
                    </time>
                  ) : (
                    ''
                  )}

                  <div className="text-base w-1 h-1 rounded-full bg-black dark:bg-white mx-1"></div>

                  <p className="text-base font-light text-gray-500 dark:text-gray-400">
                    {' '}
                    {getPost.reading_time} Min Read
                  </p>
                </div>
              </address>
            </header>

            <figure>
              <Image
                className="mx-auto"
                width={1000}
                height={250}
                src={getPost.feature_image}
                alt={getPost.feature_image_alt}
              />
              <figcaption
                className="text-center"
                dangerouslySetInnerHTML={{
                  __html: getPost?.feature_image_caption
                }}
              ></figcaption>
            </figure>

            <div dangerouslySetInnerHTML={{ __html: getPost?.html }}></div>
          </article>
        </div>
      </main>
      <Newsletter />
    </>
  );
}
export default Read;
你用dangerouslySetInnerHTML渲染帖子的 HTML 数据。但是你需要写很多 CSS 来处理来自 Ghost CMS API 的动态内容。
为了解决这个问题,我使用了@tailwindcss/typography包。我还从 Ghost 下载了cards.min.css。现在你不需要在你的 Next 应用程序中写一行 CSS 了。
用generateStaticParams函数生成静态网站。之前,我们使用getStaticProps函数。
// ghost-client.ts

export async function generateStaticParams() {
  // fetch All posts

  const posts = await getPosts();

  // return the slug

  return posts.map((post) => ({
    slug: post.slug
  }));
}
为文章阅读页面(reading page)生成静态网站 slug
如何建立阅读页(reading page)
我为博客设计了一个简单的标签页(Tag Page)。标签页显示与所使用的标签(tags)有关的文章。
你也可以创建一个分类页(category)。标签页(Tag pages)和分类页(category pages)使用相同的逻辑和功能。
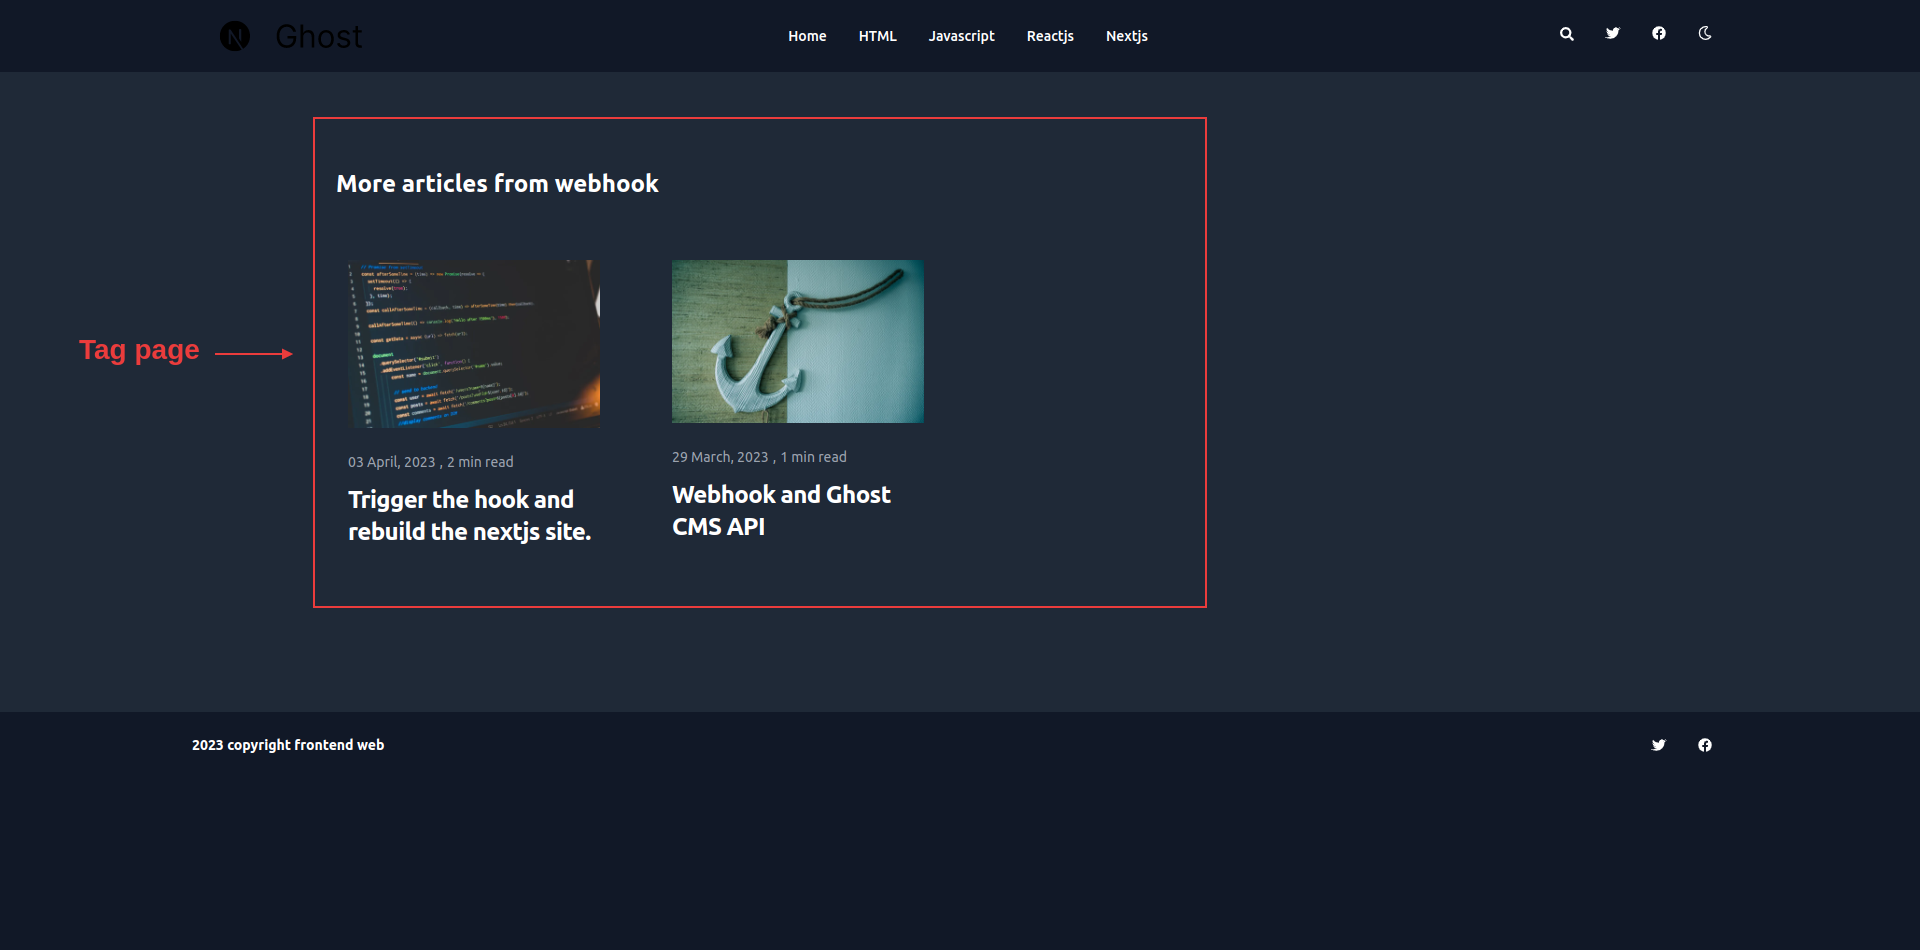
与阅读页(reading page)类似,我们将根据 Ghost CMS API 的标签来获取文章。
// ghost-client.ts

// return all posts realted to tag slug
export async function getTagPosts(tagSlug: string) {
  return await api.posts
    .browse({ filter: `tag:${tagSlug}`, include: 'count.posts' })
    .catch((err) => {
      throw new Error(err);
    });
}

// return all the slugs to build static with generateStaticParams
export async function getAllTags() {
  return await api.tags
    .browse({
      limit: 'all'
    })
    .catch((err) => {
      console.log(err);
    });
}
getTagPosts(<tag-slug>)函数返回所有与特定标签相关的可用帖子。
在用getTagPosts()接收所有帖子后,我们用map()方法渲染所有帖子。
// src/app/tag/[slug]/page.tsx

import React from 'react';
import Card from '../../Card';

import { getTagPosts, getAllTags } from '../../ghost-client';

import { notFound } from 'next/navigation';

import type { PostsOrPages } from '@tryghost/content-api';

export async function generateStaticParams() {
  const allTags: Tags = await getAllTags();

  let allTagsItem: { slug: string }[] = [];

  // genrate the slug for static site

  allTags?.map((item) => {
    allTagsItem.push({
      slug: item.slug
    });
  });

  return allTagsItem;
}

async function Tag({ params }: { params: { slug: string } }) {
  let tagPosts: PostsOrPages = await getTagPosts(params.slug);

  // Handling 404 error

  if (tagPosts.length === 0) {
    notFound();
  }

  return (
    <aside
      aria-label="Related articles"
      className="py-8 lg:py-24 dark:bg-gray-800"
    >
      <div className="px-4 mx-auto max-w-screen-xl">
        <h2 className="mb-8 text-2xl font-bold text-gray-900 dark:text-white">
          More articles from {params.slug.split('-').join(' ')}
        </h2>

        <div className="container my-12 mx-auto grid grid-cols-1 gap-12 md:gap-12 lg:gap-12  lg:grid-cols-3  md:grid-cols-2 xl:grid-cols-4 2xl:grid-cols-4 ">
          {tagPosts.map((item) => (
            <Card key={item.uuid} item={item} />
          ))}
        </div>
      </div>
    </aside>
  );
}

export default Tag;
用generateStaticParams函数生成静态网站。它有助于生成静态构建的 slug。
// ghost-client.ts

export async function getAllTags() {
  return await api.tags
    .browse({
      limit: 'all'
    })
    .catch((err) => {
      console.log(err);
    });
}
为标签页生成静态网站 slug
如何建立作者页(author page)
博客网站的最后一个也是最重要的一个页面是作者页。在这里,读者可以了解更多关于作者的信息。
对于这个演示博客,我为作者设计了一个基本页面。
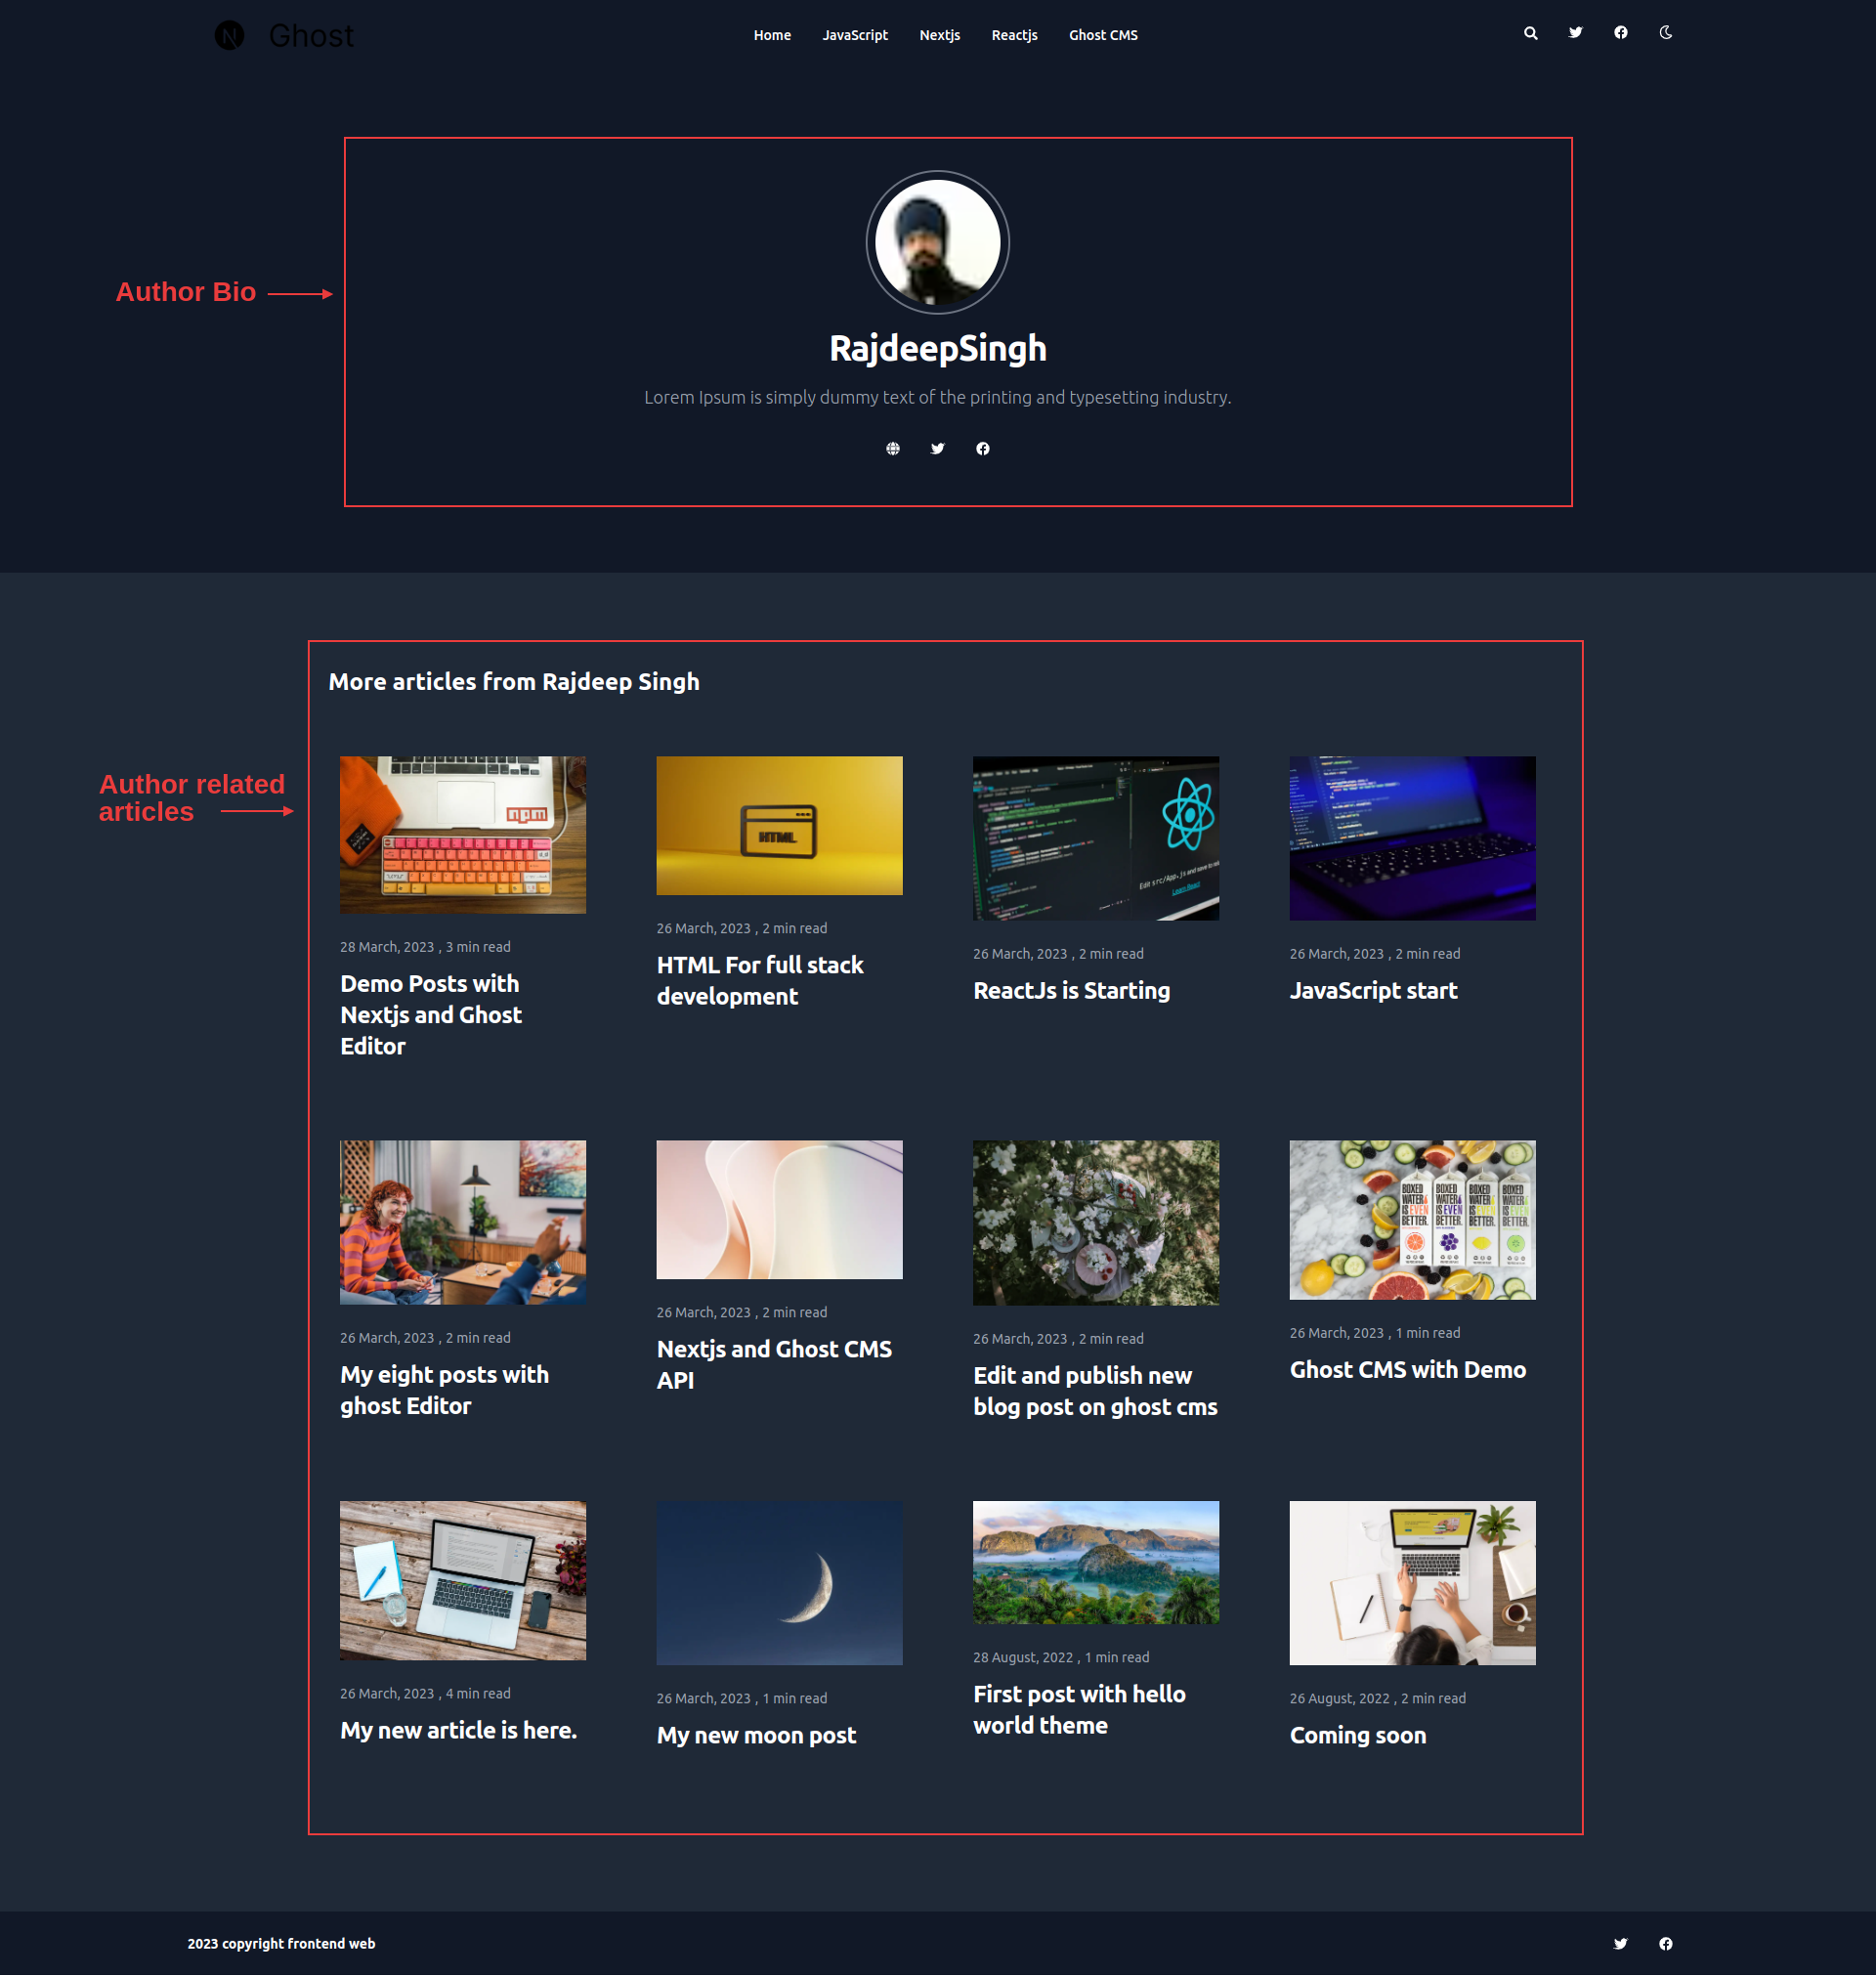
我们将以类似于建立标签页的方式来建立这个页面。首先,我们从 Ghost CMS 的 API 中获取作者的元数据和作者的帖子。
// ghost-client.ts

// get author meta Data

export async function getSingleAuthor(authorSlug: string) {
  return await api.authors
    .read(
      {
        slug: authorSlug
      },
      { include: ['count.posts'] }
    )
    .catch((err) => {
      console.log(err);
    });
}

// get author related posts

export async function getSingleAuthorPosts(authorSlug: string) {
  return await api.posts
    .browse({ filter: `authors:${authorSlug}` })
    .catch((err) => {
      console.log(err);
    });
}

// get All author from Ghost CMS for generateStaticParams

export async function getAllAuthors() {
  return await api.authors
    .browse({
      limit: 'all'
    })
    .catch((err) => {
      throw new Error(err);
    });
}
getSingleAuthor(<author-slug>)根据作者的名字返回单个作者的数据,getSingleAuthorPosts(<author-slug>)函数返回与作者有关的所有帖子。
我们在map()方法的帮助下渲染帖子数据。
// src/app/author/[slug]/page.tsx

import React from 'react';
import Link from 'next/link';
import { FaFacebook, FaTwitter, FaGlobe } from 'react-icons/fa';
import Card from '../../Card';

import {
  getSingleAuthor,
  getSingleAuthorPost,
  getAllAuthors
} from '../../ghost-client';

import Image from 'next/image';
import { notFound } from 'next/navigation';

import type { Author, PostsOrPages } from '@tryghost/content-api';

export async function generateStaticParams() {
  const allAuthor: Author[] = await getAllAuthors();

  let allAuthorItem: { slug: string }[] = [];

  allAuthor.map((item) => {
    allAuthorItem.push({
      slug: item.slug
    });
  });
  return allAuthorItem;
}

async function AuthorPage({ params }: { params: { slug: string } }) {
  const getAuthor: Author = await getSingleAuthor(params.slug);

  const allAuthor: PostsOrPages = await getSingleAuthorPost(params.slug);

  // Handling 404 errors
  if (allAuthor?.length === 0) {
    notFound();
  }

  return (
    <>
      <section className="dark:bg-gray-900">
        <div className="py-8 px-4 mx-auto max-w-screen-xl lg:py-16 lg:px-6">
          <div className=" p-10 text-gray-500 sm:text-lg dark:text-gray-400">
            {getAuthor?.profile_image !== undefined ? (
              <Image
                height={30}
                width={30}
                className="w-36 h-36 p-2 rounded-full mx-auto ring-2 ring-gray-300 dark:ring-gray-500"
                src={getAuthor?.profile_image}
                alt={getAuthor?.name}
              />
            ) : (
              ''
            )}

            {getAuthor?.name ? (
              <h2 className="mb-4 mt-4 text-4xl tracking-tight font-bold text-center text-gray-900 dark:text-white">
                {getAuthor?.name.split(' ')[0]}
                <span className="font-extrabold">
                  {getAuthor?.name?.split(' ')[1]}
                </span>
              </h2>
            ) : (
              ''
            )}

            <p className="mb-4 font-light text-center">{getAuthor?.bio} </p>

            <ul className="flex flex-wrap p-4 justify-center md:space-x-8 md:mt-0 md:text-sm md:font-medium">
              {getAuthor?.website !== null ? (
                <li>
                  <Link
                    href={getAuthor?.website}
                    className="block py-2 pl-3 pr-4 text-gray-700 hover:text-blue-700 dark:hover:text-blue-700 rounded md:p-0 dark:text-white"
                    aria-current="page"
                  >
                    <FaGlobe />
                  </Link>{' '}
                </li>
              ) : (
                ' '
              )}

              {getAuthor?.twitter !== null ? (
                <li>
                  <Link
                    href={getAuthor?.twitter}
                    className="block py-2 pl-3 pr-4 text-gray-700 rounded hover:text-blue-700 dark:hover:text-blue-700 md:p-0 dark:text-white"
                    aria-current="page"
                  >
                    <FaTwitter />
                  </Link>
                </li>
              ) : (
                ' '
              )}

              {getAuthor?.facebook !== null &&
              getAuthor.facebook !== undefined ? (
                <li>
                  <Link
                    href={getAuthor?.facebook}
                    className="block py-2 pl-3 pr-4 text-gray-700 rounded  hover:text-blue-700 dark:hover:text-blue-700 md:p-0 dark:text-white"
                  >
                    {' '}
                    <FaFacebook />
                  </Link>
                </li>
              ) : (
                ' '
              )}
            </ul>
          </div>
        </div>
      </section>

      <aside
        aria-label="Related articles"
        className="py-8 lg:py-24 dark:bg-gray-800"
      >
        <div className="px-4 mx-auto max-w-screen-xl">
          <h2 className="mb-8 text-2xl font-bold text-gray-900 dark:text-white">
            More articles from {getAuthor?.name}
          </h2>

          <div className="container my-12 mx-auto grid grid-cols-1 gap-12 md:gap-12 lg:gap-12  lg:grid-cols-3  md:grid-cols-2 xl:grid-cols-4 2xl:grid-cols-4 ">
            {allAuthor?.map((item) => (
              <Card key={item?.uuid} item={item} />
            ))}
          </div>
        </div>
      </aside>
    </>
  );
}
export default AuthorPage;
为了生成静态网站的作者 slug,我们需要使用generateStaticParams函数。我们不需要其他东西来建立静态网站。
// ghost-client.ts

// Build Static Site

export async function generateStaticParams() {
  const allAuthor: Author[] = await getAllAuthors();

  let allAuthorItem: { slug: string }[] = [];

  allAuthor.map((item) => {
    allAuthorItem.push({
      slug: item.slug
    });
  });
  return allAuthorItem;
}
如何建立作者页(author page)
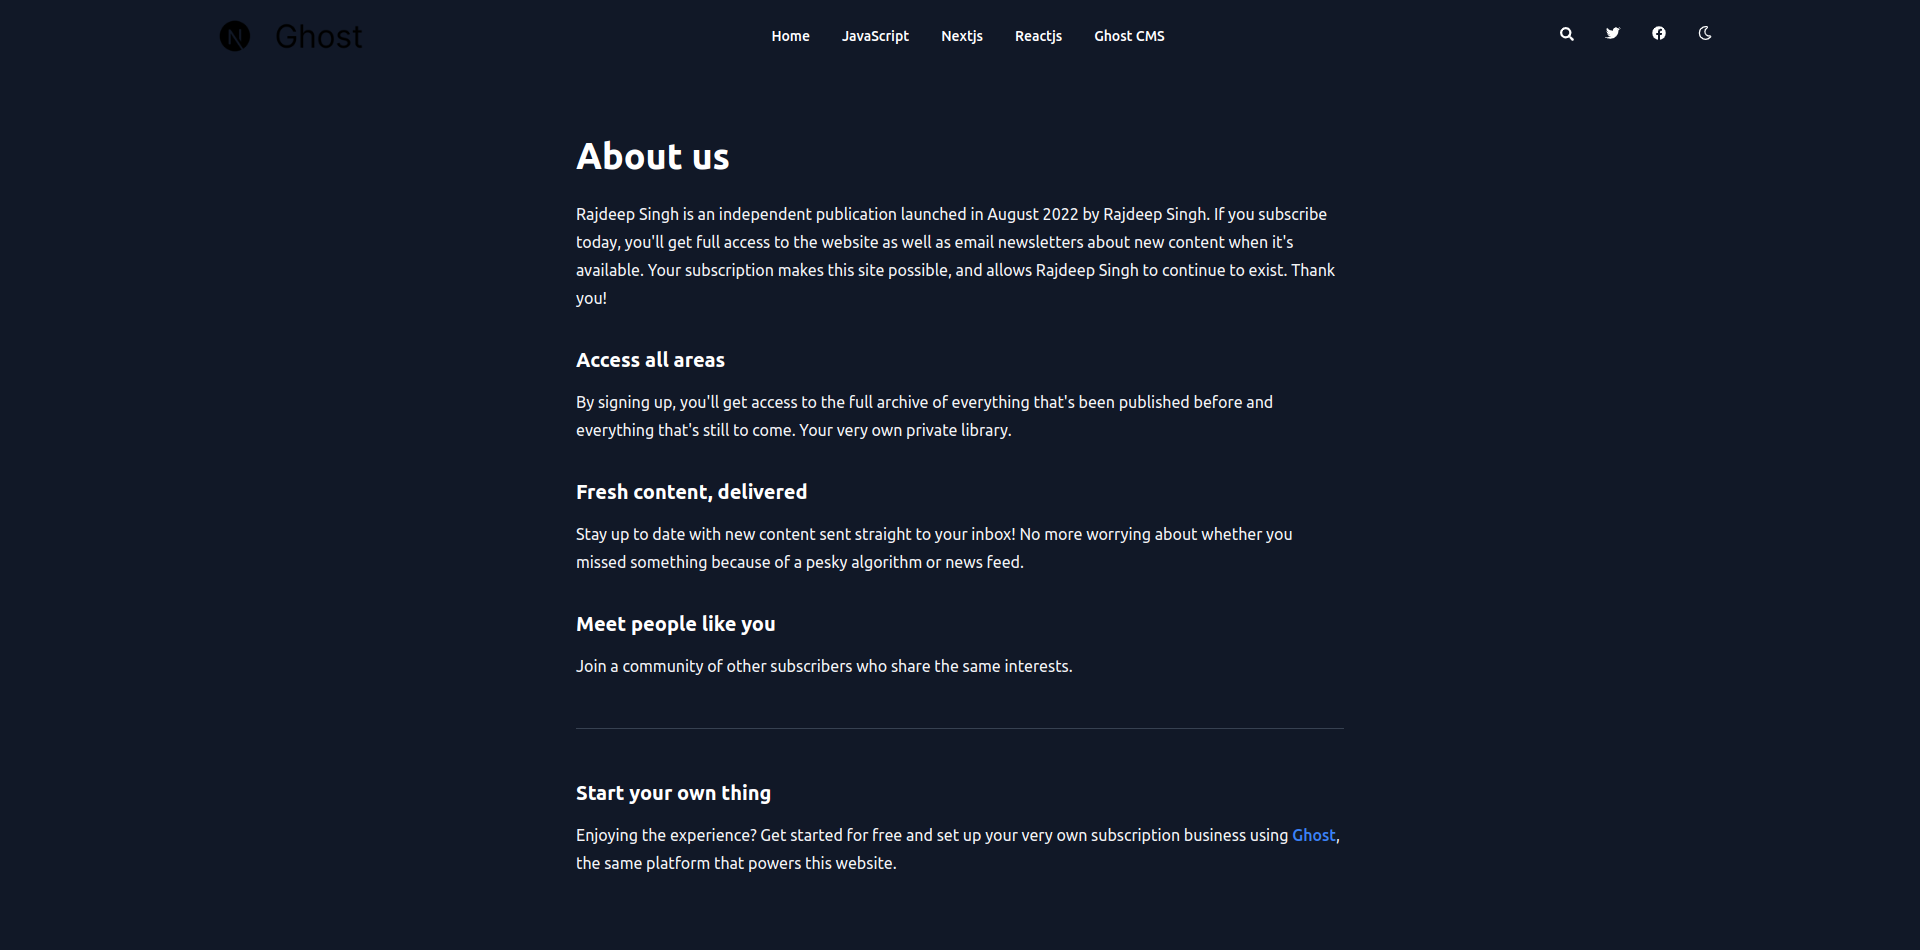
对于像 关于(About)、联系(Contact)、隐私政策(Privacy Policy) 等单页(single page),你也可以用 Ghost Content API 创建它们。
我们的单页设计看起来像这样:
首先,你需要从 Ghost Content API 中获取所有页面和单页的数据。
// ghost-client.tsx

// fetch all pages

export async function getSinglePage(pageSlug: string) {
  return await api.pages
    .read({
      slug: pageSlug
    })
    .catch((err) => {
      console.error(err);
    });
}

// single page data

export async function getSinglePage(pageSlug: string) {
  return await api.pages
    .read(
      {
        slug: pageSlug
      },
      { include: ['tags'] }
    )
    .catch((err) => {
      console.error(err);
    });
}
getSinglePage(page-slug)函数返回基于 slug 页面的单一页面数据,getAllPages()函数返回所有可用的已发布页面数据,以便用generateStaticParams()函数生成动态参数。
// src/app/pages/[slug]/page.tsx

import { getSinglePage, getAllPages } from '../../ghost-client';
import { notFound } from 'next/navigation';
import type { PostOrPage } from '@tryghost/content-api';
import '../../cards.min.css';

// genrate Static slug or params for blog

export async function generateStaticParams() {
  const pages = await getAllPages();

  return pages.map((post) => ({
    slug: post.slug
  }));
}

async function Pages({ params }: { params: { slug: string } }) {
  // fetch single page
  const getPage = await getSinglePage(params.slug);

  // handle 404 error
  if (!getPage) {
    notFound();
  }

  return (
    <>
      <main className="pt-8 pb-16 lg:pt-16 lg:pb-24 dark:bg-gray-900">
        <div className="flex justify-between px-4 mx-auto max-w-screen-xl ">
          <article className="mx-auto w-full max-w-3xl prose prose-xl prose-p:text-gray-800  dark:prose-p:text-gray-100 sm:prose-base prose-a:no-underline prose-blue dark:prose-invert">
            <h1 className="mb-14 text-3xl font-extrabold leading-tight text-gray-900 lg:mb-6 lg:text-4xl dark:text-white">
              {getPage.title}
            </h1>

            <div dangerouslySetInnerHTML={{ __html: getPage?.html }}></div>
          </article>
        </div>
      </main>
    </>
  );
}
export default Pages;
如何处理分页(pagination)
分页(Pagination )有助于加快你的网站访问速度,并将你的网站分成更小的部分,更容易消化的页面。你可以用 prev和 next 将你的文章相互连接起来。
meta:{
    pagination: { page: 1, limit: 10, pages: 2, total: 12, next: 2, prev: null }
 }
next 跳转到下一个页面,prev 跳转到上一个页面
首先,我们将创建一个Pagination.tsx文件作为 React 组件。
// Pagination.tsx

import Link from 'next/link';
import { Pagination } from '@tryghost/content-api';

function PaginationItem({ item }: { item: Pagination }) {
  let paginationItems = [];

  for (let index = 1; index <= item?.pages; index++) {
    paginationItems.push(
      <li key={index * 2}>
        <Link
          href={index === 1 ? '/' : `/pagination/${index}`}
          className="px-3 py-2 leading-tight bg-blue-100 hover:bg-blue-200 border-transparent border rounded-lg text-black dark:bg-gray-800 dark:text-gray-400 mx-2 dark:hover:bg-gray-700 dark:hover:text-white"
        >
          {index}
        </Link>
      </li>
    );
  }

  return (
    <nav aria-label="pagination" className="mx-auto my-20 container">
      <ul className="mx-auto flex justify-center -space-x-px">
        <li>
          {item.prev ? (
            <Link
              href={item.prev === 1 ? '/' : `/pagination/${item.prev}`}
              className="px-3 py-2 mr-2 border border-transparent rounded-md  leading-tight bg-white hover:text-blue-700 dark:bg-gray-800 dark:text-gray-400
              dark:hover:bg-gray-700 dark:hover:text-white"
            >
              Prev
            </Link>
          ) : (
            ' '
          )}
        </li>

        {paginationItems}

        <li>
          {item.next ? (
            <Link
              href={`/pagination/${item.next}`}
              className="px-3 py-2 ml-2 border border-transparent rounded-md leading-tight bg-white hover:text-blue-700 dark:bg-gray-800 dark:text-gray-400
            dark:hover:bg-gray-700 dark:hover:text-white"
            >
              Next
            </Link>
          ) : (
            ' '
          )}
        </li>
      </ul>
    </nav>
  );
}

export default PaginationItem;
当你调用api.post.browse({ limit: 10 })请求时,API 端点会返回十个帖子和一个带有pagination的meta对象。
api.post.browse({ limit: 10 })返回的数据看起来像这样
 [
  {title: 'Demo Posts with Nextjs and Ghost Editor',... },
  {title: Trigger the hook and rebuild the nextjs site',... }

meta:{
    pagination: { page: 1, limit: 10, pages: 2, total: 12, next: 2, prev: null }
  }
]
api.posts.browse({ limit: 10 })
现在基于meta,我们可以创建分页,并将meta.pagination作为 prop 传递给Pagination组件。
// src/app/page.tsx

import { getPosts } from './ghost-client';
import Pagination from './Pagination';

export default async function Home() {
  const getPost = await getPosts();

  const AllPostForSerach = await getSearchPosts();

  return (
    <>
      {/* rest of code  */}
      <Pagination item={getPost.meta.pagination} />
    </>
  );
}
为了启用动态分页(dynamic pagination),我们将在博客中创建一个src/app/pagination/[item]/page.tsx路由。你可以为分页路由(pagination route)使用任何你想要的名字。
// ghost-client.tsx

// return all posts for generateStaticParams

export async function getPosts() {
  return await api.posts
    .browse({
      include: ['tags', 'authors'],
      limit: 10
    })
    .catch((err) => {
      throw new Error(err);
    });
}

//
export async function getPaginationPosts(page: number) {
  return await api.posts
    .browse({
      include: ['tags', 'authors'],
      limit: 10,
      page: page
    })
    .catch((err) => {
      throw new Error(err);
    });
}
getPosts是用来渲染分页上的Pagination组件。重要的部分是getPaginationPosts(<pagination-page-number>)函数,它根据分页的页码返回帖子。
// src/app/pagination/[item]/page.tsx

import { getPaginationPosts, getPosts } from '../../ghost-client';
import Card from '../../Card';
import PaginationItem from '../../Pagination';
import type { Metadata } from 'next';
import type { PostsOrPages } from '@tryghost/content-api';

export async function generateStaticParams() {
  const posts: PostsOrPages = await getPosts();

  let paginationItem: { item: number }[] = [];

  for (let index = 1; index <= posts?.meta.pagination.pages; index++) {
    paginationItem.push({
      item: index
    });
  }

  return paginationItem;
}

export default async function Pagination({
  params
}: {
  params: { item: string };
}) {
  let getParams: number = Number.parseInt(params.item);

  const getPost: PostsOrPages = await getPaginationPosts(getParams);

  return (
    <>
      <main className="container my-12 mx-auto grid grid-cols-1 gap-2 md:gap-3 lg:gap-4 lg:grid-cols-3 md:grid-cols-2 xl:grid-cols-4 2xl:grid-cols-4">
        {getPost?.map((item) => {
          return <Card key={item.uuid} item={item} />;
        })}
      </main>

      <PaginationItem item={getPost.meta.pagination} />
    </>
  );
}
use
Next.js SEO
如果你是一个博主,你知道 SEO 在帮助人们找到你的博客和你的文章方面是多么重要。对于 SEO,Next.js 提供了一个generateMetadata功能,为你的网站生成动态 SEO 元数据。这意味着你不需要任何额外的包来进行 SEO。
在这个例子中,我将解释如何为博客只在主页和阅读页上启用 SEO。你可以使用同样的逻辑在你的任何其他页面上启用它。
首先,让我们看看如何在主页上启用 SEO:
// ghost-client.ts

// Get you settings meta data from Ghost CMS
export async function getNavigation() {
  return await api.settings.browse();
}
// src/app/page.tsx

import { getNavigation } from './ghost-client';

export async function generateMetadata(): Promise<Metadata> {
  const Metadata = await getNavigation();
  return {
    title: Metadata.title,
    description: Metadata.description,
    keywords: ['Next.js', 'React', 'JavaScript']
  };
}
现在我们来看看如何在阅读页(reading page)上启用 SEO:
// ghost-client.ts

export async function getSinglePost(postSlug: string) {
  return await api.posts
    .read(
      {
        slug: postSlug
      },
      { include: ['tags', 'authors'] }
    )
    .catch((err) => {
      console.error(err);
    });
}
generateMetadata有 params prop,可以帮助访问 slug。然后,基于 slug,我们获得数据并返回。
export async function generateMetadata({
  params
}: {
  params: { slug: string };
}): Promise<Metadata> {
  const metaData: PostOrPage = await getSinglePost(params.slug);

  let tags = metaData?.tags.map((item) => item.name);

  return {
    title: metaData.title,
    description: metaData.description,
    keywords: tags,
    openGraph: {
      title: metaData.title,
      description: metaData.excpet,
      url: metaData.url,
      keywords: tags,
      images: [
        {
          url: metaData.feature_image
        }
      ],
      locale: metaData.locale,
      type: 'website'
    }
  };
}
如何开启搜索
在静态博客上启用搜索是很难从头做起的。相反,你可以使用第三方的 Node 页面,如 Orama 或 Flex search。
对于我们的演示,我们创建了一个非常简单的搜索栏功能,无需安装任何额外的软件包。
首先,我们从 Ghost CMS 的 API 中获取所有帖子。
// ghost-client.ts

export async function getSearchPosts() {
  return await api.posts.browse({ limit: "all"}).catch(err => {
    console.log(err)
  });
在我们用JSON.stringify()的帮助下将其转换为字符串后,我们再创建一个新的search.json文件。在每次请求时,它都会更新或重写我们的search.json文件。
// src/app/page.tsx

import { getSearchPosts } from './ghost-client';
import * as fs from 'node:fs';

export default async function Home() {
  // get All posts for search
  const AllPostForSerach = await getSearchPosts();

  // Enable getSearch

  try {
    const jsonString = JSON.stringify(AllPostForSerach);

    fs.writeFile('search.json', jsonString, 'utf8', (err) => {
      if (err) {
        console.log('Error writing file', err);
      } else {
        console.log('Successfully wrote file');
      }
    });
  } catch (error) {
    console.log('error : ', error);
  }

  return (
    <>
      <main className="container my-12 mx-auto grid grid-cols-1 gap-2 md:gap-3 lg:gap-4 lg:grid-cols-3 md:grid-cols-2 xl:grid-cols-4 2xl:grid-cols-4">
        {/* rest code... */}
      </main>
    </>
  );
}
当你在搜索输入中输入文本时,根据文本查询,我们比较查询或文本在search.json文件的数据。如果它与查询的文章标题相匹配,那么我们就存储searchPost变量,最后我们在searchPost变量页面呈现存储的数据。
'use client';

import React, { useEffect, useState } from 'react';
import * as Popover from '@radix-ui/react-popover';
import { FaSearch } from 'react-icons/fa';
import Link from 'next/link';
import searchData from '../../search.json';
import type { PostOrPage } from '@tryghost/content-api';

let searchPost: PostOrPage[] = [];

function Search() {
  const [query, setQuery] = useState(null);

  useEffect(() => {
    searchPost.length = 0;

    searchData.map((item: PostOrPage) => {
      if (
        item?.title.trim().toLowerCase().includes(query?.trim().toLowerCase())
      ) {
        searchPost.push(item);
      }
    });
  }, [query]);

  return (
    <Popover.Root>
      <Popover.Trigger asChild>
        <button className="cursor-pointer outline-none" aria-label="Search">
          <FaSearch />
        </button>
      </Popover.Trigger>

      <Popover.Portal>
        <Popover.Content
          className="rounded p-2 bg-white dark:bg-gray-800 w-[480px] will-change-[transform,opacity] data-[state=open]:data-[side=top]:animate-slideDownAndFade data-[state=open]:data-[side=right]:animate-slideLeftAndFade data-[state=open]:data-[side=bottom]:animate-slideUpAndFade data-[state=open]:data-[side=left]:animate-slideRightAndFade"
          sideOffset={5}
        >
          <div className="my-2">
            <label
              htmlFor="default-search"
              className="mb-2 mt-5 text-sm font-medium text-gray-900 sr-only dark:text-white"
            >
              Search bar{' '}
            </label>
            <div className="relative">
              <div className="absolute inset-y-0 left-0 flex items-center pl-3 pointer-events-none">
                <svg
                  className="w-5 h-5 text-gray-500 dark:text-gray-400"
                  fill="none"
                  stroke="currentColor"
                  viewBox="0 0 24 24"
                  xmlns="http://www.w3.org/2000/svg"
                >
                  <path
                    strokeLinecap="round"
                    strokeLinejoin="round"
                    strokeWidth="2"
                    d="M21 21l-6-6m2-5a7 7 0 11-14 0 7 7 0 0114 0z"
                  ></path>
                </svg>
              </div>
              <input
                type="search"
                id="default-search"
                onChange={(event) => setQuery(event?.target.value)}
                className="block w-full p-4 pl-10 text-sm text-gray-900 border border-gray-300 rounded-lg bg-gray-50 focus:ring-blue-500 focus:border-blue-500 dark:bg-gray-700 dark:border-gray-600 dark:placeholder-gray-400 dark:text-white dark:focus:ring-blue-500 dark:focus:border-blue-500"
                placeholder="Start searching here ..."
                required
              />
            </div>
          </div>

          {serachPost.length > 0
            ? serachPost.map((item) => {
                return (
                  <div key={item.uuid} className="my-3">
                    <div className="text-white my-2 py-2 bg-blue-400 dark:bg-gray-900 dark:hover:bg-blue-400 border-none rounded-md dark:text-white">
                      <Link
                        href={`read/${item.slug}`}
                        className="relative inline-flex items-center rounded-lg w-full px-4 py-2 text-sm font-medium"
                      >
                        {item.title}
                      </Link>
                    </div>
                  </div>
                );
              })
            : ' '}
        </Popover.Content>
      </Popover.Portal>
    </Popover.Root>
  );
}

export default Search;
如何开启搜索
Next.js 有两种类型的 错误处理。第一种是基于布局,第二种是 全局错误 处理。对于这里的演示,我们将使用基于布局的错误处理。
Next 提供一个特殊类型的error.tsx文件来处理你网站上的错误。它不处理 404,500 等,它只处理运行时错误。
'use client'; // Error components must be Client components
import React from 'react';
import { useEffect } from 'react';
import Link from 'next/link';
export default function Error({
  error,
  reset
}: {
  error: Error;
  reset: () => void;
}) {
  useEffect(() => {
    console.error(error);
  }, [error]);

  return (
    <section className="dark:bg-gray-900 my-16">
      <div className="py-8 px-4 mx-auto max-w-screen-xl lg:py-16 lg:px-6">
        <div className="mx-auto max-w-screen-sm text-center">
          <h1 className="mb-4 text-7xl tracking-tight font-extrabold lg:text-9xl text-primary-600 dark:text-primary-500">
            Something wrong
          </h1>
          <p className="mb-4 text-lg p-2 font-light bg-red-500 text-white dark:bg-red-400 dark:text-white">
            {error.message}
          </p>

          <div className="flex justify-around mt-2">
            <Link
              href="#"
              className="inline-flex bg-gray-600 text-white hover:bg-gray-700 focus:ring-4 font-medium rounded-lg text-sm p-2
                text-center"
            >
              Back to Homepage
            </Link>

            <button
              className="bg-gray-600 text-white rounded-lg p-2"
              onClick={() => reset()}
            >
              Try again
            </button>
          </div>
        </div>
      </div>
    </section>
  );
}
如何处理 404 错误
为了处理 Next.js 应用程序文件夹中的 404 错误,你需要在你的文件夹最顶层创建一个not-found.tsx文件。
我们的 404 文件看起来像这样:
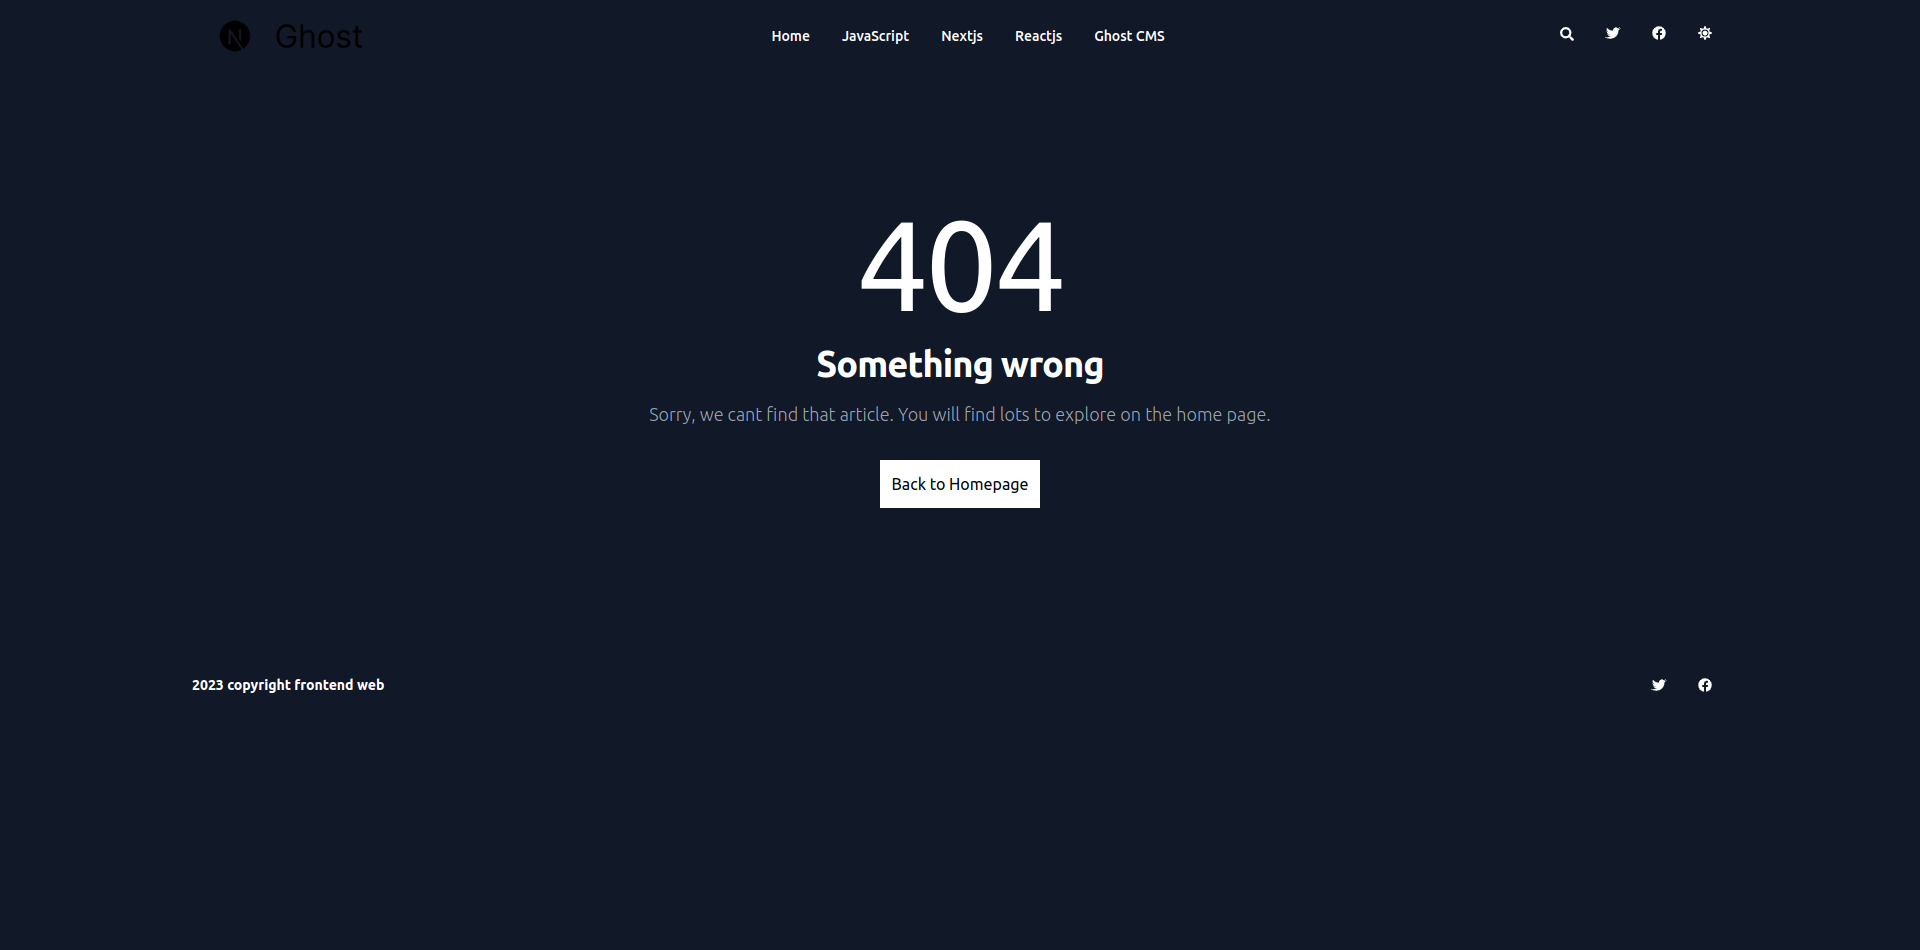
以下是相关代码:
import Link from 'next/link';

function NotFound() {
  return (
    <section className="bg-white dark:bg-gray-900 my-16">
      <div className="py-8 px-4 mx-auto max-w-screen-xl lg:py-16 lg:px-6">
        <div className="mx-auto max-w-screen-sm text-center">
          <h1 className="mb-4 text-7xl tracking-tight lg:text-9xl text-primary-600 dark:text-primary-500">
            404
          </h1>
          <p className="mb-4 text-3xl tracking-tight font-bold text-gray-900 md:text-4xl dark:text-white">
            {' '}
            Something wrong
          </p>
          <p className="mb-4 text-lg font-light text-gray-500 dark:text-gray-400">
            Sorry, we cant find that article. You will find lots to explore on
            the home page.
          </p>
          <Link
            href="/"
            className="inline-flex text-white bg-black dark:bg-white dark:text-black p-3 hover:bg-gray-800 my-4"
          >
            Back to Homepage
          </Link>
        </div>
      </div>
    </section>
  );
}

export default NotFound;
not-found.tsx错误文件的问题是它在 Next(v13.3.0)中不能自动显示。要显示 404 错误,你需要手动显示该错误。这里是你如何做的:
import { notFound } from 'next/navigation';

async function Read({ params }: { params: { slug: string } }) {
  const getPost = await getSinglePost(params.slug);

  // if not found getPost, then show 404 error

  if (!getPost) {
    notFound();
  }

  return (
    <main className="pt-8 pb-16 lg:pt-16 lg:pb-24 dark:bg-gray-900">
      rest of code ....
    </main>
  );
}
如何用 webhooks 重新构建你的静态网站
当你创建一个静态网站时,最大的问题发生在有人在 Ghost 中写了一个新的帖子或改变了一个现有的帖子。对于一个个人项目,你可以手动重新部署你的网站。但对于一个较大的网站来说,你不可能在每次发生这种情况时都这样做。
最好的解决办法是使用 webhooks。Ghost 提供 webhook 支持。如果你更新一个现有的帖子或写一个新的帖子,它就会在 Ghost 中更新。
在演示项目中,我们使用 Vercel webhooks 来部署我们的博客。当我们创建一个新的博客或更新网站上的东西时,Ghost 会触发 Vercel webhook。然后 Vercel 根据需要重建网站。
你不需要为这个写代码,只要跟着你的思路,边走边复制粘贴。
如何从 Vercel 获得 webhook
首先,进入 Vercel 仪表板。
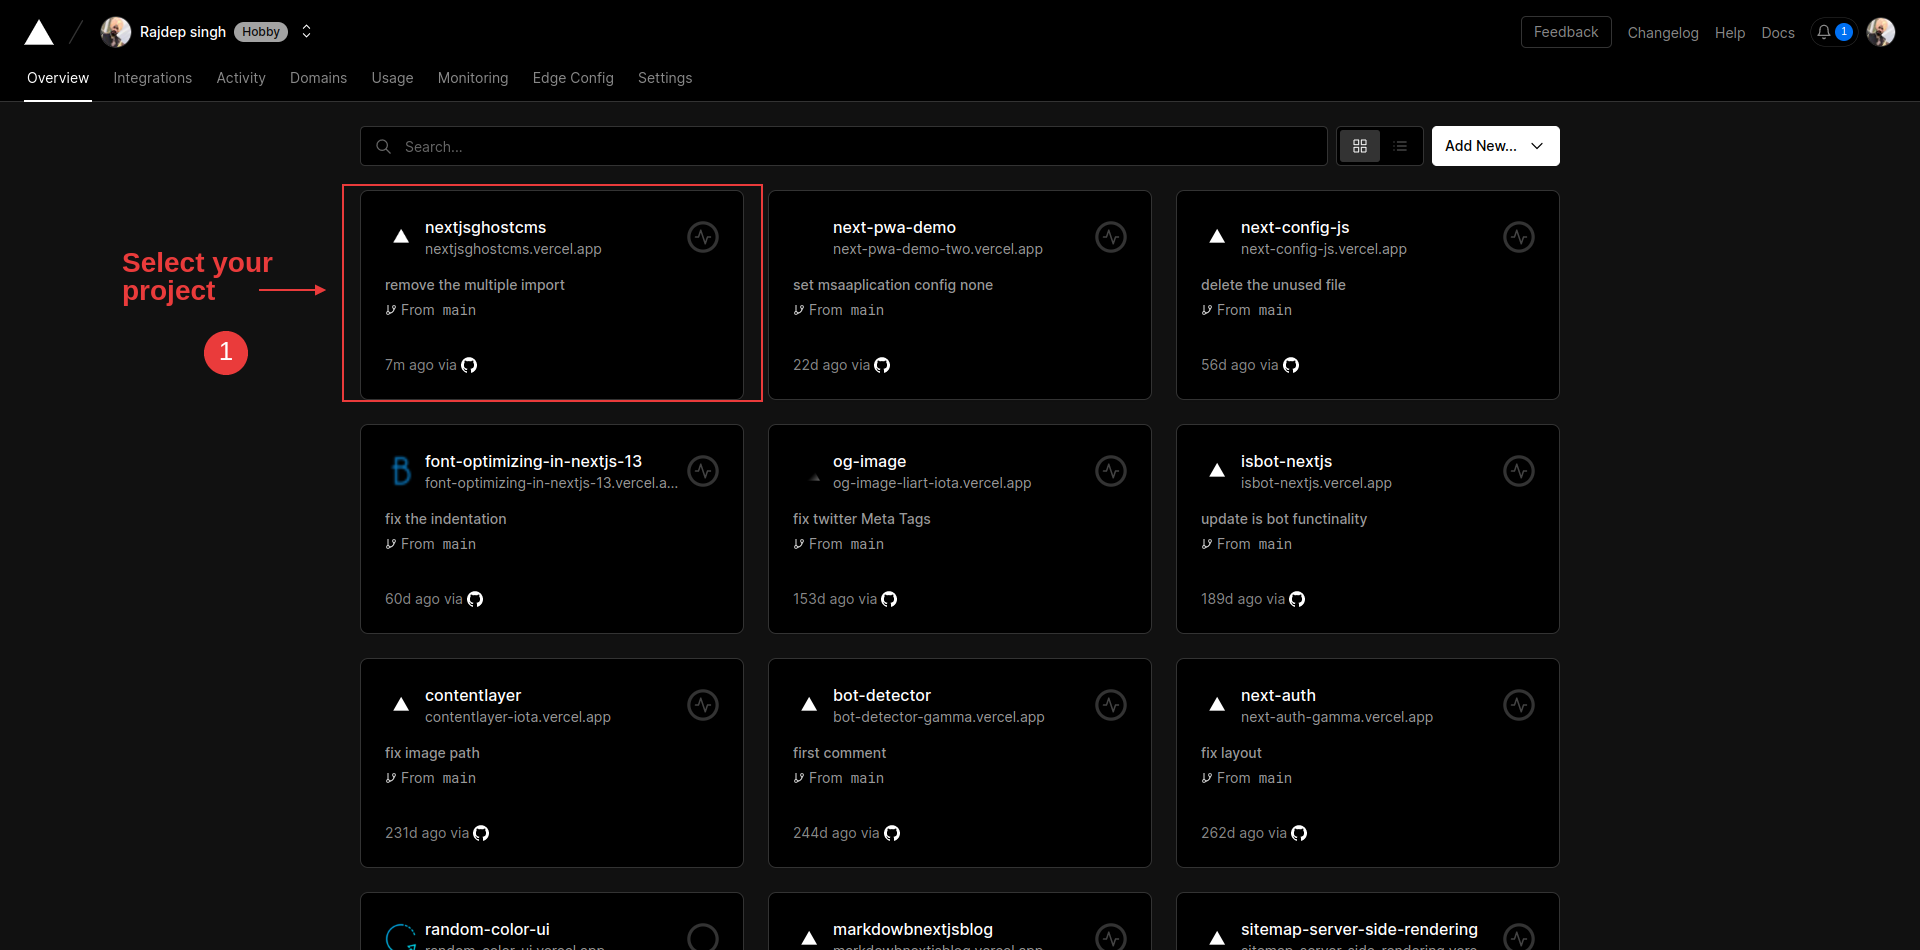
选择你的项目,你将在那里部署你的 Ghost 前台。
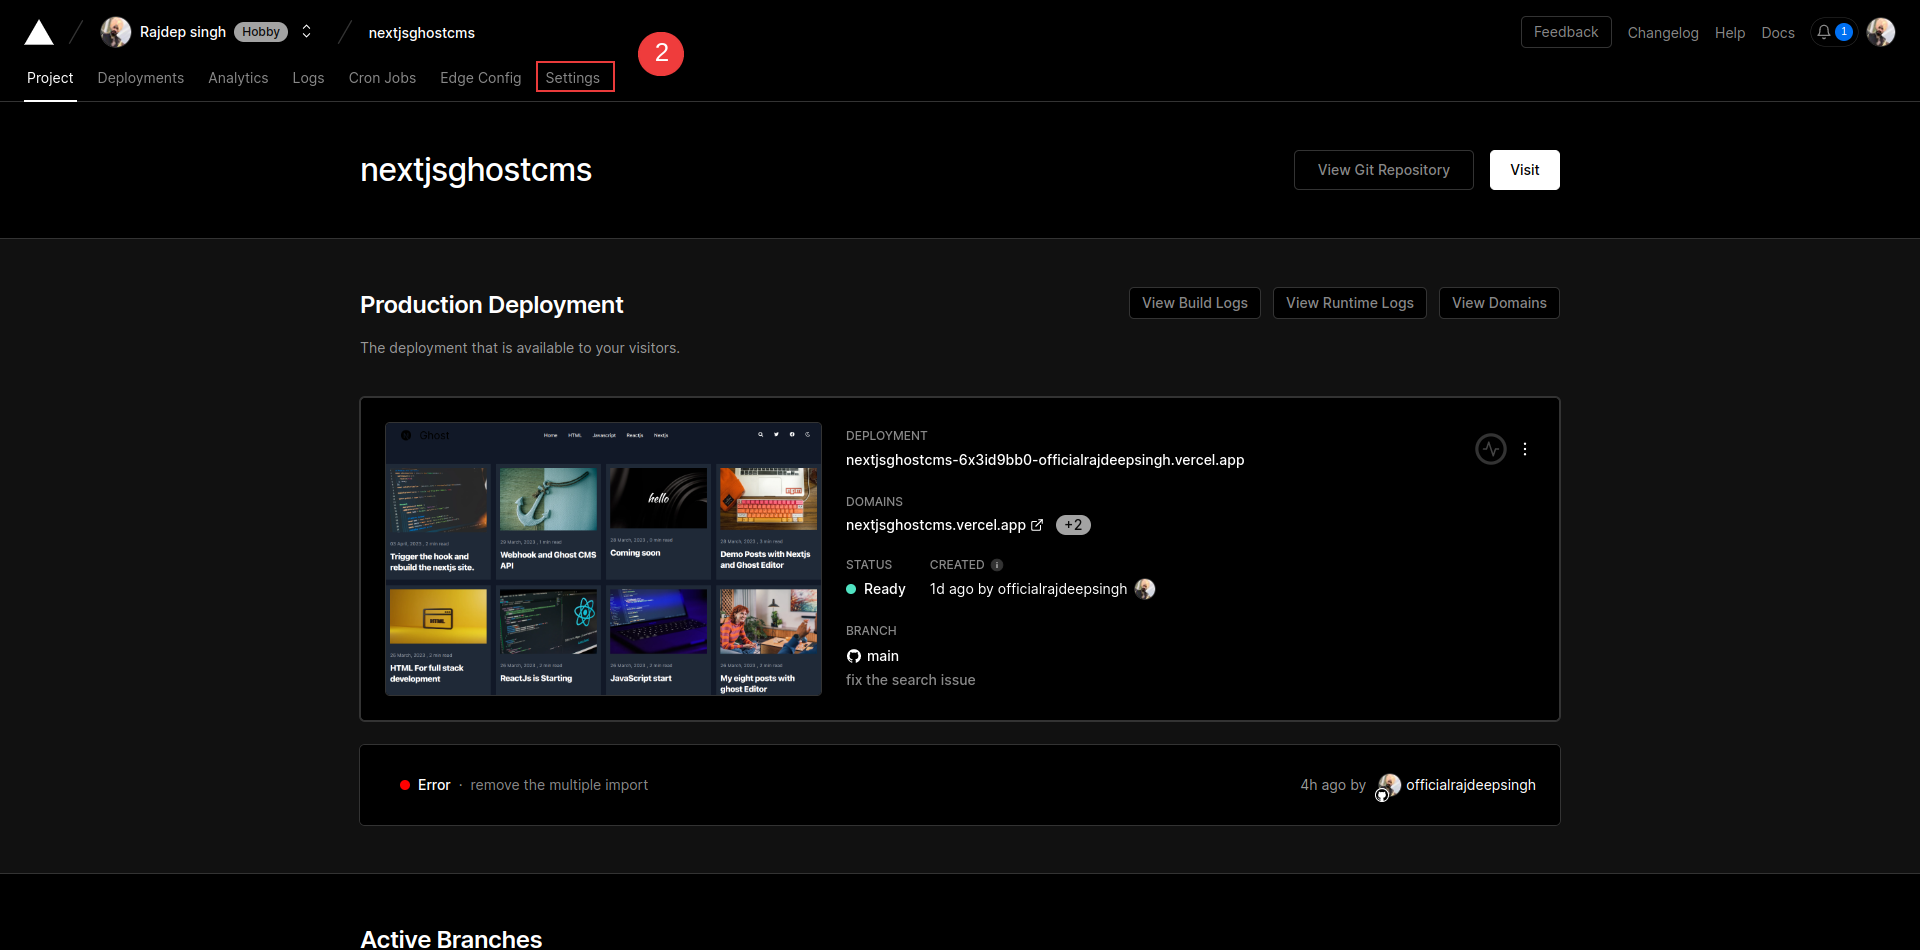
点击你的 Vercel 项目中的设置标签(settings)。
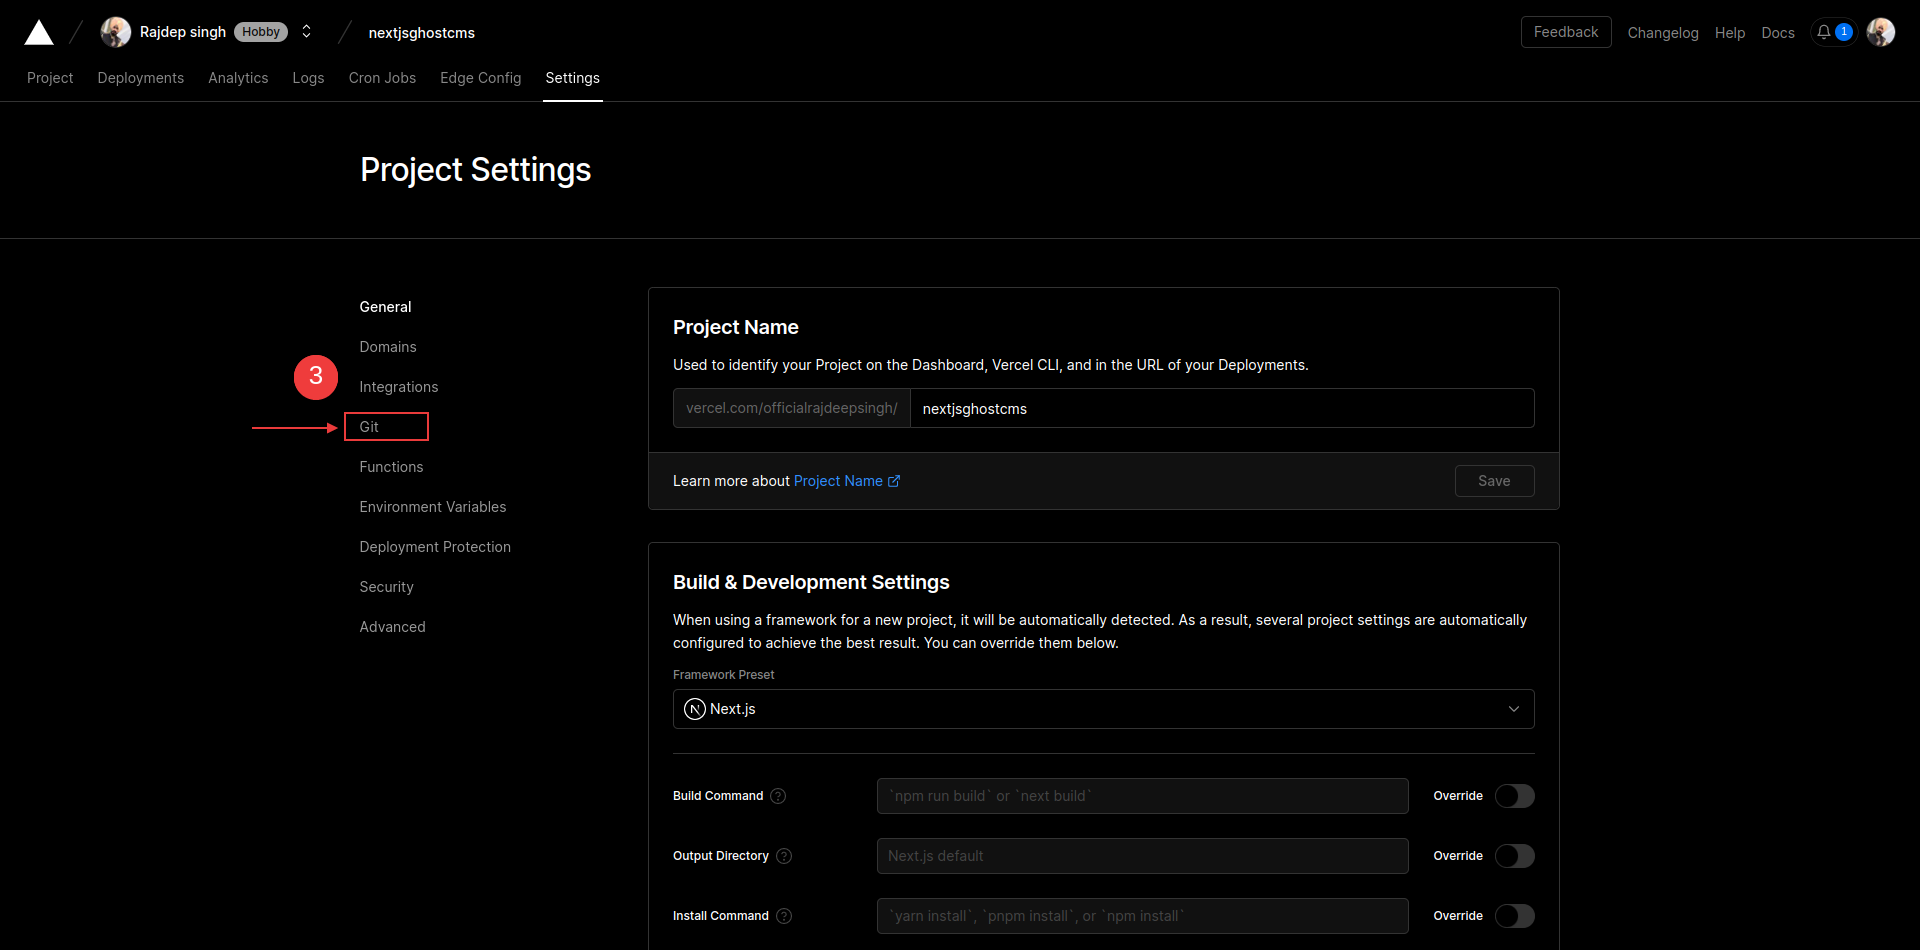
然后点击 Git 标签。向下滚动后,你可以看到 deploy hook 的选择。
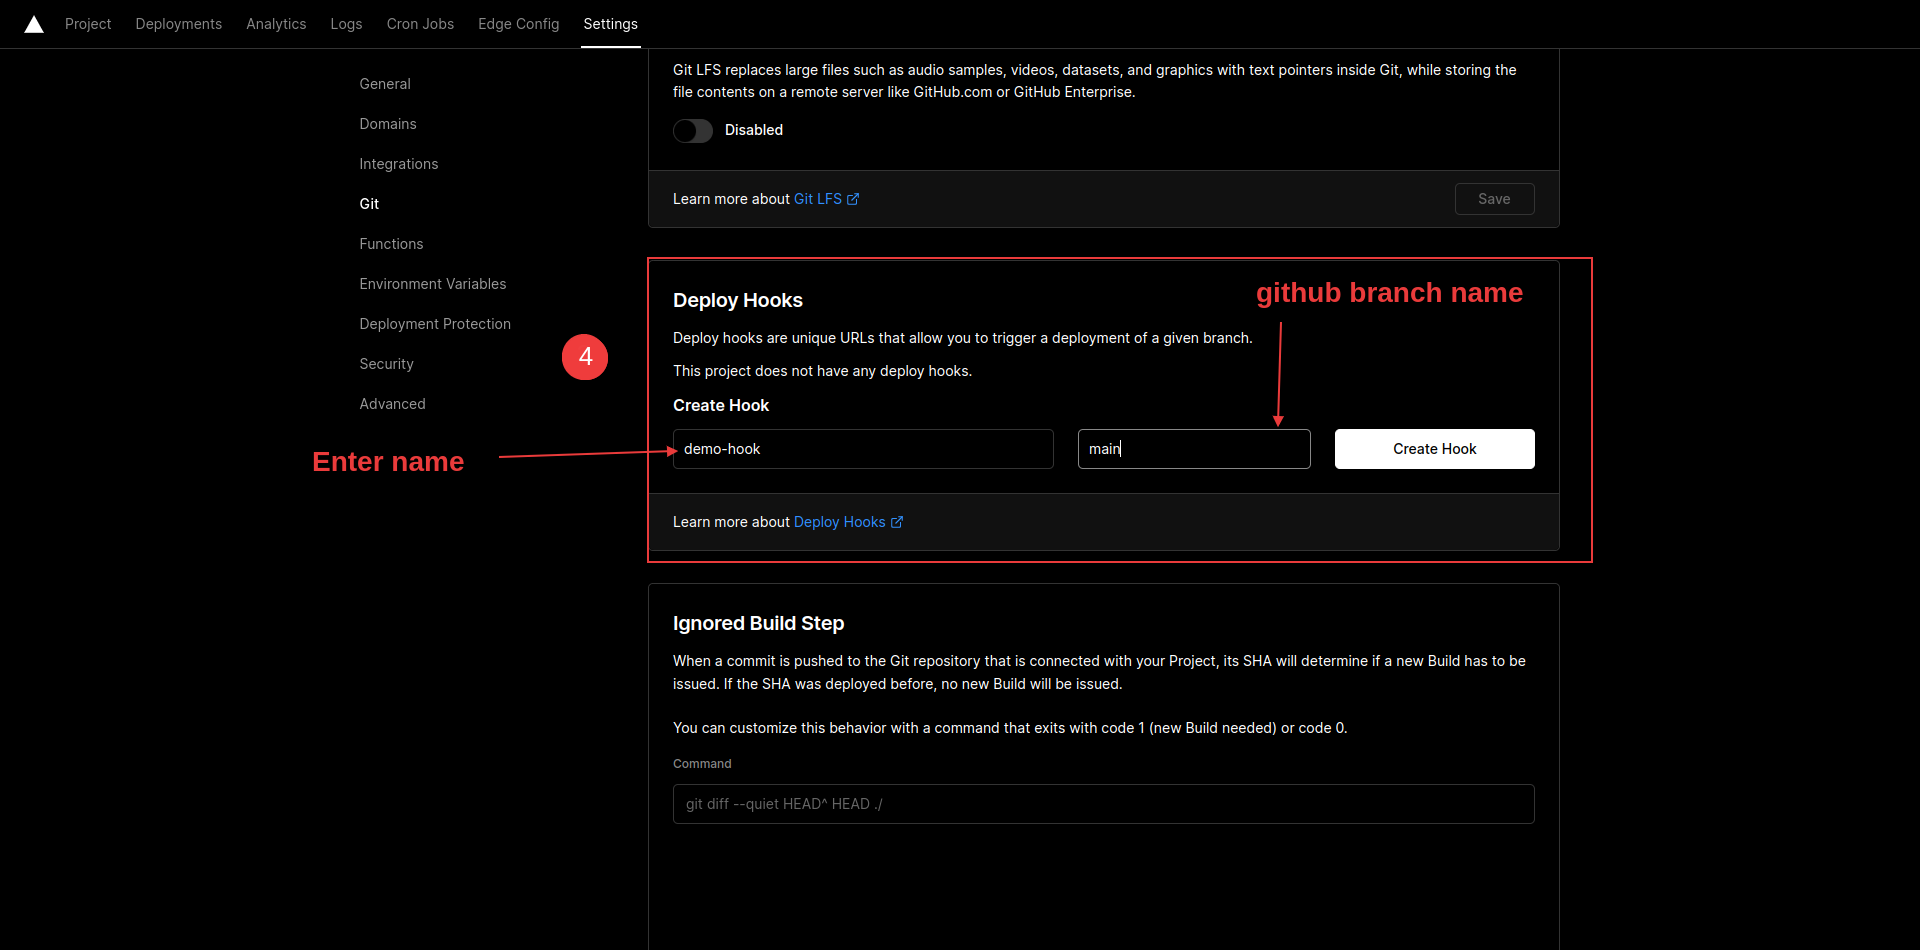
输入你的 webhook 名称和分支名称,然后点击 create hook 按钮
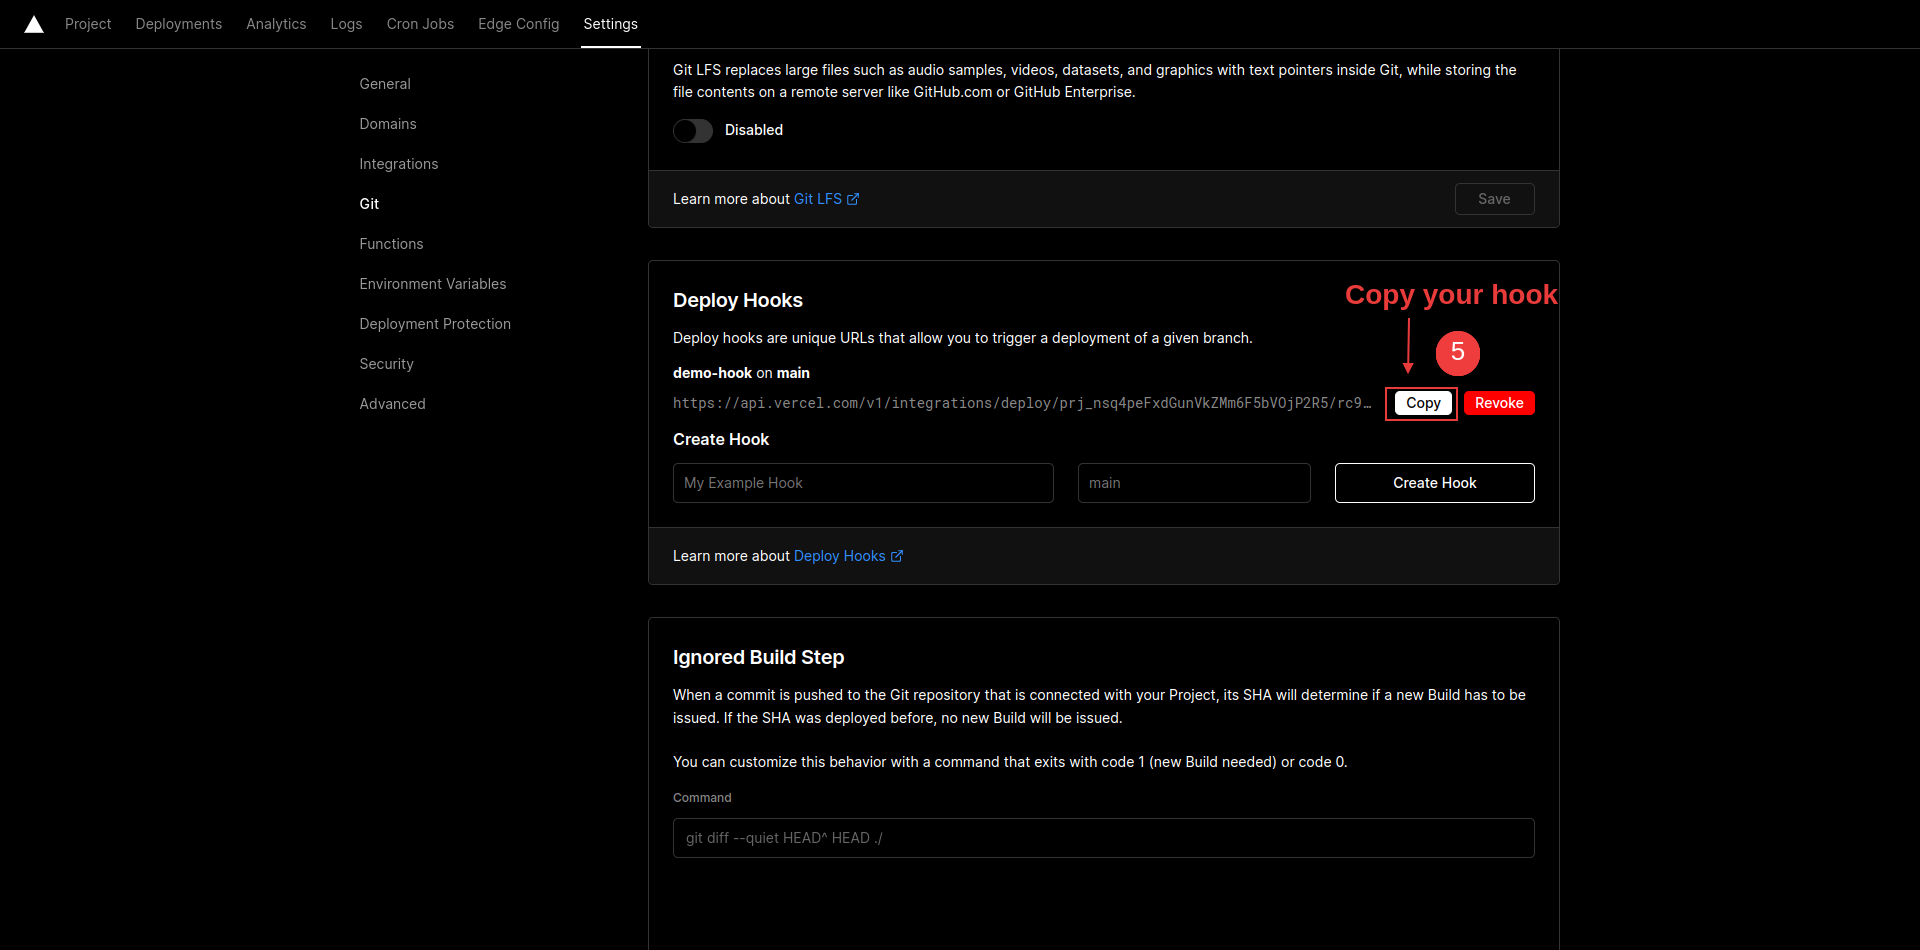
点击 copy 按钮,复制你的 vercel webhook。
如何在 Ghost 仪表板中集成 Vercel 的 web hook
当 Ghost 中发生变化时,它就会触发 Vercel 的 webhook URL。然后,Vercel 会重新部署博客网站。
要将 Vercel webhook 与 Ghost 集成,只需遵循以下步骤:
打开 Ghost CMS 仪表板。
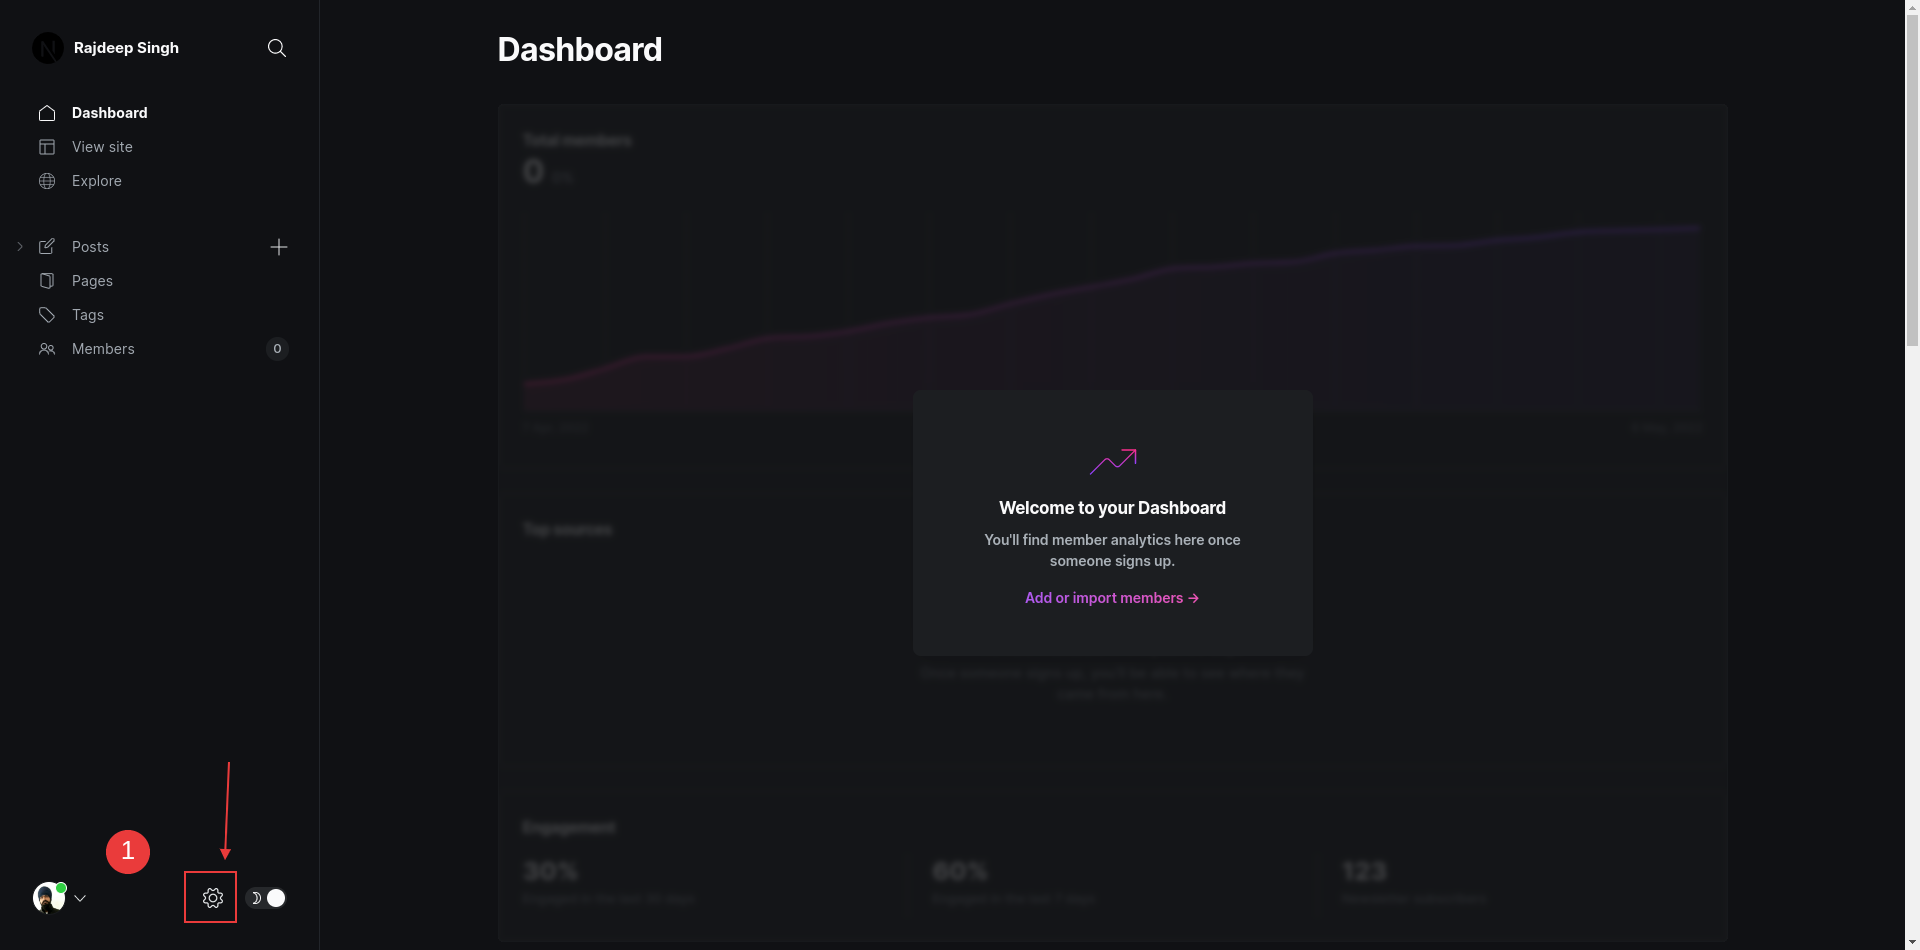
点击设置(齿轮)图标。
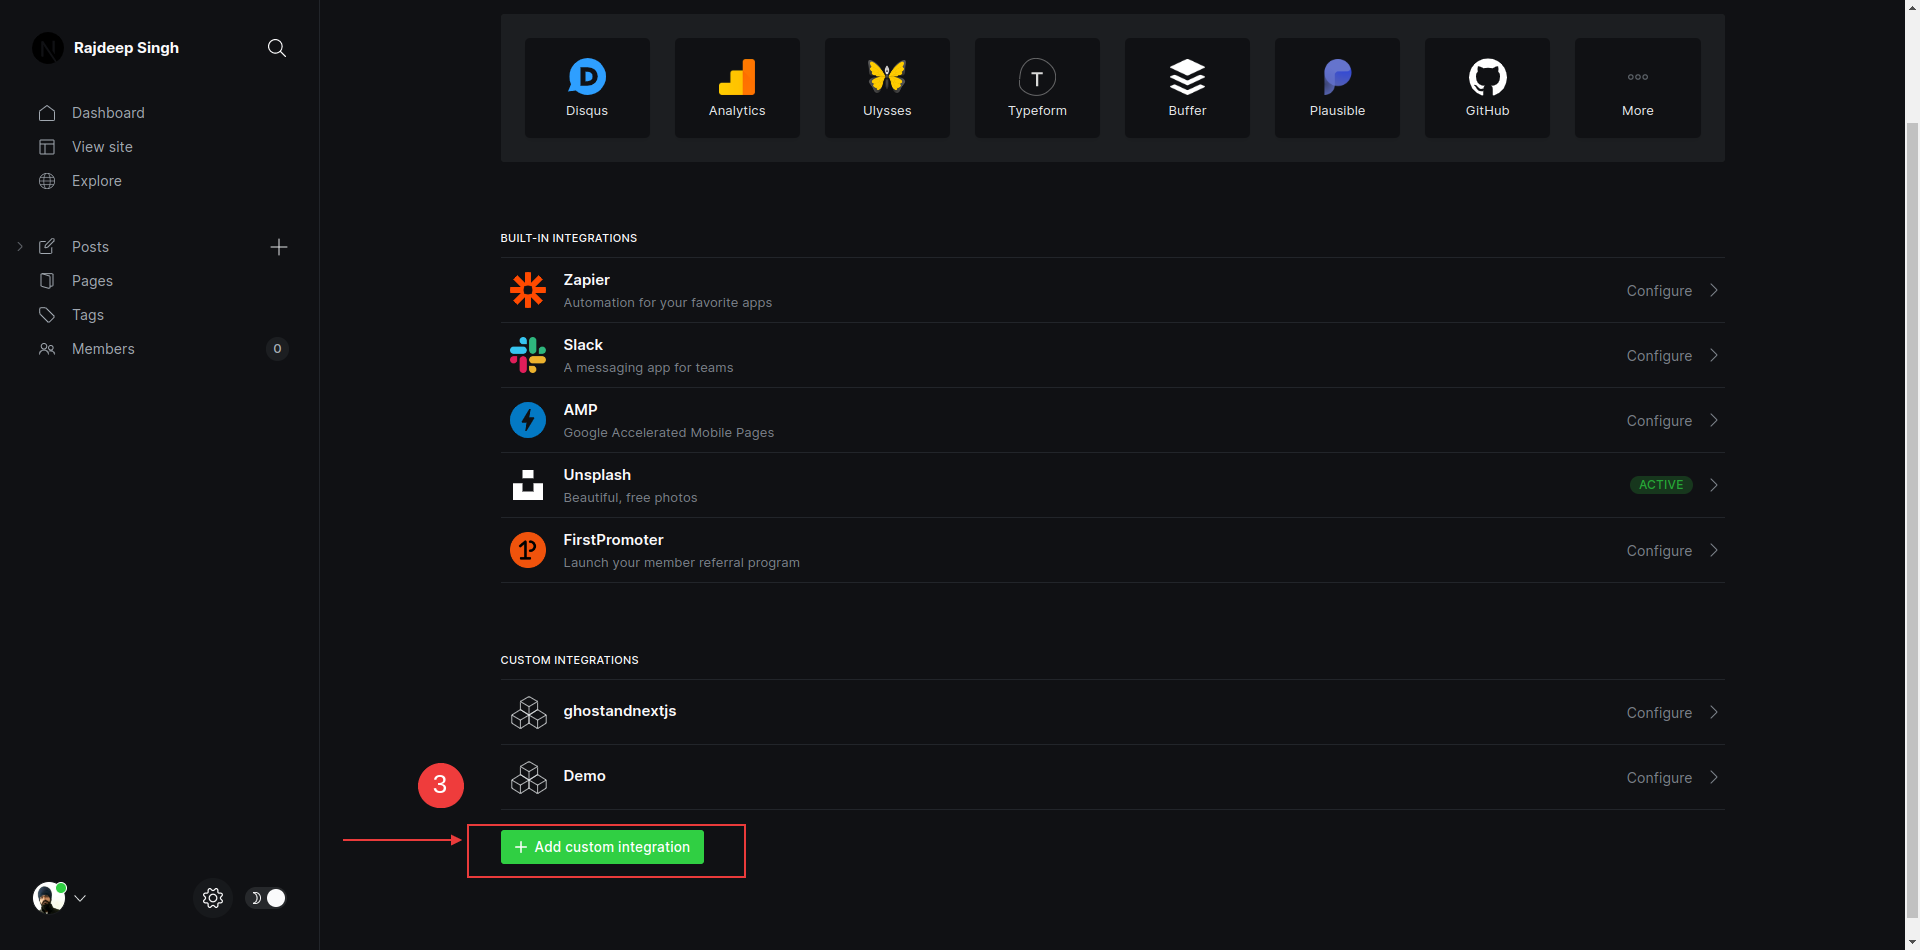
点击 New custom integration 按键。
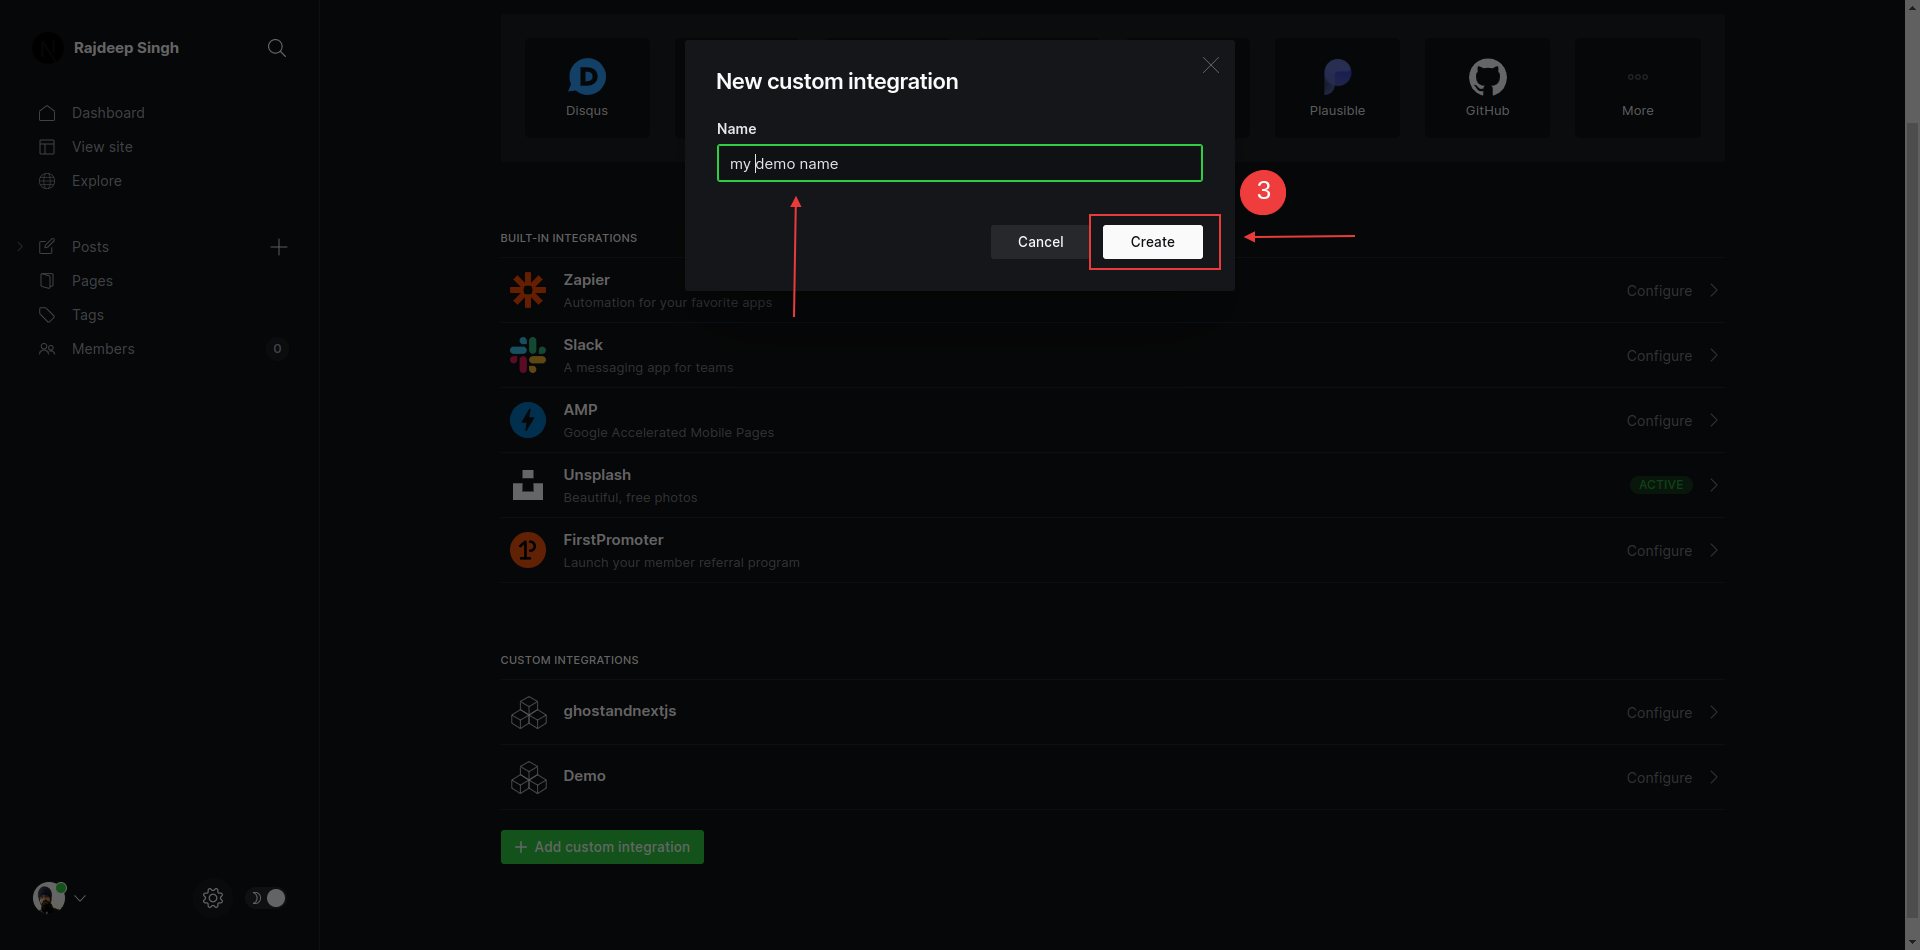
输入 integration 名字
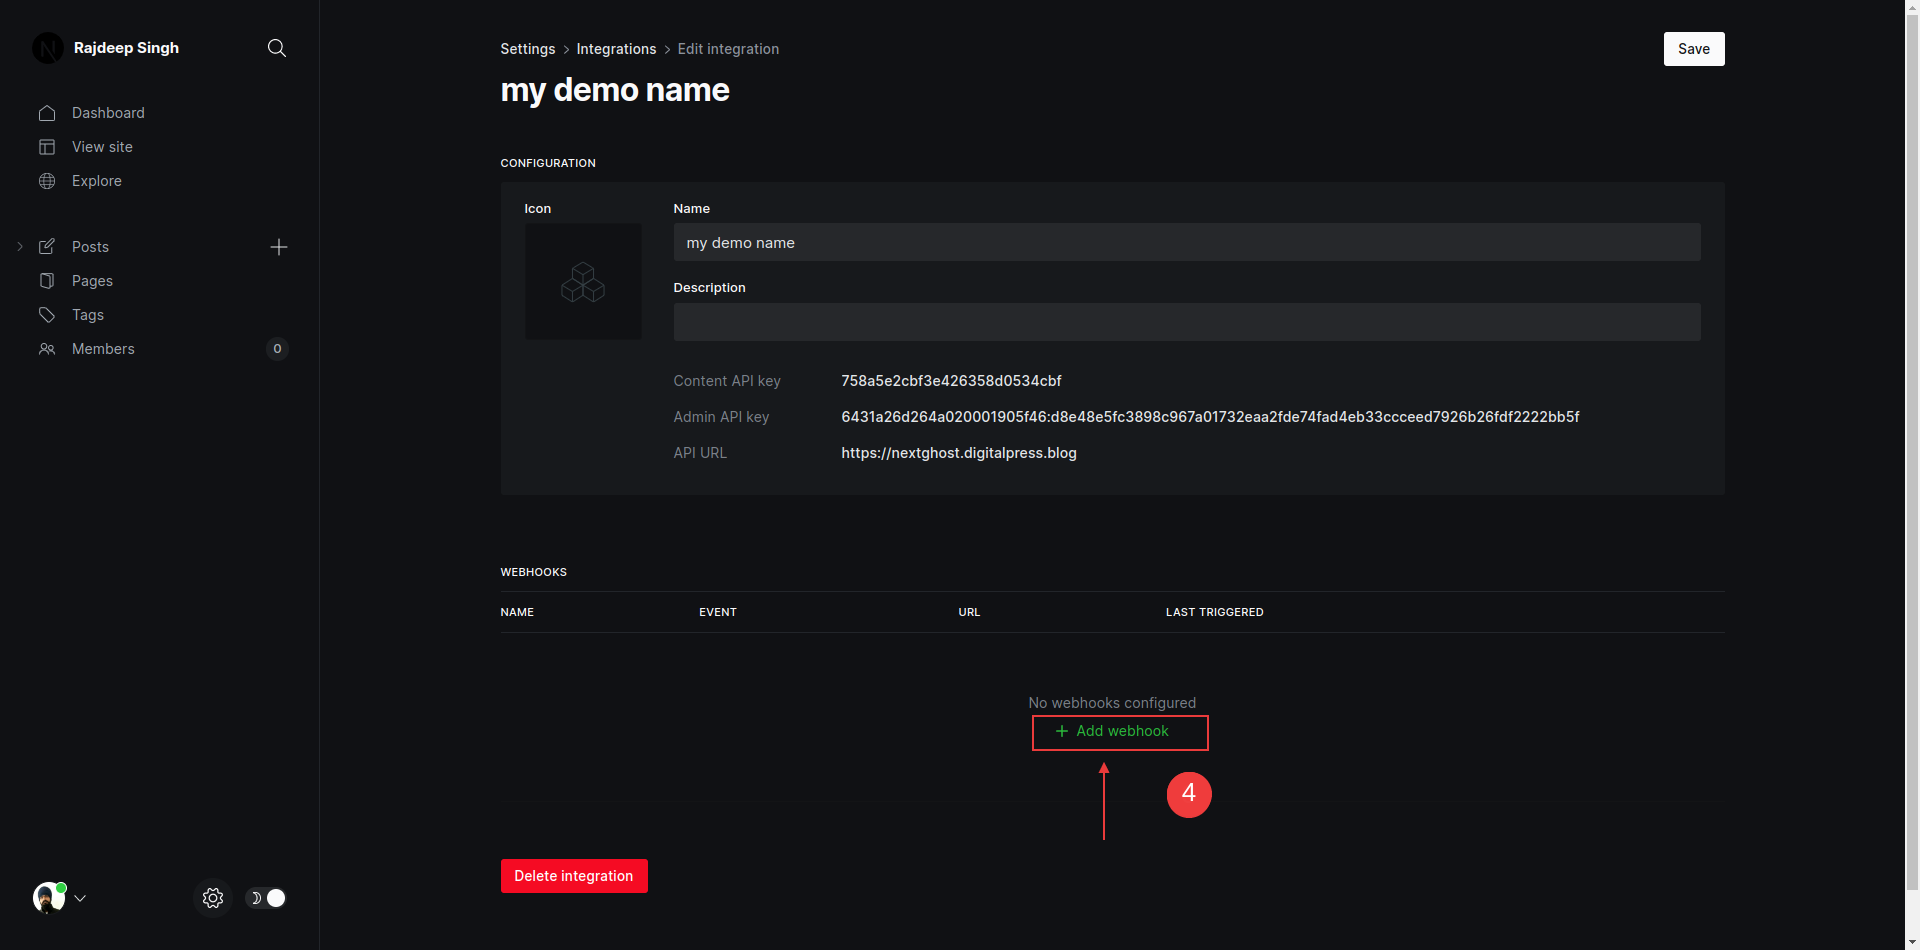
点击 add webhook 按键。
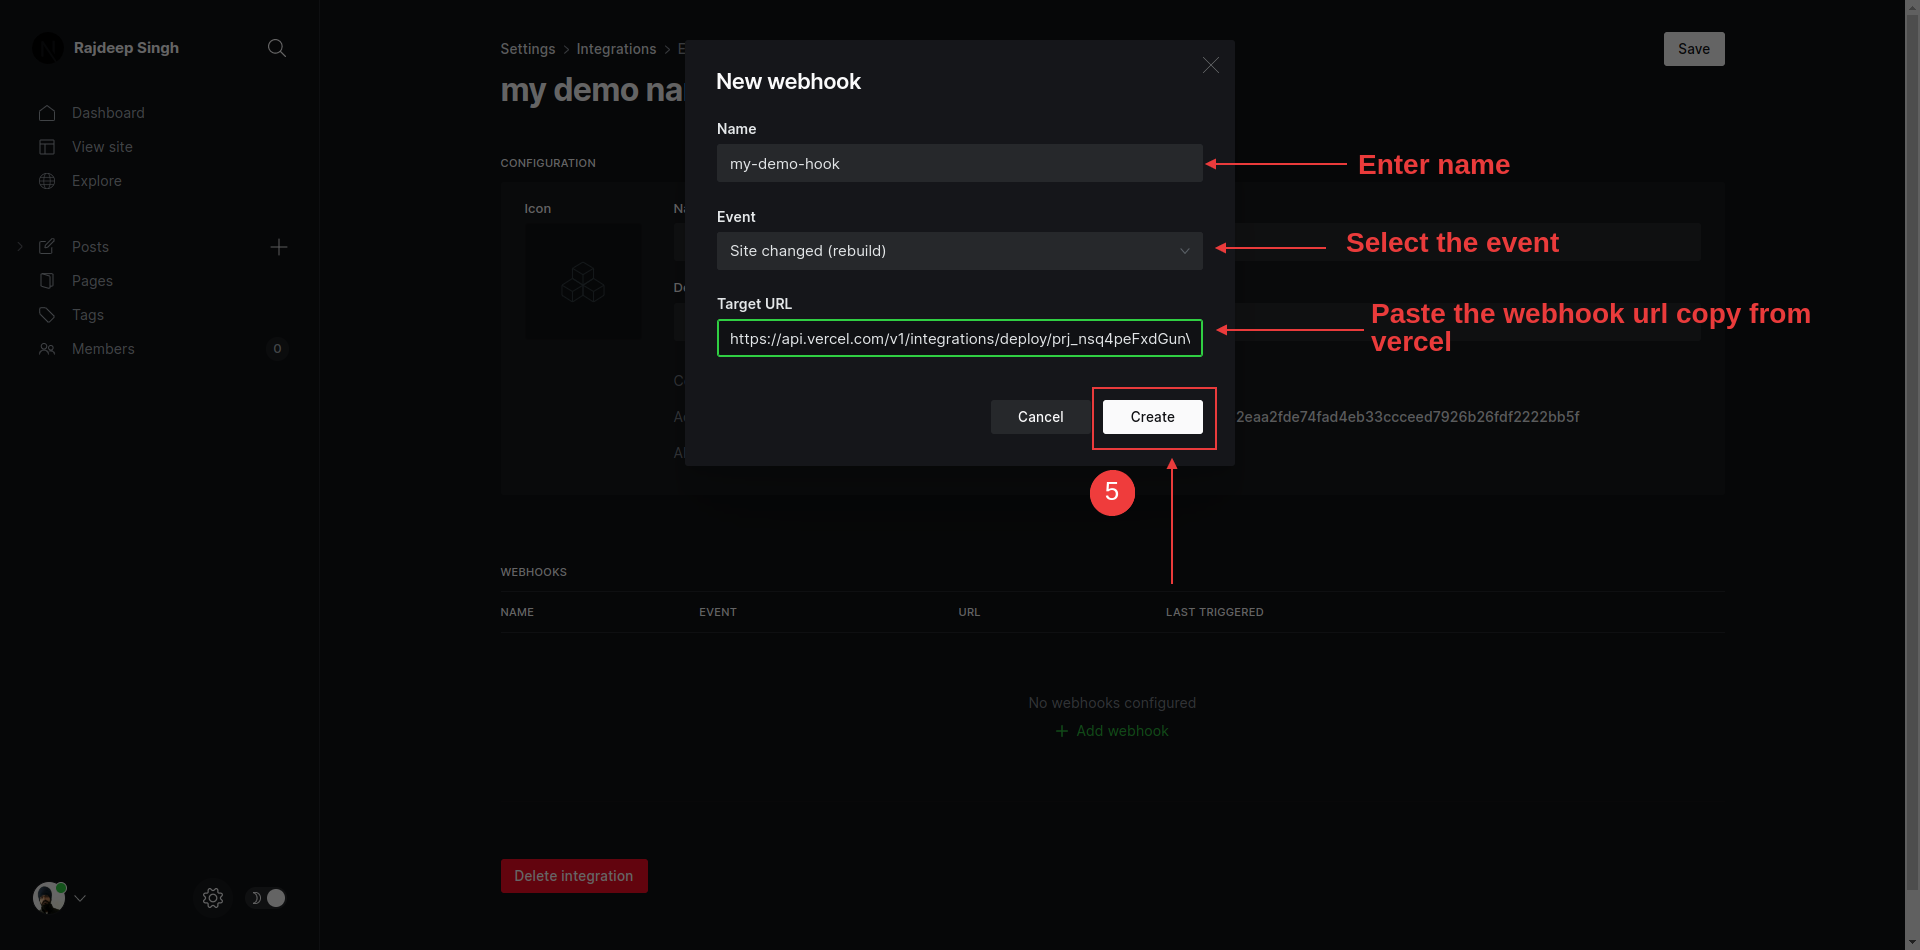
首先,输入名称,然后选择事件,并粘贴你从 Vercel 仪表板上复制的 URL。
基于该事件,Ghost 将调用 webhook,你的网站将重新构建。重新部署需要时间,这取决于你的网站有多大,以此类推。
总结
使用 Next.js 和 Ghost CMS,一切都应该正常工作,正如我们在本教程中所做的那样。
但是 Ghost 的一些编辑器组件,比如切换器,在需要 JavaScript 交互的地方,却不能工作。你可以通过编写你自己的 JavaScript 或者获得 Ghost 的 JavaScript 文件,并将其添加到read/[slug]/page.tsx文件中来解决这个问题。
通过结合 Next.js 和 Ghost CMS API,你可以节省大量的主机费用,但你会失去一些功能,如内置的注册(signup)、登录(login)、账户(accounts)、订阅(subscriptions)、搜索栏(search bar)和会员访问级别(member access levels)。
你可以在 Twitter 和 Linkedin 上关注我或联系我。如果你喜欢我的工作,你可以在我的博客、officialrajdeepsingh.dev、frontend web上阅读更多内容,并注册我的免费通讯(free newsletter) 。
你还可以查看 awesome-next,这是一个精心策划的基于 Nextjs 的很棒的库列表,有助于用 Next.js 构建小型和大型应用程序。
这里有一些补充内容:
- 用 Headless Ghost+Next.js 构建自定义 JavaScript 应用程序
- 用 Ghost 为你的服务器端应用提供动力,用 Next.js 的 React 框架构建一个完全自定义的前端
- Ghost 内容 API 文档
- 入门|Next.js
我在 Next 上写了大量的文章。如果你对 Next 和相关的东西感兴趣,你可以在 Medium 上关注我,并加入 frontend web publication。